DHCP Relays
DHCP is a client server protocol that automatically provides IP hosts with IP addresses and other related configuration information. A DHCP relay (agent) is a host that forwards DHCP packets between clients and servers that are not on the same physical subnet.
Basic Configuration
Cumulus Linux uses server groups to receive different DHCP requests on separate interfaces from different end hosts and to relay the requests to specific DHCP servers in a VRF. Server groups provide load balancing and HA, ensuring more resilient DHCP service delivery in case of server failure or maintenance and prevents broadcasting requests to all servers.
In Cumulus Linux 5.13 and earlier, DHCP relay does not use server groups, but instead, forwards all DHCP client requests to every DHCP server within the same VRF. Cumulus Linux 5.14 no longer provides the nv show service dhcp-relay <vrf-id> server commands.
If you have configured DHCP relay in Cumulus Linux 5.13 or earlier, the upgrade process migrates the configuration to a new default config file called isc-dhcp-relay-<server-group-id>-<vrf-id> in the /etc/default directory and selects the uplink and downlink interfaces automatically. After upgrade, make sure to review the new configuration and adjust as needed.
To set up DHCP relay, configure:
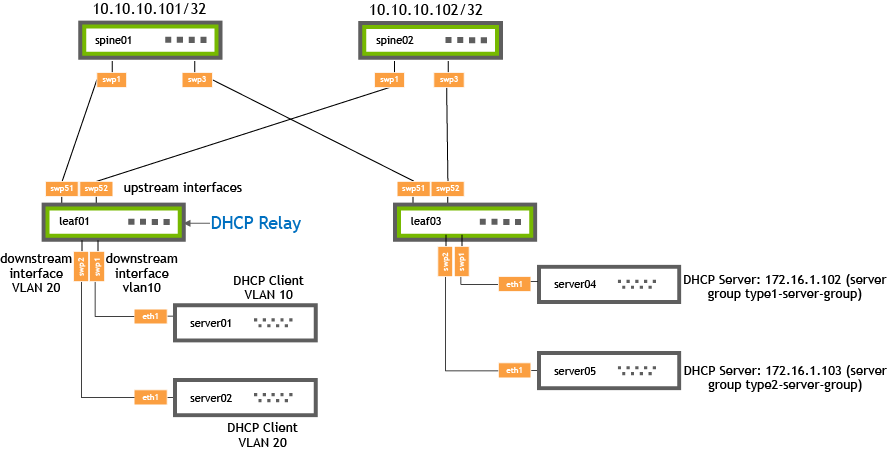
- A server group that contains at least one DHCP server for a specific VRF.
- The DHCP relay server facing (upstream) interface for the server group. You can specify multiple interfaces.
- The DHCP relay host facing (downstream) interface for the server group.
- Server groups do not support IPv6.
- A server group must contain at least one server and one upstream interface.
- You must associate a downstream interface with the server group.
cumulus@switch:~$ nv set service dhcp-relay default server-group type1-server-group server 172.16.1.102
cumulus@switch:~$ nv set service dhcp-relay default server-group type1-server-group upstream-interface swp51
cumulus@switch:~$ nv set service dhcp-relay default server-group type1-server-group upstream-interface swp52
cumulus@switch:~$ nv set service dhcp-relay default downstream-interface vlan10 server-group-name type1-server-group
cumulus@switch:~$ nv config apply
To unset a server in a server group, run the nv unset service dhcp-relay <vf> server-group <server-group> server <server-id> command:
cumulus@switch:~$ nv unset service dhcp-relay default server-group type1-server-group server 172.16.1.102
cumulus@switch:~$ nv config apply
To unset a server group, run the nv unset service dhcp-relay <vf> server-group <server-group> command:
cumulus@switch:~$ nv unset service dhcp-relay default server-group type1-server-group
cumulus@switch:~$ nv config apply
- When you unset servers or upstream interfaces in a server group, at least one server and upstream interface must remain.
- You cannot unset a server group if it is associated with a downstream interface. Unset the downstream interface first with the
nv unset service dhcp-relay <vrf-id> downstream-interface <interface-id>command.
In Cumulus 5.13 and earlier, DHCP relay forwards all DHCP client requests to every DHCP server within the same VRF. Cumulus Linux generates a single configuration file for each VRF in the format isc-dhcp-relay-<VRF>. Only one instance of the DHCP relay service runs per VRF.
Cumulus Linux 5.14 and later enables selective forwarding of DHCP client requests to specific groups of servers within the same VRF and introduces multiple configuration files; one for each server group.
In the /etc/default directory, create a file with the name of the server group in the format isc-dhcp-relay-<server-group-id>-<vrf-id>. Add the DHCP server IP addresses and the interfaces participating in DHCP relay associated with the server group (upstream and downstream interfaces).
cumulus@switch:~$ sudo nano /etc/default/isc-dhcp-relay-type1-server-group-default
SERVERS="172.16.1.102"
INTF_CMD="-i swp51-52 -i vlan10"
OPTIONS=""
Restart the DHCP relay service for the server group with the dhcrelay-<server-group>-<vrf-id>.service command:
cumulus@switch:~$ sudo systemctl enable dhcrelay-type1-server-group-default.service
cumulus@switch:~$ sudo systemctl restart dhcrelay-type1-server-group-default.service
- To configure a VLAN interface, specify the VLAN ID, not the parent bridge. In the example above, you specify vlan10, not the bridge bridge1.
- When you configure DHCP relay with VRR, the DHCP relay client must run on the SVI; not on the -v0 interface.
Optional Configuration
This section describes optional DHCP relay configurations. The steps provided in this section assume that you have already configured basic DHCP relay, as described above.
DHCP Agent Information Option (Option 82)
Cumulus Linux supports DHCP Agent Information Option 82, which allows a DHCP relay to insert circuit or relay specific information into a request that the switch forwards to a DHCP server. In addition to enabling DHCP Agent Information Option 82, you can:
- Inject the circuit ID of the physical switch port on which the relayed DHCP discover packet arrives instead of the SVI.
- Configure a remote ID, which includes information that identifies the relay agent, such as the MAC address. By default, this is the system MAC address of the device on which DHCP relay is running.
To enable DHCP Agent Information Option 82:
cumulus@switch:~$ nv set service dhcp-relay default agent state enabled
cumulus@switch:~$ nv config apply
To enable DHCP relay to inject the circuit ID of the physical switch port on which the relayed DHCP discover packet arrives instead of the SVI:
cumulus@switch:~$ nv set service dhcp-relay default agent use-pif-circuit-id state enabled
cumulus@switch:~$ nv config apply
To configure the remote ID, which is a custom string (up to 255 characters in length), run the nv set service dhcp-relay <vrf-id> agent remote-id <ID> command. The following example configures the remote ID to be the MAC address 44:38:39:BE:EF:AA.
cumulus@switch:~$ nv set service dhcp-relay default agent remote-id 44:38:39:BE:EF:AA
cumulus@switch:~$ nv config apply
-
Edit the
/etc/default/isc-dhcp-relay-<server-group-id>-<vrf-id>file and add one of the following options:To inject the ingress SVI interface against which DHCP processes the relayed DHCP discover packet, add
-ato theOPTIONSline:cumulus@switch:~$ sudo nano /etc/default/isc-dhcp-relay-type1-server-group-default ... # Additional options that are passed to the DHCP relay daemon? OPTIONS="-a"To inject the physical switch port on which the relayed DHCP discover packet arrives instead of the SVI, add
-a --use-pif-circuit-idto theOPTIONSline:cumulus@switch:~$ sudo nano /etc/default/isc-dhcp-relay-type1-server-group-default ... # Additional options that are passed to the DHCP relay daemon? OPTIONS="-a --use-pif-circuit-id"To customize the Remote ID sub-option, add
-a -rto theOPTIONSline followed by a custom string (up to 255 characters). The following example adds the MAC address 44:38:39:BE:EF:AA:cumulus@switch:~$ sudo nano /etc/default/isc-dhcp-relay-type1-server-group-default ... # Additional options that are passed to the DHCP relay daemon? OPTIONS="-a -r 44:38:39:BE:EF:AA" -
Restart the
dhcrelayservice to apply the new configuration:cumulus@switch:~$ sudo systemctl restart dhcrelay-type1-server-group-default.service
Control the Gateway IP Address with RFC 3527
When you need DHCP relay in an environment that relies on an anycast gateway (such as EVPN), a unique IP address is necessary on each device for return traffic. By default, in a BGP unnumbered environment with DHCP relay, the source IP address is the loopback IP address and the gateway IP address is the SVI IP address. However with anycast traffic, the SVI IP address is not unique to each rack; it is typically shared between racks. Most EVPN ToR deployments only use a single unique IP address, which is the loopback IP address.
RFC 3527 enables the DHCP server to react to these environments by introducing a new parameter to the DHCP header called the link selection sub-option, which the DHCP relay agent builds. The link selection sub-option takes on the normal role of the gateway address in relaying to the DHCP server which subnet correlates to the DHCP request. When using this sub-option, the gateway address continues to be present but only relays the return IP address that the DHCP server uses; the gateway address becomes the unique loopback IP address.
When enabling RFC 3527 support, you can specify an interface, such as the loopback interface or a switch port interface to use as the gateway address. The relay picks the first IP address on that interface. If the interface has multiple IP addresses, you can specify a specific IP address for the interface.
RFC 3527 supports IPv4 DHCP relays only.
To enable RFC 3527 support and control the gateway address:
Run the nv set service dhcp-relay <vrf-id> gateway-interface command with the interface or IP address you want to use. The following example uses the first IP address on the loopback interface as the gateway IP address:
cumulus@switch:~$ nv set service dhcp-relay default gateway-interface lo
The first IP address on the loopback interface is typically the 127.0.0.1 address. This example uses IP address 10.10.10.1 on the loopback interface as the gateway address:
cumulus@switch:~$ nv set service dhcp-relay default gateway-interface lo address 10.10.10.1
This example uses the first IP address on swp2 as the gateway address:
cumulus@switch:~$ nv set service dhcp-relay default gateway-interface swp2
This example uses IP address 10.0.0.4 on swp2 as the gateway address:
cumulus@switch:~$ nv set service dhcp-relay default gateway-interface swp2 address 10.0.0.4
-
Edit the
/etc/default/isc-dhcp-relay-<server-group-id>-<vrf-id>file and provide the-Uoption with the interface or IP address you want to use as the gateway address.This example uses the first IP address on the loopback interface as the gateway address:
cumulus@switch:~$ sudo nano /etc/default/isc-dhcp-relay-type1-server-group-default
...
# Additional options that are passed to the DHCP relay daemon?
OPTIONS="-U lo"
The first IP address on the loopback interface is typically the 127.0.0.1 address. This example uses IP address 10.10.10.1 on the loopback interface as the gateway address:
cumulus@switch:~$ sudo nano /etc/default/isc-dhcp-relay-type1-server-group-default
...
# Additional options that are passed to the DHCP relay daemon?
OPTIONS="-U 10.10.10.1%lo"
This example uses the first IP address on swp2 as the gateway address:
cumulus@switch:~$ sudo nano /etc/default/isc-dhcp-relay-type1-server-group-default
...
# Additional options that are passed to the DHCP relay daemon?
OPTIONS="-U swp2"
This example uses IP address 10.0.0.4 on swp2 as the gateway address:
cumulus@switch:~$ sudo nano /etc/default/isc-dhcp-relay-type1-server-group-default ... # Additional options that are passed to the DHCP relay daemon? OPTIONS="-U 10.0.0.4%swp2" -
Restart the
dhcrelayservice to apply the configuration change:cumulus@switch:~$ sudo systemctl restart dhcrelay-type1-server-group-default.service
DHCP Relay for IPv4 in an EVPN Symmetric Environment with MLAG
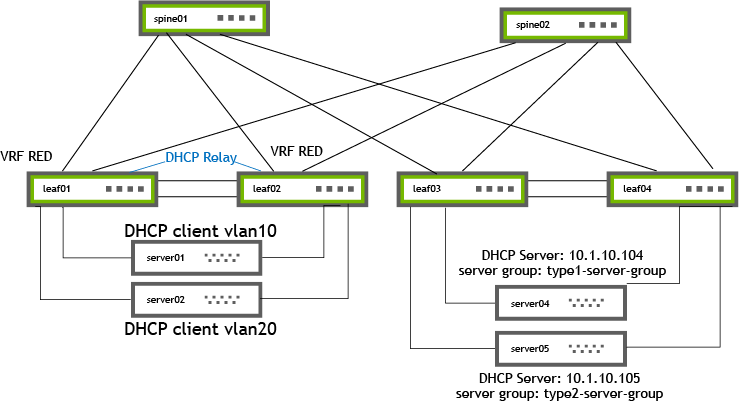
In a multi-tenant EVPN symmetric routing environment with MLAG, you must enable RFC 3527 support. You can specify an interface, such as the loopback or VRF interface for the gateway address. The interface must be reachable in the tenant VRF that you configure for DHCP relay and must have a unique IPv4 address. For EVPN symmetric routing with an anycast gateway that reuses the same SVI IP address on multiple leaf switches, you must assign a unique IP address for the VRF interface and include the layer 3 VNI for this VRF in the DHCP relay configuration.
The following example:
- Configures VRF RED with IPv4 address 20.20.20.1/32.
- Configures the SVIs vlan10 and vlan20, and the layer 3 VNI VLAN interface for VRF RED vlan4024_l3 to be part of the interface list to service DHCP packets. To obtain the layer 3 VNI VLAN interface, run the
nv show vrf <vrf-id> evpncommand. - Sets the DHCP server to 10.1.10.104.
- Configures VRF RED to advertise connected routes as type-5 so that the VRF RED loopback IPv4 address is reachable.
You do not need to add physical uplinks in the EVPN relay configuration. Only layer 3 VNI VLAN interface configuration is required for uplinks.
cumulus@switch:~$ nv set vrf RED loopback ip address 20.20.20.1/32
cumulus@switch:~$ nv set service dhcp-relay RED downstream-interface vlan10 server-group-name red-servers
cumulus@switch:~$ nv set service dhcp-relay RED downstream-interface vlan20 server-group-name red-servers
cumulus@switch:~$ nv set service dhcp-relay RED server-group red-servers upstream-interface vlan4024_l3
cumulus@switch:~$ nv set service dhcp-relay RED server-group red-servers server 10.1.10.104
cumulus@switch:~$ nv set vrf RED router bgp address-family ipv4-unicast redistribute connected enable on
cumulus@switch:~$ nv set vrf RED router bgp address-family ipv4-unicast route-export to-evpn enable on
cumulus@switch:~$ nv config apply
-
Edit the
/etc/network/interfacesfile to configure VRF RED with IPv4 address 20.20.20.1/32cumulus@leaf01:mgmt:~$ sudo nano /etc/network/interfaces ... auto RED iface RED address 20.20.20.1/32 vrf-table auto -
Configure VRF RED to advertise the connected routes as type-5 so that the loopback IPv4 address is reachable:
cumulus@leaf01:mgmt:~$ sudo vtysh
...
leaf01# configure terminal
leaf01(config)# router bgp 65101 vrf RED
leaf01(config-router)# address-family l2vpn evpn
leaf01(config-router-af)# advertise ipv4 unicast
leaf01(config-router-af)# end
leaf01# write memory
The
/etc/frr/frr.conffile now contains the following entries:... router bgp 65101 vrf RED bgp router-id 10.10.10.1 .. ! address-family ipv4 unicast redistribute connected maximum-paths 64 maximum-paths ibgp 64 exit-address-family ! address-family l2vpn evpn advertise ipv4 unicast exit-address-family exit -
Edit the
/etc/default//etc/default/isc-dhcp-relay-<server-group-id>-<vrf-id>file.cumulus@leaf01:mgmt:~$ sudo nano /etc/default/isc-dhcp-relay-red-servers-RED SERVERS="10.1.10.104" INTF_CMD=" -i vlan10 -i vlan20 -i vlan4024_l3" OPTIONS="-U RED" -
Enable and start the DHCP service:
sudo systemctl enable dhcrelay-red-servers-RED.service
sudo systemctl start dhcrelay-red-servers-RED.service
DHCP Relay for IPv4 in an EVPN Symmetric Environment without MLAG
In a multi-tenant EVPN symmetric routing environment without MLAG, the VLAN interface (SVI) IPv4 address is typically unique on each leaf switch, which does not require RFC 3527 configuration.
The following example:
- Configures the SVIs vlan10 and vlan20, and the layer 3 VNI VLAN interface for VRF RED vlan4024_l3 to be part of INTF_CMD list to service DHCP packets. To obtain the layer 3 VNI VLAN interface, run the
nv show vrf <vrf-id> evpncommand. - Sets the DHCP server IP address to 10.1.10.104.
You do not need to add physical uplinks in the EVPN relay configuration. Only layer 3 VNI VLAN interface configuration is required for uplinks.
cumulus@switch:~$ nv set service dhcp-relay RED downstream-interface vlan10 server-group-name red-servers
cumulus@switch:~$ nv set service dhcp-relay RED downstream-interface vlan20 server-group-name red-servers
cumulus@switch:~$ nv set service dhcp-relay RED server-group red-servers upstream-interface vlan4024_l3
cumulus@switch:~$ nv set service dhcp-relay RED server-group red-servers server 10.1.10.104
cumulus@switch:~$ nv config apply
-
Edit the
/etc/default//etc/default/isc-dhcp-relay-<server-group-id>-<vrf-id>file.cumulus@leaf01:mgmt:~$ sudo nano /etc/default/isc-dhcp-relay-red-servers-RED SERVERS="10.1.10.104" INTF_CMD=" -i vlan10 -i vlan20 -i vlan4024_l3" OPTIONS="" -
Enable and start the DHCP service:
sudo systemctl enable dhcrelay-red-servers-RED.service
sudo systemctl start dhcrelay-red-servers-RED.service
DHCP Relay for IPv6 in an EVPN Symmetric Environment
For IPv6 DHCP relay in a symmetric routing environment, you must assign a unique IPv6 address to the non-default VRF interfaces that participate in DHCP relay. Cumulus Linux uses this IPv6 address as the source address when sending packets to the DHCP server and the DHCP server replies to this address.
RFC 3527 does not apply to IPv6. IPv6 has the functionality described in RFC 3527 as part of its normal operations.
The following example:
- Configures VRF RED with the unique IPv6 address 2001:db8:666::1/128.
- Configures VLAN 10 and 20 in VRF RED to service DHCP requests from downstream hosts.
- Sets the DHCP server to 2001:db8:199::2.
- Configures the layer 3 VNI interface for VRF RED vlan4024_l3 to process DHCP packets from the upstream server.
- Configures VRF RED to advertise the connected routes so that the loopback IPv6 address is reachable.
cumulus@switch:~$ nv set vrf RED loopback ip address 2001:db8:666::1/128
cumulus@switch:~$ nv set service dhcp-relay6 RED interface downstream vlan10
cumulus@switch:~$ nv set service dhcp-relay6 RED interface downstream vlan20
cumulus@switch:~$ nv set service dhcp-relay6 RED interface upstream RED server-address 2001:db8:199::2
cumulus@switch:~$ nv set service dhcp-relay6 RED interface upstream vlan4024_l3
cumulus@switch:~$ nv set vrf RED router bgp address-family ipv6-unicast route-export to-evpn enable on
cumulus@switch:~$ nv config apply
-
Edit the
/etc/network/interfacesfile to configure VRF RED with IPv6 address 2001:db8:666::1/128:cumulus@leaf01:mgmt:~$ sudo nano /etc/network/interfaces ... auto RED iface RED address 2001:db8:666::1/128 vrf-table auto -
Configure VRF RED to advertise the connected routes so that the loopback IPv6 address is reachable:
cumulus@leaf01:mgmt:~$ sudo vtysh
...
leaf01# configure terminal
leaf01(config)# router bgp 65101 vrf RED
leaf01(config-router)# address-family l2vpn evpn
leaf01(config-router-af)# advertise ipv6 unicast
leaf01(config-router-af)# end
leaf01# write memory
The
/etc/frr/frr.conffile now contains the following entries:... router bgp 65101 vrf RED bgp router-id 10.10.10.1 .. ! address-family ipv6 unicast redistribute connected maximum-paths 64 maximum-paths ibgp 64 exit-address-family ! address-family l2vpn evpn advertise ipv6 unicast exit-address-family exit -
Edit the
/etc/default/isc-dhcp-relay6-<vrf-id>file.- Set the
-loption to the VLANs that receive DHCP requests from hosts. - Set the
<ip-address-dhcp-server>%<interface-facing-dhcp-server>option to associate the DHCP Server with VRF RED. - Set the
-uoption to indicate where the switch receives replies from the DHCP server (SVI vlan4024_l3).
cumulus@leaf01:mgmt:~$ sudo nano /etc/default/isc-dhcp-relay6-RED INTF_CMD="-l vlan10 -l vlan20" SERVERS="-u 2001:db8:199::2%RED -u vlan4024_l3" - Set the
-
Enable and start the DHCP service:
sudo systemctl enable dhcrelay6@RED.service
sudo systemctl start dhcrelay6@RED.service
Gateway IP Address as Source IP for Relayed DHCP Packets (Advanced)
You can configure the dhcrelay service to forward IPv4 (only) DHCP packets to a DHCP server and ensure that the source IP address of the relayed packet is the same as the gateway IP address. By default, the source IP address of the relayed packet is from a layer 3 interface on the switch using normal routing methods.
This option impacts all relayed IPv4 packets globally.
To use the gateway IP address as the source IP address:
cumulus@switch:~$ nv set service dhcp-relay default source-ip giaddress
cumulus@switch:~$ nv config apply
To configure this setting back to the default (where the source IP address of the relayed packet is from a layer 3 interface), set the source IP address to auto:
cumulus@switch:~$ nv set service dhcp-relay default source-ip auto
cumulus@switch:~$ nv config apply
-
Edit the
/etc/default/isc-dhcp-relay-<server-group-id>-<vrf-id>file to add--giaddr-srcto theOPTIONSline.cumulus@switch:~$ sudo nano /etc/default/isc-dhcp-relay-type1-server-group-default SERVERS="172.16.1.102" INTF_CMD="-i vlan10 -i swp51 -i swp52 -U swp2" OPTIONS="--giaddr-src" -
Restart the
dhcrelayservice to apply the configuration change:cumulus@switch:~$ sudo systemctl restart dhcrelay-type1-server-group-default.service
To configure this setting back to the default (where the source IP address of the relayed packet is from a layer 3 interface), remove the --giaddr-src from the OPTIONS line.
Show DHCP Relay Information
To show DHCP relay configuration information, run the nv show service dhcp-relay command for IPv4 or the nv show service dhcp-relay6 command for IPv6:
cumulus@switch:~$ nv show service dhcp-relay
Vrf      Gateway Interface  Gateway IP Address  Source Ip  Agent State  Agent Remote Id  Circuit-Id State
-------  -----------------  ------------------  ---------  -----------  ---------------  ----------------
RED                                             auto       disabled                      disabled
default                                         auto       enabled                       enabled
Show DHCP Relay Server Group Information
To show the configured DHCP server groups, run the nv show service dhcp-relay <vrf-id> server-group command:
cumulus@switch:~$ nv show service dhcp-relay default server-group
Server Group           Server Ip     Upstream Interface
------------           ------------  ------------------
type1-server-group     172.16.1.102  swp51-52
To show information about a specific DHCP server group, run the nv show service dhcp-relay <vrf-id> server-group <server-group-id> command:
cumulus@switch:~$ nv show service dhcp-relay default server-group type1-server-group
                      operational   applied
--------------------  ------------  ------------
[server]              172.16.1.102  172.16.1.102
[upstream-interface]  swp51-52      swp51-52
To show the DHCP servers configured for a server group, run the nv show service dhcp-relay <vrf-id> server-group <server-group-id> server command:
cumulus@switch:~$ nv show service dhcp-relay default server-group type1-server-group server
DHCP Server IP
--------------
172.16.1.102
172.16.1.103
To show the upstream interfaces in a server group, run the nv show service dhcp-relay <vrf-id> server-group <server-group-id> upstream-interface command:
cumulus@switch:~$ nv show service dhcp-relay default server-group type1-server-group upstream-interface
Upstream Interface
------------------
swp51-52
Show Downstream Interfaces
To show the DHCP relay downstream interfaces, run the nv show service dhcp-relay <vrf-id> downstream-interface command:
cumulus@switch:~$ nv show service dhcp-relay default downstream-interface
Downstream Interface  server-group-name
--------------------  -----------------
vlan101               type1-server-group
To show information for a specific DHCP relay downstream interface, run the nv show service dhcp-relay <vrf-id> downstream-interface <interface-id> command:
cumulus@switch:~$ nv show service dhcp-relay default downstream-interface vlan101
                   operational           applied
-----------------  -----------           ---------
server-group-name  type1-server-group    type1-server-group
Show DHCP Relay Agent Information
To show the DHCP relay agent information per VRF, run the nv show service dhcp-relay <vrf-id> agent command:
cumulus@switch:~$ nv show service dhcp-relay default agent
                    operational  applied
------------------  -----------  -------
state               enabled      enabled
remote-id           1212         1212
use-pif-circuit-id
  state             enabled      enabled
To show the DHCP relay agent pif-circuit-id configuration, run the nv show service dhcp-relay <vrf-id> agent use-pif-circuit-id command:
cumulus@switch:~$ nv show service dhcp-relay default agent use-pif-circuit-id
       operational  applied
-----  -----------  -------
state  enabled      enabled
journalctl Command
To see how DHCP relay is working on your switch, run the journalctl command:
cumulus@switch:~$ sudo journalctl -l -n 20 | grep dhcrelay
Dec 05 20:58:55 leaf01 dhcrelay[6152]: sending upstream swp52
Dec 05 20:58:55 leaf01 dhcrelay[6152]: sending upstream swp51
Dec 05 20:58:55 leaf01 dhcrelay[6152]: Relaying Reply to fe80::4638:39ff:fe00:3 port 546 down.
Dec 05 20:58:55 leaf01 dhcrelay[6152]: Relaying Reply to fe80::4638:39ff:fe00:3 port 546 down.
Dec 05 21:03:55 leaf01 dhcrelay[6152]: Relaying Renew from fe80::4638:39ff:fe00:3 port 546 going up.
Dec 05 21:03:55 leaf01 dhcrelay[6152]: sending upstream swp52
Dec 05 21:03:55 leaf01 dhcrelay[6152]: sending upstream swp51
Dec 05 21:03:55 leaf01 dhcrelay[6152]: Relaying Reply to fe80::4638:39ff:fe00:3 port 546 down.
Dec 05 21:03:55 leaf01 dhcrelay[6152]: Relaying Reply to fe80::4638:39ff:fe00:3 port 546 down.
To specify a time period with the journalctl command, use the --since flag:
cumulus@switch:~$ sudo journalctl -l --since "2 minutes ago" | grep dhcrelay
Dec 05 21:08:55 leaf01 dhcrelay[6152]: Relaying Renew from fe80::4638:39ff:fe00:3 port 546 going up.
Dec 05 21:08:55 leaf01 dhcrelay[6152]: sending upstream swp52
Dec 05 21:08:55 leaf01 dhcrelay[6152]: sending upstream swp51
Configuration Errors
If you configure DHCP relays by editing the /etc/default/isc-dhcp-relay-<server-group-id>-<vrf-id> file manually, you can introduce configuration errors that cause the DHCP relay service to crash.
For example, if you see an error similar to the following, check that there is no space between the DHCP server address and the interface you use as the uplink.
Core was generated by /usr/sbin/dhcrelay --nl -d -i vx-40 -i vlan10 10.0.0.4 -U 10.0.1.2  %vlan20.
Program terminated with signal SIGSEGV, Segmentation fault.
To resolve the issue, manually edit the /etc/default/isc-dhcp-relay-<server-group-id>-<vrf-id> file to remove the space, then run the systemctl restart dhcrelay-<server-group-id>-<vrf-id>.service command to restart the dhcrelay service and apply the configuration change.
Considerations
- The
dhcrelaycommand does not bind to an interface if the interface name is longer than 14 characters. This is a known limitation indhcrelay. - DHCP discover packets transiting the switch are also sent to the CPU for additional processing, then dropped after being switched by the hardware. This causes the
RX_DRPandHwIfInDiscardscounters to increment on the interface even though the hardware forwards the packet correctly.