Interface Configuration and Management
ifupdown is the network interface manager for Cumulus Linux. Cumulus Linux uses an updated version of this tool, ifupdown2.
For more information on network interfaces, see Switch Port Attributes.
By default, ifupdown is quiet. Use the verbose option (-v) to show commands as they are executed when bringing an interface down or up.
Basic Commands
To bring up the physical connection to an interface or apply changes to an existing interface, run the sudo ifup <interface> command. The following example command brings up the physical connection to swp1:
cumulus@switch:~$ sudo ifup swp1
To bring down the physical connection to a single interface, run the sudo ifdown <interface> command. The following example command brings down the physical connection to swp1:
cumulus@switch:~$ sudo ifdown swp1
The ifdown command always deletes logical interfaces after bringing them down. When you bring down the physical connection to an interface, it is brought back up automatically after any future reboots or configuration changes with ifreload -a.
To administratively bring the interface up or down; for example, to bring down a port, bridge, or bond but not the physical connection for a port, bridge, or bond, you can use --admin-state option. Alternatively, you can use NCLU commands.
When you put an interface into an admin down state, the interface remains down after any future reboots or configuration changes with ifreload -a.
To put an interface into an admin down state, run the net add interface <interface> link down command.
cumulus@switch:~$ net add interface swp1 link down
cumulus@switch:~$ net pending
cumulus@switch:~$ net commit
These commands create the following configuration in the /etc/network/interfaces file:
auto swp1
iface swp1
    link-down yes
To bring the interface back up, run the net del interface <interface> link down command.
cumulus@switch:~$ net del interface swp1 link down
cumulus@switch:~$ net pending
cumulus@switch:~$ net commit
To put an interface into an admin down state, run the sudo ifdown <interface> --admin-state command:
cumulus@switch:~$ sudo ifdown swp1 --admin-state
These commands create the following configuration in the /etc/network/interfaces file:
auto swp1
iface swp1
    link-down yes
To bring the interface back up, run the sudo ifup <interface> --admin-state command:
cumulus@switch:~$ sudo ifup swp1 --admin-state
To see the link and administrative state, use the ip link show command. In the following example, swp1 is administratively UP and the physical link is UP (LOWER_UP flag).
cumulus@switch:~$ ip link show dev swp1
3: swp1: <BROADCAST,MULTICAST,UP,LOWER_UP> mtu 1500 qdisc pfifo_fast state UP mode DEFAULT qlen 500
    link/ether 44:38:39:00:03:c1 brd ff:ff:ff:ff:ff:ff
For additional information on interface administrative state and physical state, refer to this knowledge base article.
ifupdown2 Interface Classes
ifupdown2 enables you to group interfaces into separate classes, where a class is a user-defined label that groups interfaces that share a common function (such as uplink, downlink or compute). You specify classes in the /etc/network/interfaces file.
The most common class is auto, which you configure like this:
auto swp1
iface swp1
You can add other classes using the allow prefix. For example, if you have multiple interfaces used for uplinks, you can define a class called uplinks:
auto swp1
allow-uplink swp1
iface swp1 inet static
    address 10.1.1.1/31

auto swp2
allow-uplink swp2
iface swp2 inet static
    address 10.1.1.3/31
This allows you to perform operations on only these interfaces using the --allow=uplinks option. You can still use the -a options because these interfaces are also in the auto class:
cumulus@switch:~$ sudo ifup --allow=uplinks
cumulus@switch:~$ sudo ifreload -a
If you are using Management VRF, you can use the special interface class called mgmt and put the management interface into that class. The management VRF must have an IPv6 address in addition to an IPv4 address to work correctly.
The mgmt interface class is not supported with NCLU commands.
allow-mgmt eth0
iface eth0 inet dhcp
    vrf mgmt

allow-mgmt mgmt
iface mgmt
    address 127.0.0.1/8
    address ::1/128
    vrf-table auto
All ifupdown2 commands (ifup, ifdown, ifquery, ifreload) can take a class. Include the --allow=<class> option when you run the command. For example, to reload the configuration for the management interface described above, run:
cumulus@switch:~$ sudo ifreload --allow=mgmt
Use the -a option to bring up or down all interfaces that are marked with the common auto class in the
/etc/network/interfaces file.
To administratively bring up all interfaces marked auto, run:
cumulus@switch:~$ sudo ifup -a
To administratively bring down all interfaces marked auto, run:
cumulus@switch:~$ sudo ifdown -a
To reload all network interfaces marked auto, use the ifreload command. This command is equivalent to running ifdown then ifup; however, ifreload skips unchanged configurations:
cumulus@switch:~$ sudo ifreload -a
Certain syntax checks are done by default. As a precaution, apply configurations only if the syntax check passes. Use the following compound command:
cumulus@switch:~$ sudo bash -c "ifreload -s -a && ifreload -a"
For more information, see the individual man pages for ifup(8), ifdown(8), ifreload(8).
Configure a Loopback Interface
Cumulus Linux has a loopback interface preconfigured in the /etc/network/interfaces file. When the switch boots up, it has a loopback interface called lo, which is up and assigned an IP address of 127.0.0.1.
The loopback interface lo must always be specified in the /etc/network/interfaces file and must always be up.
ifupdown Behavior with Child Interfaces
By default, ifupdown recognizes and uses any interface present on the system that is listed as a dependent of an interface (for example, a VLAN, bond, or physical interface). You are not required to list interfaces in the interfaces file unless they need a specific configuration for MTU, link speed, and so on. If you need to delete a child interface, delete all references to that interface from the interfaces file.
In the following example, swp1 and swp2 do not need an entry in the interfaces file. The following stanzas defined in /etc/network/interfaces provide the exact same configuration:
With Child Interfaces Defined:
auto swp1
iface swp1

auto swp2
iface swp2

auto bridge
iface bridge
    bridge-vlan-aware yes
    bridge-ports swp1 swp2
    bridge-vids 1-100
    bridge-pvid 1
    bridge-stp on
Without Child Interfaces Defined
auto bridge
iface bridge
    bridge-vlan-aware yes
    bridge-ports swp1 swp2
    bridge-vids 1-100
    bridge-pvid 1
    bridge-stp on
In the following example, swp1.100 and swp2.100 do not need an entry in the interfaces file. The following stanzas defined in /etc/network/interfaces provide the exact same configuration:
With Child Interfaces Defined
auto swp1.100
iface swp1.100

auto swp2.100
iface swp2.100

auto br-100
iface br-100
    address 10.0.12.2/24
    address 2001:dad:beef::3/64
    bridge-ports swp1.100 swp2.100
    bridge-stp on
Without Child Interfaces Defined
auto br-100
iface br-100
    address 10.0.12.2/24
    address 2001:dad:beef::3/64
    bridge-ports swp1.100 swp2.100
    bridge-stp on
For more information about bridges in traditional mode and bridges in VLAN-aware mode, read this knowledge base article.
ifupdown2 Interface Dependencies
ifupdown2 understands interface dependency relationships. When you run ifup and ifdown with all interfaces, the commands always run with all interfaces in dependency order. When you run ifup and ifdown
with the interface list on the command line, the default behavior is to not run with dependents; however, if there are any built-in dependents, they will be brought up or down.
To run with dependents when you specify the interface list, use the --with-depends option. The --with-depends option walks through all dependents in the dependency tree rooted at the interface you specify.
Consider the following example configuration:
auto bond1
iface bond1
    address 100.0.0.2/16
    bond-slaves swp29 swp30

auto bond2
iface bond2
    address 100.0.0.5/16
    bond-slaves swp31 swp32

auto br2001
iface br2001
    address 12.0.1.3/24
    bridge-ports bond1.2001 bond2.2001
    bridge-stp on
The ifup --with-depends br2001 command brings up all dependents of br2001: bond1.2001, bond2.2001, bond1, bond2, bond1.2001, bond2.2001, swp29, swp30, swp31, swp32.
cumulus@switch:~$ sudo ifup --with-depends br2001
The ifdown --with-depends br2001 command brings down all dependents of br2001: bond1.2001, bond2.2001, bond1, bond2, bond1.2001, bond2.2001, swp29, swp30, swp31, swp32.
cumulus@switch:~$ sudo ifdown --with-depends br2001
ifdown2 always deletes logical interfaces after bringing them down. Use the --admin-state option if you only want to administratively bring the interface up or down. In the above example, ifdown br2001 deletes br2001.
To guide you through which interfaces will be brought down and up, use the --print-dependency option.
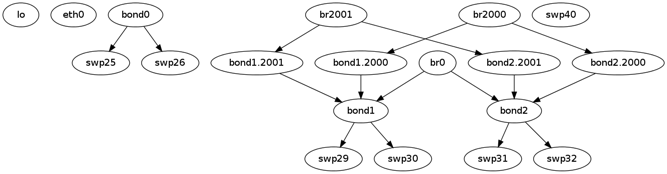
For example, run ifquery --print-dependency=list -a to show the dependency list for all interfaces:
cumulus@switch:~$ sudo ifquery --print-dependency=list -a
lo : None
eth0 : None
bond0 : ['swp25', 'swp26']
bond1 : ['swp29', 'swp30']
bond2 : ['swp31', 'swp32']
br0 : ['bond1', 'bond2']
bond1.2000 : ['bond1']
bond2.2000 : ['bond2']
br2000 : ['bond1.2000', 'bond2.2000']
bond1.2001 : ['bond1']
bond2.2001 : ['bond2']
br2001 : ['bond1.2001', 'bond2.2001']
swp40 : None
swp25 : None
swp26 : None
swp29 : None
swp30 : None
swp31 : None
swp32 : None
To print the dependency list of a single interface, run the ifquery --print-dependency=list <interface> command. The following example command shows the dependency list for br2001:
cumulus@switch:~$ sudo ifquery --print-dependency=list br2001
br2001 : ['bond1.2001', 'bond2.2001']
bond1.2001 : ['bond1']
bond2.2001 : ['bond2']
bond1 : ['swp29', 'swp30']
bond2 : ['swp31', 'swp32']
swp29 : None
swp30 : None
swp31 : None
swp32 : None
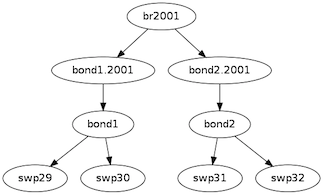
To show the dependency information for an interface in dot format, run the ifquery --print-dependency=dot <interface> command. The following example command shows the dependency information for interface br2001 in
dot format:
cumulus@switch:~$ sudo ifquery --print-dependency=dot br2001
/* Generated by GvGen v.0.9 (http://software.inl.fr/trac/wiki/GvGen) */
digraph G {
    compound=true;
    node1 [label="br2001"];
    node2 [label="bond1.2001"];
    node3 [label="bond2.2001"];
    node4 [label="bond1"];
    node5 [label="bond2"];
    node6 [label="swp29"];
    node7 [label="swp30"];
    node8 [label="swp31"];
    node9 [label="swp32"];
    node1->node2;
    node1->node3;
    node2->node4;
    node3->node5;
    node4->node6;
    node4->node7;
    node5->node8;
    node5->node9;
}
You can use dot to render the graph on an external system where dot is installed.
To print the dependency information of the entire interfaces file, run the following command:
cumulus@switch:~$ sudo ifquery --print-dependency=dot -a >interfaces_all.dot
Subinterfaces
On Linux, an interface is a network device that can be either physical, like a switch port (for example, swp1) or virtual, like a VLAN (for example, vlan100). A VLAN subinterface is a VLAN device on an interface, and the VLAN ID is appended to the parent interface using dot (.) VLAN notation. For example, a VLAN with ID 100 that is a subinterface of swp1 is named swp1.100. The dot VLAN notation for a VLAN device name is a standard way to specify a VLAN device on Linux. Many Linux configuration tools, such as ifupdown2 and its predecessor ifupdown, recognize such a name as a VLAN interface name.
A VLAN subinterface only receives traffic tagged for that VLAN; therefore, swp1.100 only receives packets tagged with VLAN 100 on switch port swp1. Similarly, any packets transmitted from swp1.100 are tagged with VLAN 100.
In an MLAG configuration, the peer link interface that connects the two switches in the MLAG pair has a VLAN subinterface named 4094 by default if you configured the subinterface with NCLU. The peerlink.4094 subinterface only receives traffic tagged for VLAN 4094.
ifup and Upper (Parent) Interfaces
When you run ifup on a logical interface (like a bridge, bond or VLAN interface), if the ifup results in the creation of the logical interface, it implicitly tries to execute on the interface’s upper (or parent) interfaces as well.
Consider this example configuration:
auto br100
iface br100
    bridge-ports bond1.100 bond2.100

auto bond1
iface bond1
    bond-slaves swp1 swp2
If you run ifdown bond1, ifdown deletes bond1 and the VLAN interface on bond1 (bond1.100); it also removes bond1 from the bridge br100. Next, when you run ifup bond1, it creates bond1 and the VLAN interface on bond1 (bond1.100); it also executes ifup br100 to add the bond VLAN interface (bond1.100) to the bridge br100.
There can be cases where an upper interface (like br100) is not in the right state, which can result in warnings. The warnings are mostly harmless.
If you want to disable these warnings, you can disable the implicit upper interface handling by setting skip_upperifaces=1 in the /etc/network/ifupdown2/ifupdown2.conf file.
With skip_upperifaces=1, you have to explicitly execute ifup on the upper interfaces. In this case, you will have to run ifup br100 after an ifup bond1 to add bond1 back to bridge br100.
Although specifying a subinterface like swp1.100 and then running ifup swp1.100 results in the automatic creation of the swp1 interface in the kernel, specify the parent interface swp1 as well. A parent interface is one where any physical layer configuration can reside, such as link-speed 1000 or link-duplex full. If you only create swp1.100 and not swp1, then you cannot run ifup swp1 because you did not specify it.
Configure IP Addresses
To configure IP addresses, run the following commands.
The following commands configure three IP addresses for swp1: two IPv4 addresses, and one IPv6 address.
cumulus@switch:~$ net add interface swp1 ip address 12.0.0.1/30
cumulus@switch:~$ net add interface swp1 ip address 12.0.0.2/30
cumulus@switch:~$ net add interface swp1 ipv6 address 2001:DB8::1/126
cumulus@switch:~$ net pending
cumulus@switch:~$ net commit
These commands create the following code snippet in the /etc/network/interfaces file:
auto swp1
iface swp1
    address 12.0.0.1/30
    address 12.0.0.2/30
    address 2001:DB8::1/126
You can specify both IPv4 and IPv6 addresses for the same interface.
For IPv6 addresses, you can create or modify the IP address for an interface using either :: or 0:0:0 notation. Both of the following examples are valid:
cumulus@switch:~$ net add bgp neighbor 2620:149:43:c109:0:0:0:5 remote-as internal
cumulus@switch:~$ net add interface swp1 ipv6 address 2001:DB8::1/126
NCLU adds the address method and address family when needed, specifically when you are creating DHCP or loopback interfaces.
auto lo
iface lo inet loopback
In the /etc/network/interfaces file, list all IP addresses under the iface section. The following command example adds IP address 10.0.0.1/30 and 10.0.0.2/30 to swp1.
auto swp1
iface swp1
    address 10.0.0.1/30
    address 10.0.0.2/30
The address method and address family are not mandatory; they default to inet/inet6 and static. However, you must specify inet/inet6 when you are creating DHCP or loopback interfaces.
auto lo
iface lo inet loopback
You can specify both IPv4 and IPv6 addresses in the same iface stanza:
auto swp1
iface swp1
    address 192.0.2.1/30
    address 192.0.2.2/30
    address 2001:DB8::1/126
A runtime configuration is non-persistent, which means the configurationyou create here does not persist after you reboot the switch.
To make non-persistent changes to interfaces at runtime, use ip addr add:
cumulus@switch:~$ sudo ip addr add 192.0.2.1/30 dev swp1
cumulus@switch:~$ sudo ip addr add 2001:DB8::1/126 dev swp1
To remove an addresses from an interface, use ip addr del:
cumulus@switch:~$ sudo ip addr del 192.0.2.1/30 dev swp1
cumulus@switch:~$ sudo ip addr del 2001:DB8::1/126 dev swp1
For more details on the options available to manage and query interfaces, see man ip.
To show the assigned IP address on an interface, run the ip addr show command. The following example command shows the assigned IP address on swp1.
cumulus@switch:~$ ip addr show dev swp1
3: swp1: <BROADCAST,MULTICAST,SLAVE,UP,LOWER_UP> mtu 1500 qdisc pfifo_fast state UP qlen 500
    link/ether 44:38:39:00:03:c1 brd ff:ff:ff:ff:ff:ff
    inet 192.0.2.1/30 scope global swp1
    inet 192.0.2.2/30 scope global swp1
    inet6 2001:DB8::1/126 scope global tentative
        valid_lft forever preferred_lft forever
Specify IP Address Scope
ifupdown2 does not honor the configured IP address scope setting in the /etc/network/interfaces file, treating all addresses as global. It does not report an error. Consider this example configuration:
auto swp2
iface swp2
    address 35.21.30.5/30
    address 3101:21:20::31/80
    scope link
When you run ifreload -a on this configuration, ifupdown2 considers all IP addresses as global.
cumulus@switch:~$ ip addr show swp2
5: swp2: <BROADCAST,MULTICAST,UP,LOWER_UP> mtu 1500 qdisc pfifo_fast state UP group default qlen 1000
link/ether 74:e6:e2:f5:62:82 brd ff:ff:ff:ff:ff:ff
inet 35.21.30.5/30 scope global swp2
valid_lft forever preferred_lft forever
inet6 3101:21:20::31/80 scope global
valid_lft forever preferred_lft forever
inet6 fe80::76e6:e2ff:fef5:6282/64 scope link
valid_lft forever preferred_lft forever
To work around this issue, configure the IP address scope:
Run the following commands:
cumulus@switch:~$ net add interface swp6 post-up ip address add 71.21.21.20/32 dev swp6 scope site
cumulus@switch:~$ net pending
cumulus@switch:~$ net commit
These commands create the following code snippet in the /etc/network/interfaces file:
auto swp6
iface swp6
    post-up ip address add 71.21.21.20/32 dev swp6 scope site
In the /etc/network/interfaces file, configure the IP address scope using post-up ip address add <address> dev <interface> scope <scope>. For example:
auto swp6
iface swp6
    post-up ip address add 71.21.21.20/32 dev swp6 scope site
Then run the ifreload -a command on this configuration.
The following configuration shows the correct scope:
cumulus@switch:~$ ip addr show swp6
9: swp6: <BROADCAST,MULTICAST,UP,LOWER_UP> mtu 1500 qdisc pfifo_fast state UP group default qlen 1000
link/ether 74:e6:e2:f5:62:86 brd ff:ff:ff:ff:ff:ff
inet 71.21.21.20/32 scope site swp6
valid_lft forever preferred_lft forever
inet6 fe80::76e6:e2ff:fef5:6286/64 scope link
valid_lft forever preferred_lft forever
Purge Existing IP Addresses on an Interface
By default, ifupdown2 purges existing IP addresses on an interface. If you have other processes that manage IP addresses for an interface, you can disable this feature.
To disable IP address purge on an interface, run the following commands:
cumulus@switch:~$ net add interface swp1 address-purge no
cumulus@switch:~$ net pending
cumulus@switch:~$ net commit
These commands create the following configuration snippet in the /etc/network/interfaces file:
auto swp1
iface swp1
    address-purge no
In the /etc/network/interfaces file, add address-purge no to the interface configuration. The following example command disables IP address purge on swp1.
cumulus@switch:~# sudo nano /etc/network/interfaces

auto swp1
iface swp1
    address-purge no
Purging existing addresses on interfaces with multiple iface stanzas is not supported. Doing so can result in the configuration of multiple addresses for an interface after you change an interface address and reload the configuration with ifreload -a. If this happens, you must shut down and restart the interface with ifup and ifdown, or manually delete superfluous addresses with ip address delete specify.ip.address.here/mask dev DEVICE. See also the Caveats and Errata section below for cautions about using multiple iface stanzas for the same interface.
Specify User Commands
You can specify additional user commands in the /etc/network/interfaces file. The interface stanzas in /etc/network/interfaces can have a command that runs at pre-up, up, post-up, pre-down, down, and post-down:
To add a command to an interface stanza, run the following commands:
cumulus@switch:~$ net add interface swp1 post-up /sbin/foo bar
cumulus@switch:~$ net add interface ip address 12.0.0.1/30
cumulus@switch:~$ net pending
cumulus@switch:~$ net commit
These commands create the following configuration in the /etc/network/interfaces file:
auto swp1
iface swp1
    address 12.0.0.1/30
    post-up /sbin/foo bar
If your post-up command also starts, restarts, or reloads any systemd service, you must use the --no-block option with systemctl. Otherwise, that service or even the switch itself might hang after starting or restarting. For example, to restart the dhcrelay service after bringing up VLAN 100, first run:
cumulus@switch:~$ net add vlan 100 post-up systemctl --no-block restart dhcrelay.service
This command creates the following configuration in the /etc/network/interfaces file:
auto bridge
iface bridge
    bridge-vids 100
    bridge-vlan-aware yes
auto vlan100
iface vlan100
post-up systemctl –no-block restart dhcrelay.service
vlan-id 100
vlan-raw-device bridge
To add a command to an interface stanza, add the command in the /etc/network/interfaces file. For example:
cumulus@switch:~# sudo nano /etc/network/interfaces

auto swp1
iface swp1
    address 12.0.0.1/30
    up /sbin/foo bar
If your post-up command also starts, restarts, or reloads any systemd service, you must use the --no-block option with systemctl. Otherwise, that service or even the switch itself might hang after starting or restarting. For example, to restart the dhcrelay service after bringing up a VLAN, the /etc network/interfaces configuration looks like this:
auto bridge.100
iface bridge.100
    post-up systemctl --no-block restart dhcrelay.service
You can add any valid command in the sequence to bring an interface up
or down; however, limit the scope to network-related commands associated
with the particular interface. For example, it does not make sense to
install a Debian package on ifup of swp1, even though it is
technically possible. See man interfaces for more details.
Source Interface File Snippets
Sourcing interface files helps organize and manage the interfaces file. For example:
cumulus@switch:~$ sudo cat /etc/network/interfaces
# The loopback network interface
auto lo
iface lo inet loopback

# The primary network interface
auto eth0
iface eth0 inet dhcp

source /etc/network/interfaces.d/bond0
The contents of the sourced file used above are:
cumulus@switch:~$ sudo cat /etc/network/interfaces.d/bond0
auto bond0
iface bond0
    address 14.0.0.9/30
    address 2001:ded:beef:2::1/64
    bond-slaves swp25 swp26
Use Globs for Port Lists
Globs define a range of ports.
NCLU supports globs to define port lists (a range of ports). You must use commas to separate different ranges of ports in the NCLU command; for example:
cumulus@switch:~$ net add bridge bridge ports swp1-4,6,10-12
cumulus@switch:~$ net pending
cumulus@switch:~$ net commit
These commands produce the following snippet in the /etc/network/interfaces file. The file renders the list of ports individually.
...

auto bridge
iface bridge
    bridge-ports swp1 swp2 swp3 swp4 swp6 swp10 swp11 swp12
    bridge-vlan-aware yes
auto swp1
iface swp1

auto swp2
iface swp2

auto swp3
iface swp3

auto swp4
iface swp4

auto swp6
iface swp6

auto swp10
iface swp10

auto swp11
iface swp11

auto swp12
iface swp12
Use the glob keyword to specify bridge ports and bond slaves:
auto br0
iface br0
    bridge-ports glob swp1-6.100

auto br1
iface br1
    bridge-ports glob swp7-9.100  swp11.100 glob swp15-18.100
Mako Templates
ifupdown2 supports Mako-style templates. The Mako template engine is run over the interfaces file before parsing.
While ifupdown2 supports Mako templates, NCLU does not understand them. As a result, NCLU cannot read or write to the /etc/network/interfaces file.
Use the template to declare cookie-cutter bridges in the interfaces file:
And use it to declare addresses in the interfaces file:
%for i in [1,12]:
auto swp${i}
iface swp${i}
    address 10.20.${i}.3/24
In Mako syntax, use square brackets ([1,12]) to specify a list of individual numbers (in this case, 1 and 12). Use range(1,12) to specify a range of interfaces.
You can test your template and confirm it evaluates correctly by running mako-render /etc/network/interfaces.
To comment out content in Mako templates, use double hash marks (##). For example:
## % for i in range(1, 4):
## auto swp${i}
## iface swp${i}
## % endfor
##
For more examples of configuring Mako templates, read this knowledge base article.
Run ifupdown Scripts under /etc/network/ with ifupdown2
Unlike the traditional ifupdown system, ifupdown2 does not run scripts installed in /etc/network/*/ automatically to configure network interfaces.
To enable or disable ifupdown2 scripting, edit the addon_scripts_support line in the /etc/network/ifupdown2/ifupdown2.conf file. 1 enables scripting and 2 disables scripting. The following example enables scripting.
cumulus@switch:~$ sudo nano /etc/network/ifupdown2/ifupdown2.conf
# Support executing of ifupdown style scripts.
# Note that by default python addon modules override scripts with the same name
addon_scripts_support=1
ifupdown2 sets the following environment variables when executing commands:
$IFACErepresents the physical name of the interface being processed; for example,br0or vxlan42. The name is obtained from the/etc/network/interfacesfile.$LOGICALrepresents the logical name (configuration name) of the interface being processed.$METHODrepresents the address method; for example, loopback, DHCP, DHCP6, manual, static, and so on.$ADDRFAMrepresents the address families associated with the interface, formatted in a comma-separated list for example,"inet,inet6".
Add Descriptions to Interfaces
You can add descriptions to interfaces configured in the /etc/network/interfaces file by using the alias keyword.
The following commands create an alias for swp1:
cumulus@switch:~$ net add interface swp1 alias hypervisor_port_1
cumulus@switch:~$ net pending
cumulus@switch:~$ net commit
These commands create the following code snippet:
auto swp1
iface swp1
    alias hypervisor_port_1
In the /etc/network/interfaces file, add a description using the alias keyword:
cumulus@switch:~# sudo nano /etc/network/interfaces

auto swp1
iface swp1
    alias swp1 hypervisor_port_1
You can query the interface description.
To show the description (alias) for an interface, run the net show interface <interface> command. The following example command shows the description for swp1:
cumulus@switch$ net show interface swp1
    Name   MAC                Speed     MTU   Mode
--  ----   -----------------  -------   -----  ---------
UP  swp1   44:38:39:00:00:04  1G        1500   Access/L2
Alias
-----
hypervisor_port_1
To show the interface description (alias) for all interfaces on the switch, run the net show interface alias command. For example:
cumulus@switch:~$ net show interface alias
State    Name            Mode              Alias
-----    -------------   -------------     ------------------
UP       bond01          LACP
UP       bond02          LACP
UP       bridge          Bridge/L2
UP       eth0            Mgmt
UP       lo              Loopback          loopback interface
UP       mgmt            Interface/L3
UP       peerlink        LACP
UP       peerlink.4094   SubInt/L3
UP       swp1            BondMember        hypervisor_port_1
UP       swp2            BondMember        to Server02
...
To show the interface description for all interfaces on the switch in JSON format, run the net show interface alias json command.
To show the description (alias) for an interface, run the ip link show command. The alias appears on the alias line:
cumulus@switch$ ip link show swp1
3: swp1: <NO-CARRIER,BROADCAST,MULTICAST,UP> mtu 1500 qdisc pfifo_fast state DOWN mode DEFAULT qlen 500
    link/ether aa:aa:aa:aa:aa:bc brd ff:ff:ff:ff:ff:ff
    alias hypervisor_port_1
Interface descriptions also appear in the SNMP OID IF-MIB::ifAlias .
- Aliases are limited to 256 characters.
- Avoid using apostrophes or non-ASCII characters in the alias string. Cumulus Linux does not parse these characters.
Caveats and Errata
Even though ifupdown2 supports the inclusion of multiple iface stanzas for the same interface, use a single iface stanza for each interface. If you must specify more than one iface stanza; for example, if the configuration for a single interface comes from many places, like a template or a sourced file, make sure the stanzas do not specify the same interface attributes. Otherwise, unexpected behavior can result.
In the following example, swp1 is configured in two places: the /etc/network/interfaces file and the /etc/network/interfaces.d/speed_settings file. ifupdown2 correctly parses this configuration because the same attributes are not specified in multiple iface stanzas.
cumulus@switch:~$ sudo cat /etc/network/interfaces

source /etc/network/interfaces.d/speed_settings

auto swp1
iface swp1
  address 10.0.14.2/24

cumulus@switch:~$ cat /etc/network/interfaces.d/speed_settings

auto swp1
iface swp1
  link-speed 1000
  link-duplex full
You cannot purge existing addresses on interfaces with multiple iface stanzas.
ifupdown2 and sysctl
For sysctl commands in the pre-up, up, post-up, pre-down, down, and post-down lines that use the
$IFACE variable, if the interface name contains a dot (.), ifupdown2 does not change the name to work with sysctl. For example, the interface name bridge.1 is not converted to bridge/1.
Interface Name Limitations
Interface names are limited to 15 characters in length, the first character cannot be a number and the name cannot include a dash (-). In addition, any name that matches with the regular expression .{0,13}\-v.* is not supported.
If you encounter issues, remove the interface name from the /etc/network/interfaces file, then restart the networking.service.
cumulus@switch:~$ sudo nano /etc/network/interfaces
cumulus@switch:~$ sudo systemctl restart networking.service