Simulation Management
This page covers the simulation lifecycle, checkpoints, and simulation history in NVIDIA DSX Air.
Simulation Lifecycle
A simulation in NVIDIA DSX Air transitions through several states during its lifecycle. Understanding these states helps you monitor your simulation’s progress and troubleshoot issues.
Starting a Simulation
When you start a simulation, it progresses through the following states:
- Inactive: The simulation is not running. This is the initial state after creation or after shutdown.
- Requesting: Air is requesting compute resources for your simulation.
- Provisioning: Air is assigning workers and setting up the infrastructure for your nodes.
- Booting: The nodes in your simulation are starting up.
- Active: The simulation is fully running. You can connect to node consoles and interact with your network.
Stopping a Simulation
When you stop a simulation, Air can optionally save your progress:
- Shutting Down: The nodes are gracefully shutting down.
- Saving: Air is saving a checkpoint of your simulation’s current state (if enabled).
- Inactive: The simulation has stopped and resources are released.
By default, stopping a simulation creates a checkpoint so you can resume from where you left off.
Viewing Simulation Status
The simulation status badge appears next to your simulation name and in the simulations list. Common statuses include:
| Status | Description |
|---|---|
| inactive | Simulation is stopped and not consuming resources |
| active | Simulation is running |
| booting | Nodes are starting up |
| saving | A checkpoint is being saved |
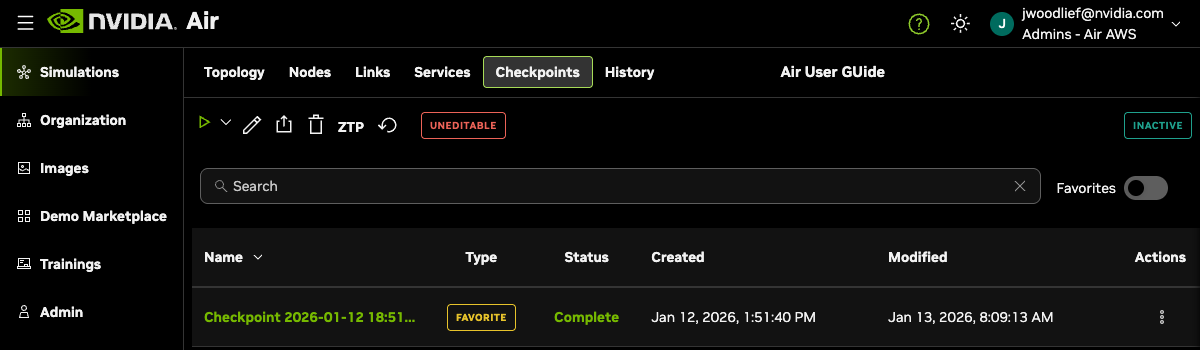
Checkpoints
Checkpoints are snapshots of your simulation’s state at a specific point in time. They allow you to save your work and resume later without losing configuration changes or data.
How Checkpoints Work
- When you stop a running simulation, Air automatically saves a checkpoint by default.
- Checkpoints capture the state of all nodes in your simulation, including any configuration changes you made.
- You can start a simulation from any saved checkpoint to restore that exact state.
Viewing Checkpoints
To view your simulation’s checkpoints, open your simulation and select the Checkpoints tab.
Starting from a Checkpoint
To start your simulation from a specific checkpoint:
- Click the dropdown arrow next to the Start Simulation button.
- Select the checkpoint you want to restore.

The simulation starts and restores all nodes to the state captured in that checkpoint.
Favorite Checkpoints
Mark important checkpoints as favorites to protect them from automatic deletion. Favorite checkpoints display “Favorites” in the Type column instead of “standard”. When your organization reaches its checkpoint storage limit, Air deletes the oldest non-favorite checkpoints first to make room for new ones.
Checkpoint Limits
Air stores up to 3 checkpoints per simulation. When this limit is reached:
- Air automatically deletes the oldest non-favorite checkpoint to make room for a new one.
- Favorite checkpoints are preserved and do not count toward automatic deletion.
Reverting a Simulation
Reverting a simulation deletes all of its checkpoints and returns the simulation to an editable state. Use revert when you need to add, remove, or modify nodes in a simulation that already has checkpoints.
By default, a simulation becomes uneditable after it starts for the first time, because a checkpoint is saved when you stop it. The state badge next to the simulation name shows Editable or Uneditable to reflect this.
Requirements
You can revert a simulation only when:
- The simulation is inactive (stopped).
- The simulation has at least one checkpoint.
How to Revert
- Open the simulation.
- In the action bar at the top of the page, select the revert icon.
- In the confirmation dialog, hold the Hold to Revert button until the action completes.

After the revert completes, the state badge changes to Editable and you can modify the topology again.
Sleep
Sleep is the normal way to stop a running simulation while preserving its state. When a simulation goes to sleep, Air shuts down its nodes, saves a checkpoint of their disk state, and releases the compute resources. The simulation transitions through Shutting Down and Saving before reaching Inactive, where it stays until you start it again.
Sleeping is reversible. Starting a slept simulation restores all nodes from the saved checkpoint, so any configuration changes and in-memory state captured at sleep time are preserved.
Putting a Simulation to Sleep Manually
To put a running simulation to sleep:
- Open the simulation.
- In the action bar at the top of the page, click Stop Simulation and Store Checkpoint.
The simulation transitions to Saving while the checkpoint is written, then to Inactive.
To stop a simulation without saving a checkpoint, open the dropdown next to Stop Simulation and Store Checkpoint and select Stop Simulation Without Checkpoint. Any unsaved changes since the last checkpoint are lost.
Scheduling Automatic Sleep
You can schedule a simulation to go to sleep automatically by setting a sleep date. When the sleep date is reached, Air puts the simulation to sleep and saves a checkpoint.
To set or change the sleep date:
- Open the simulation.
- In the action bar at the top of the page, click Edit Simulation.
- Set the Sleep date and Sleep time to when you want the simulation to sleep. Times are entered in your local timezone and stored as UTC.
- Click Save.
The sleep date persists across runs. Clear it if you no longer want the simulation to sleep automatically.
Free trial accounts have an automatic sleep date applied to their simulations and cannot remove it. Contact NVIDIA to upgrade your account if you need simulations that do not sleep automatically.
Waking a Simulation
To wake a sleeping simulation, start it the same way you would start any inactive simulation. By default, Air resumes from the most recent checkpoint. To wake from a different checkpoint, see Starting from a Checkpoint.
If the sleep date has already passed when you wake the simulation, Air clears it so the simulation does not immediately go back to sleep.
Simulation History
The History tab provides a detailed log of all events that occurred during your simulation’s lifecycle. This is useful for understanding what happened to your simulation and for debugging issues.
Viewing History
To view your simulation’s history:
- Open your simulation.
- Select the History tab.
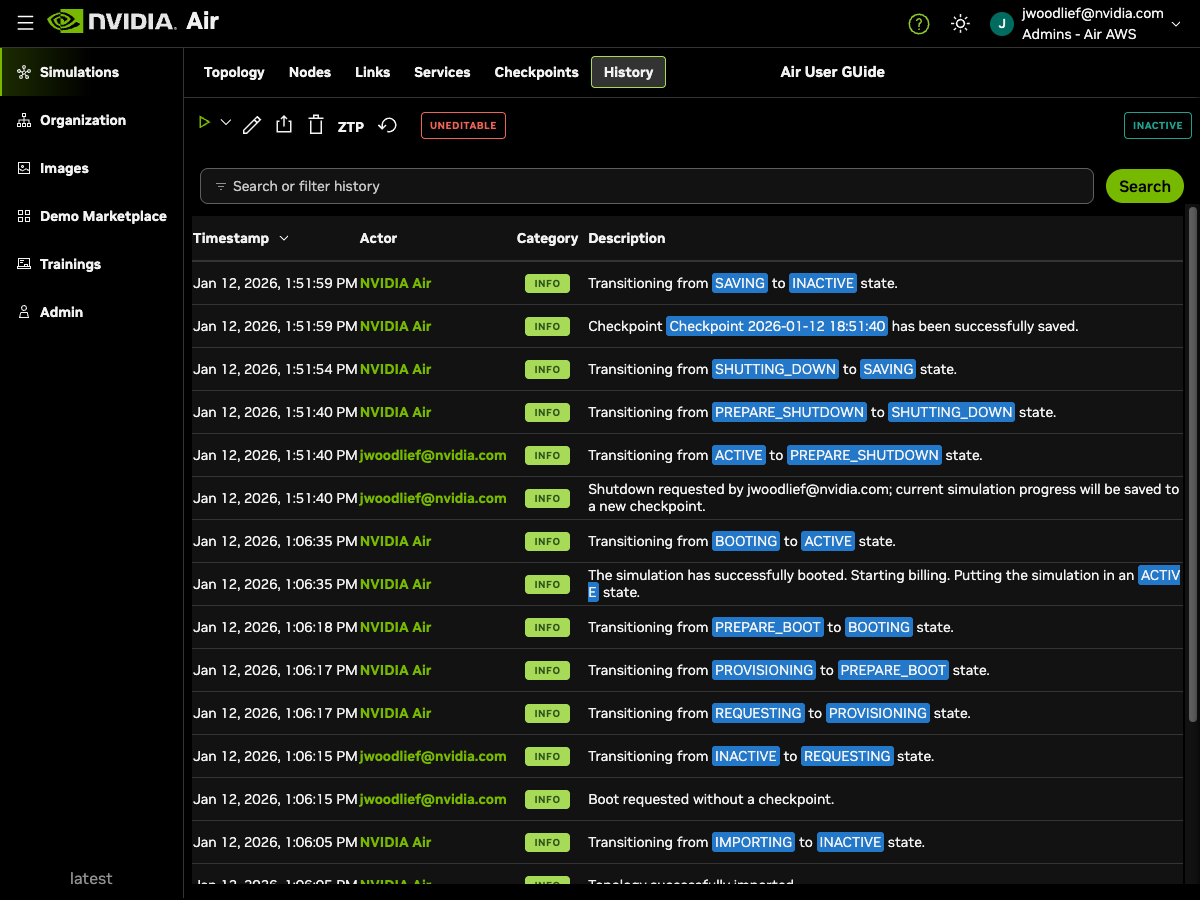
History Entry Fields
Each history entry contains:
| Field | Description |
|---|---|
| Timestamp | When the event occurred |
| Actor | Who or what triggered the event (user email or “NVIDIA Air” for system events) |
| Category | Event type: INFO, WARNING, or ERROR |
| Description | Details about what happened |
Common History Events
The history log captures events such as:
- Simulation creation: When the simulation was created and by whom
- State transitions: Changes between lifecycle states (inactive, booting, active, etc.)
- Checkpoint operations: When checkpoints are created or deleted
- User actions: Start, stop, and configuration changes initiated by users
- Errors: Any issues encountered during simulation operations
Filtering History
Use the search box at the top of the History tab to filter events by keyword. This helps you quickly find specific events in simulations with extensive history.