KVM-QEMU
Performing virtualization in Linux requires three components:
- KVM works exclusively with QEMU and performs hardware acceleration for x86 VMs with Intel and AMD CPUs. KVM and QEMU are hypervisors that emulate the VMs; the pair is often called KVM-QEMU or just KVM.
- QEMU is a machine emulator that can allow the host machine to emulate the CPU architecture of the guest machine. Because QEMU does not provide hardware acceleration, it works well with KVM.
- libvirt provides an abstraction language to define and launch VMs, but is normally used just to launch single VMs. It uses XML to represent and define the VM.
This section describes how to install and set up Cumulus VX with KVM/QEMU and Libvirt on a Linux server to create the two leaf and one spine topology shown below.
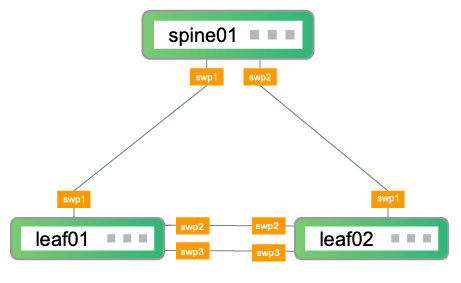
In the topology, leaf01 and leaf02 are the access layer switches on the network. leaf01 and leaf02 connect to spine01, which is the aggregation layer switch on the network. To facilitate additional configuration after the initial setup descibed in this guide, leaf01 and leaf02 also have two connections to each other.
Follow the steps below to:
- Create three VMs (leaf01, leaf02, and spine01) and the network connections between them
- Log in to the switches
- Perform basic switch configuration
- Verify configuration
These steps were tested with Cumulus VX 4.2, KVM/QEMU version 1:4.2-3ubuntu6.3, and Libvirt version 6.0.0 on Ubuntu Linux version 20.04.
Create and Configure the VMs
The following procedure creates leaf01, leaf02, and spine01 and the network connections between them. This section assumes you have Linux and KVM experience.
Download and Install the Software
-
Download the Cumulus VX Qcow2 image for KVM.
-
Run the following commands to install KVM, QEMU and Libvirt:
local@host:~$ sudo apt update -y local@host:~$ sudo apt install -qy qemu ebtables dnsmasq-base qemu-kvm libvirt-clients libvirt-daemon-system bridge-utils virt-manager python3-pip local@host:~$ sudo apt install -qy libxslt-dev libxml2-dev libvirt-dev zlib1g-dev -
Confirm that your Linux kernel and BIOS settings permit the use of KVM hardware acceleration:
local@host:~$ kvm-ok
INFO: /dev/kvm exists
KVM acceleration can be used
Create the VMs and Network Connections
-
Copy the
qcow2image onto a Linux server three times to create the three VMs. Name them as follows:- leaf01.qcow2
- leaf02.qcow2
- spine01.qcow2
-
Run the following commands to configure each VM. Make sure you specify the location of the VM at the end of the command. In the example commands below, you install the VMs in
/var/lib/libvirt/images/.
The following commands define the CPU, memory, and disk requirements for Cumulus VX, which requires at least 768MB of RAM and 6GB of disk space. CumulusVX versions 4.3 and later require 2 vCPUs. CumulusVX versions 5.0 and later require 2GB of RAM.
local@host:~$ sudo /usr/bin/kvm -curses -vga virtio -name leaf01 -pidfile leaf01.pid -smp 2 -m 768 -net nic,macaddr=00:01:00:00:01:00,model=virtio -net user,net=192.168.0.0/24,hostfwd=tcp::1401-:22 -netdev socket,udp=127.0.0.1:1602,localaddr=127.0.0.1:1601,id=dev0 -device virtio-net-pci,mac=00:02:00:00:00:01,addr=6.0,multifunction=on,netdev=dev0,id=swp1 -netdev socket,udp=127.0.0.1:1606,localaddr=127.0.0.1:1605,id=dev1 -device virtio-net-pci,mac=00:02:00:00:00:02,addr=6.1,multifunction=off,netdev=dev1,id=swp2 -netdev socket,udp=127.0.0.1:1610,localaddr=127.0.0.1:1609,id=dev2 -device virtio-net-pci,mac=00:02:00:00:00:09,addr=6.2,multifunction=off,netdev=dev2,id=swp3 /var/lib/libvirt/images/leaf01.qcow2
local@host:~$ sudo /usr/bin/kvm -curses -vga virtio -name leaf02 -pidfile leaf02.pid -smp 2 -m 768 -net nic,macaddr=00:01:00:00:02:00,model=virtio -net user,net=192.168.0.0/24,hostfwd=tcp::1402-:22 -netdev socket,udp=127.0.0.1:1604,localaddr=127.0.0.1:1603,id=dev0 -device virtio-net-pci,mac=00:02:00:00:00:03,addr=6.0,multifunction=on,netdev=dev0,id=swp1 -netdev socket,udp=127.0.0.1:1605,localaddr=127.0.0.1:1606,id=dev1 -device virtio-net-pci,mac=00:02:00:00:00:04,addr=6.1,multifunction=off,netdev=dev1,id=swp2 -netdev socket,udp=127.0.0.1:1609,localaddr=127.0.0.1:1610,id=dev2 -device virtio-net-pci,mac=00:02:00:00:00:10,addr=6.2,multifunction=off,netdev=dev2,id=swp3 /var/lib/libvirt/images/leaf02.qcow2
local@host:~$ sudo /usr/bin/kvm -curses -vga virtio -name spine01 -pidfile spine01.pid -smp 2 -m 768 -net nic,macaddr=00:01:00:00:03:00,model=virtio -net user,net=192.168.0.0/24,hostfwd=tcp::1403-:22 -netdev socket,udp=127.0.0.1:1601,localaddr=127.0.0.1:1602,id=dev0 -device virtio-net-pci,mac=00:02:00:00:00:05,addr=6.0,multifunction=on,netdev=dev0,id=swp1 -netdev socket,udp=127.0.0.1:1603,localaddr=127.0.0.1:1604,id=dev1 -device virtio-net-pci,mac=00:02:00:00:00:06,addr=6.1,multifunction=off,netdev=dev1,id=swp2 -netdev socket,udp=127.0.0.1:1609,localaddr=127.0.0.1:1610,id=dev2 -device virtio-net-pci,mac=00:02:00:00:00:11,addr=6.2,multifunction=off,netdev=dev2,id=swp3 /var/lib/libvirt/images/spine01.qcow2
Log in to the Switches
Log in to each switch with the cumulus account and default password cumulus. When you log in for the first time, you are prompted to change the default password.
If you are using Cumulus VX 4.1.1 or earlier, the default password is CumulusLinux!. You are not prompted to change the default password.
Basic Switch Configuration
Run these commands on each switch to change the hostname and bring up the interfaces. Exit the switch, then log back in to see the new hostname at the prompt.
cumulus@cumulus:mgmt:~$ nv set system hostname leaf01
cumulus@cumulus:mgmt:~$ nv set interface swp1,2,3
cumulus@cumulus:mgmt:~$ nv config apply
cumulus@cumulus:mgmt:~$ nv set system hostname leaf02
cumulus@cumulus:mgmt:~$ nv set interface swp1,2,3
cumulus@cumulus:mgmt:~$ nv config apply
cumulus@cumulus:mgmt:~$ nv set system hostname spine01
cumulus@cumulus:mgmt:~$ nv set interface swp1,2
cumulus@cumulus:mgmt:~$ nv config apply
cumulus@cumulus:mgmt:~$ exit
Verify Configuration
Run the following commands on each switch to verify the configuration:
It might take a few minutes for the LLDP information to update. If your command output is different from the output shown below, wait a few minutes, then run the command again.
cumulus@leaf01:mgmt:~$ nv show interface lldp
Interface  Speed  Type  Remote Host      Remote Port
---------  -----  ----  ---------------  -----------------
swp1       1G     swp   spine01          swp1
swp2       1G     swp   leaf02           swp2
swp3       1G     swp   leaf02           swp3
cumulus@leaf02:mgmt:~$ nv show interface lldp
Interface  Speed  Type  Remote Host      Remote Port
---------  -----  ----  ---------------  -----------------
swp1       1G     swp   spine01          swp2
swp2       1G     swp   leaf01           swp2
swp3       1G     swp   leaf01           swp3
cumulus@spine01:mgmt:~$ nv show interface lldp
Interface  Speed  Type  Remote Host      Remote Port
---------  -----  ----  ---------------  -----------------
swp1       1G     swp   leaf01          swp1
swp2       1G     swp   leaf02           swp1
Run the following commands on each switch to show system information:
cumulus@leaf01:mgmt:~$ nv show system
                   operational                                    applied
-----------------  ---------------------------------------------  -------
uptime             8 days, 23:54:37
hostname           leaf01                                         leaf01
product-name       Cumulus Linux
platform           N/A
system-memory      1.28 GB used / 311.85 MB free / 1.67 GB total
swap-memory        0 Bytes used / 0 Bytes free / 0 Bytes total
health-status      OK
date-time          2023-12-06 00:54:05
status             N/A
timezone           Etc/UTC
version
  onie             N/A
  kernel           6.1.0-cl-1-amd64
  base-os          Debian GNU/Linux 12.10
  product-release  5.13.0
  image
    build-id       5.13.0.0037
    build-date     Wed Apr 23 11:10:31 UTC 2025
Next Steps
- You can update your virtual environment to be able to use the Cumulus Linux on-demand self-paced labs, which are a quick and easy way to learn the fundamentals.
- Try NVIDIA Air, which is a free, personal, virtual data center network that provides a low-effort way to see Cumulus Networks technology in action. This is a good way to try out Cumulus Linux if you have platform or disk limitations.