Validate Network Protocol and Service Operations
NetQ lets you validate the operation of the network protocols and services running in your network either on demand or on a scheduled basis. NetQ provides three NetQ UI card workflows and several NetQ CLI validation commands to accomplish these checks on protocol and service operations:
- Validate Network card
- Create a new on-demand or scheduled validation request or run a scheduled validation on demand
- View a preview of all scheduled validations
- On-demand Validation Result card
- View the number of devices and sessions tested and their status
- View job configuration
- Scheduled Validation Result card
- View the number and status of runs, filter by failures, paths, and warnings
- View job configuration
netq checkcommand- Create and run an on-demand validation
- View summary results, individual test status, and protocol or service specific info in the terminal window
netq add validationcommand- Create an on-demand or scheduled validation
- View results inline
For a more general understanding of how well your network is operating, refer to the Validate Overall Network Health topic.
On-demand Validations
When you want to validate the operation of one or more network protocols and services right now, you can create and run on-demand validations using the NetQ UI or the NetQ CLI.
Create an On-demand Validation
You can create on-demand validations that contain checks for protocols or services that you suspect might have issues.
Using the NetQ UI, you can create an on-demand validation for multiple protocols or services at the same time. This is handy when the protocols are strongly related regarding a possible issue or if you only want to create one validation request.
To create and run a request containing checks on one or more protocols or services within the NetQ UI:
-
Open the Validate Network card.
Click
(Validation), then click Create a validation.
-
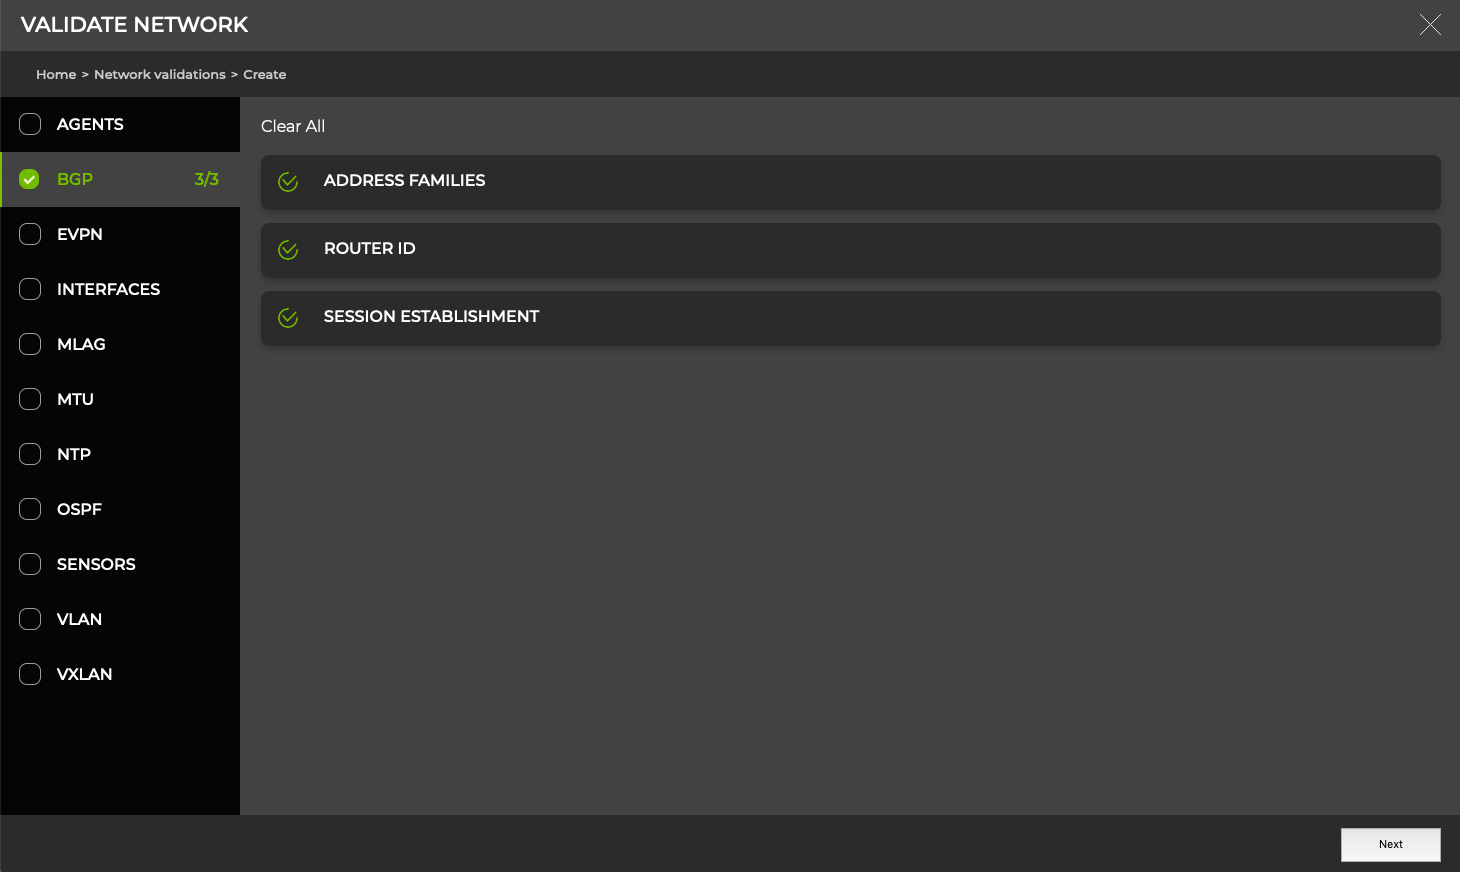
On the left side of the card, select the protocols or services you want to validate by clicking on their names, then click Next.
This example shows BGP.
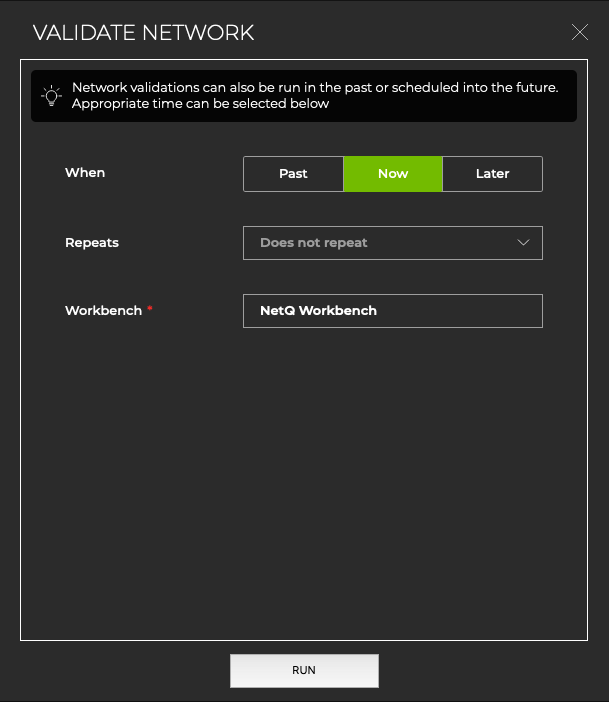
- Specify which workbench you want to run the check on. To run the check in the past, click Past and choose the time from when you want the check to start.
-
Click Run to start the check.
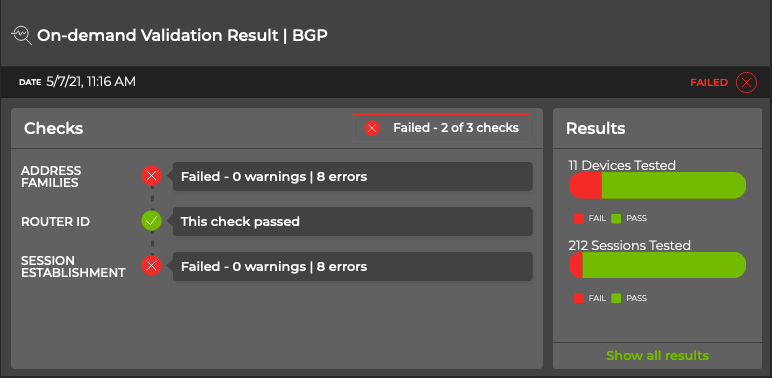
The associated On-demand Validation Result card opens on your workbench. If you selected more than one protocol or service, a card opens for each selection. Refer to View On-demand Validation Results.
To create and run a request containing checks on a single protocol or service all within the NetQ CLI, run the relevant netq check command:
netq check agents [label <text-label-name> | hostnames <text-list-hostnames>] [check_filter_id <text-check-filter-id>] [include <agent-number-range-list> | exclude <agent-number-range-list>] [around <text-time>] [streaming] [json]
netq check bgp [label <text-label-name> | hostnames <text-list-hostnames>] [vrf <vrf>] [check_filter_id <text-check-filter-id>] [include <bgp-number-range-list> | exclude <bgp-number-range-list>] [around <text-time>] [streaming] [json | summary]
netq check cl-version [label <text-label-name> | hostnames <text-list-hostnames>] [match-version <cl-ver> | min-version <cl-ver>] [check_filter_id <text-check-filter-id>] [include <version-number-range-list> | exclude <version-number-range-list>] [around <text-time>] [json | summary]
netq check clag [label <text-label-name> | hostnames <text-list-hostnames> ] [check_filter_id <text-check-filter-id>] [include <clag-number-range-list> | exclude <clag-number-range-list>] [around <text-time>] [streaming] [json | summary]
netq check evpn [mac-consistency] [label <text-label-name> | hostnames <text-list-hostnames>] [check_filter_id <text-check-filter-id>] [include <evpn-number-range-list> | exclude <evpn-number-range-list>] [around <text-time>] [json | summary]
netq check interfaces [label <text-label-name> | hostnames <text-list-hostnames>] [check_filter_id <text-check-filter-id>] [include <interface-number-range-list> | exclude <interface-number-range-list>] [around <text-time>] [streaming] [json | summary]
netq check mlag [label <text-label-name> | hostnames <text-list-hostnames> ] [check_filter_id <text-check-filter-id>] [include <mlag-number-range-list> | exclude <mlag-number-range-list>] [around <text-time>] [streaming] [json | summary]
netq check mtu [label <text-label-name> | hostnames <text-list-hostnames>] [unverified] [check_filter_id <text-check-filter-id>] [include <mtu-number-range-list> | exclude <mtu-number-range-list>] [around <text-time>] [streaming] [json | summary]
netq check ntp [label <text-label-name> | hostnames <text-list-hostnames>] [check_filter_id <text-check-filter-id>] [include <ntp-number-range-list> | exclude <ntp-number-range-list>] [around <text-time>] [streaming] [json | summary]
netq check ospf [label <text-label-name> | hostnames <text-list-hostnames>] [check_filter_id <text-check-filter-id>] [include <ospf-number-range-list> | exclude <ospf-number-range-list>] [around <text-time>] [json | summary]
netq check sensors [label <text-label-name> | hostnames <text-list-hostnames>] [check_filter_id <text-check-filter-id>] [include <sensors-number-range-list> | exclude <sensors-number-range-list>] [around <text-time>] [streaming] [json | summary]
netq check vlan [label <text-label-name> | hostnames <text-list-hostnames>] [unverified] [check_filter_id <text-check-filter-id>] [include <vlan-number-range-list> | exclude <vlan-number-range-list>] [around <text-time>] [json | summary]
netq check vxlan [label <text-label-name> | hostnames <text-list-hostnames>] [check_filter_id <text-check-filter-id>] [include <vxlan-number-range-list> | exclude <vxlan-number-range-list>] [around <text-time>] [json | summary]
All netq check commands have a summary and test results section. Some have additional summary information.
This example shows a validation of the EVPN protocol.
cumulus@switch:~$ netq check evpn
evpn check result summary:

Total nodes         : 6
Checked nodes       : 6
Failed nodes        : 0
Rotten nodes        : 0
Warning nodes       : 0

Additional summary:
Total VNIs          : 5
Failed BGP Sessions : 0
Total Sessions      : 30

EVPN BGP Session Test            : passed
EVPN VNI Type Consistency Test   : passed
EVPN Type 2 Test                 : skipped
EVPN Type 3 Test                 : passed
EVPN Session Test                : passed
Vlan Consistency Test            : passed
Vrf Consistency Test             : passed
L3 VNI RMAC Test                 : skipped
To create a request containing checks on a single protocol or service in the NetQ CLI, run:
netq add validation type (bgp | evpn | interfaces | mlag | mtu | ntp | ospf | sensors | vlan | vxlan) [alert-on-failure]
This example shows the creation of an on-demand BGP validation.
cumulus@switch:~$ netq add validation type bgp
Running job 7958faef-29e0-432f-8d1e-08a0bb270c91 type bgp
The associated Validation Result card is accessible from the full-screen Validate Network card. Refer to View On-demand Validation Results.
Create an On-demand Validation with Selected Tests
You can include or exclude one or more of the various checks performed during a validation. Refer to Validation Checks for a description of the tests for each protocol or service.
To create and run a request containing checks on one or more protocols or services within the NetQ UI:
-
Open the Validate Network card.
Click
(Validation), then click Create a validation.
-
On the left side of the card, select the protocols or services you want to validate by clicking on their names. For each protocol or service, select or deselect the tests you want to include or exclude.
This example shows BGP.
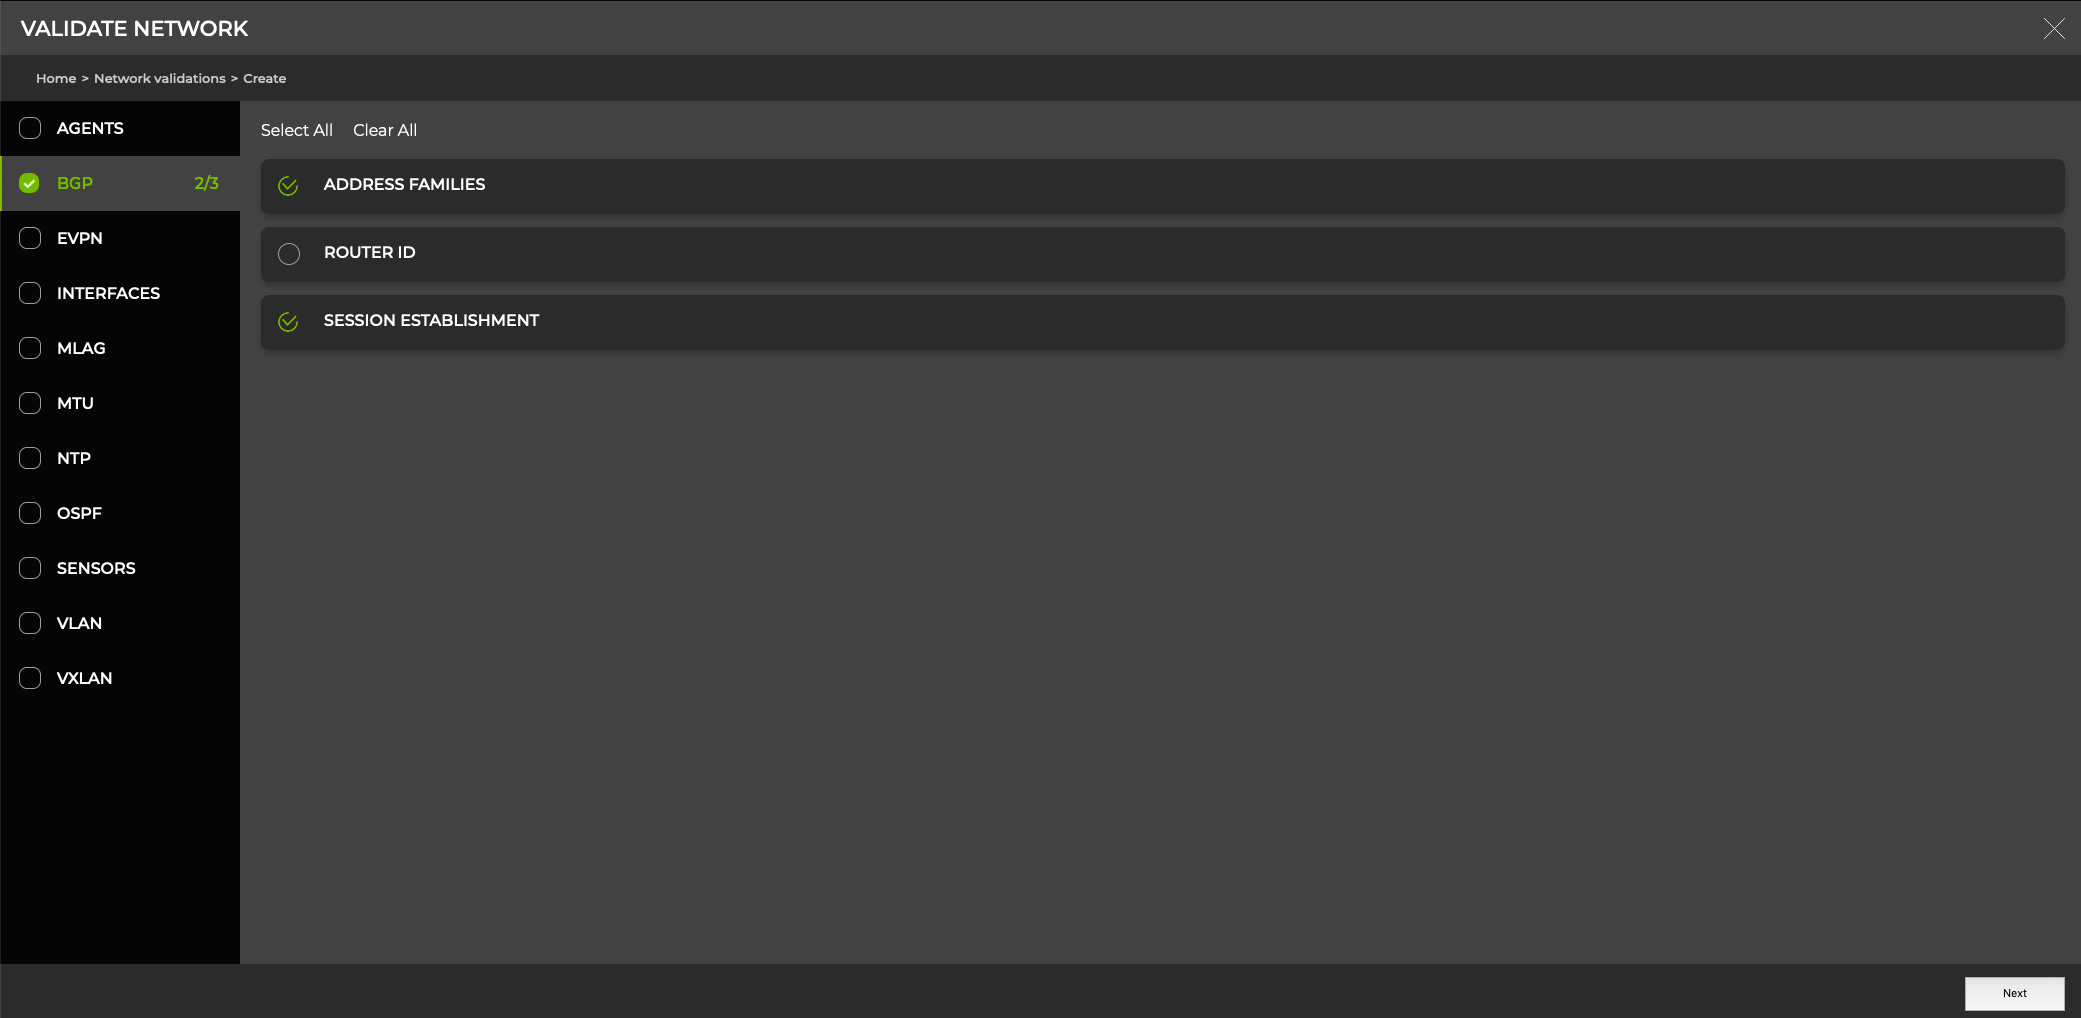
After you’ve made your selection, click Next.
- Specify which workbench you want to run the check on. To run the check in the past, click Past and choose the time from when you want the check to start.

-
Click Run to start the check.
The associated On-demand Validation Result card opens on your workbench. If you selected more than one protocol or service, a card opens for each selection. Refer to View On-demand Validation Results.
Using the include <bgp-number-range-list> and exclude <bgp-number-range-list> options of the netq check command, you can include or exclude one or more of the various checks performed during the validation.
First determine the number of the tests you want to include or exclude. Refer to Validation Checks for a description of these tests and to get the test numbers for the tests to include or exclude. You can also get the test numbers and descriptions when you run the netq show unit-tests command.
Then run the netq check command.
The following example shows a BGP validation that includes only the session establishment and router ID tests. Note that you can obtain the same results using either of the include or exclude options and that the test that is not run is marked as skipped.
cumulus@switch:~$ netq show unit-tests bgp
   0 : Session Establishment     - check if BGP session is in established state
   1 : Address Families          - check if tx and rx address family advertisement is consistent between peers of a BGP session
   2 : Router ID                 - check for BGP router id conflict in the network

Configured global result filters:
Configured per test result filters:
cumulus@switch:~$ netq check bgp include 0,2
bgp check result summary:

Total nodes         : 10
Checked nodes       : 10
Failed nodes        : 0
Rotten nodes        : 0
Warning nodes       : 0

Additional summary:
Total Sessions      : 54
Failed Sessions     : 0

Session Establishment Test   : passed
Address Families Test        : skipped
Router ID Test               : passed
cumulus@switch:~$ netq check bgp exclude 1
bgp check result summary:

Total nodes         : 10
Checked nodes       : 10
Failed nodes        : 0
Rotten nodes        : 0
Warning nodes       : 0

Additional summary:
Total Sessions      : 54
Failed Sessions     : 0

Session Establishment Test   : passed
Address Families Test        : skipped
Router ID Test               : passed
Run an Existing Scheduled Validation On Demand
Sometimes you have a validation scheduled to run at a later time, but you need to run it now.
To run a scheduled validation now:
-
Open the Validate Network card.
Click
(Validation), then click Run an existing validation.
-
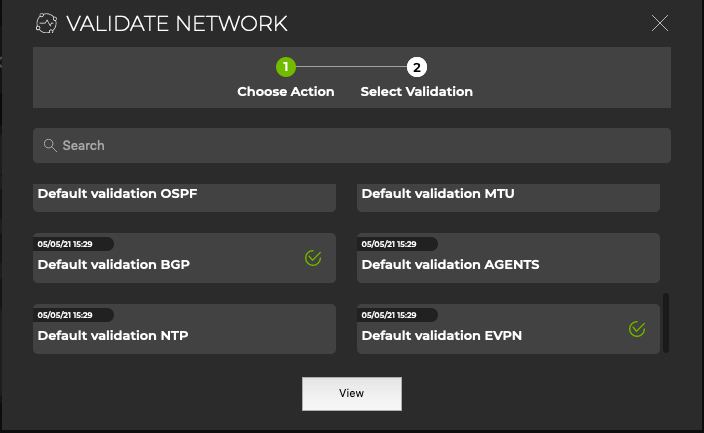
Select one or more validations you want to run by clicking their names, then click View.
-
The associated Validation Result cards open on your workbench. Refer to View On-demand Validation Results.
View On-demand Validation Results
After you have started an on-demand validation, the results are displayed based on how you created the validation request.
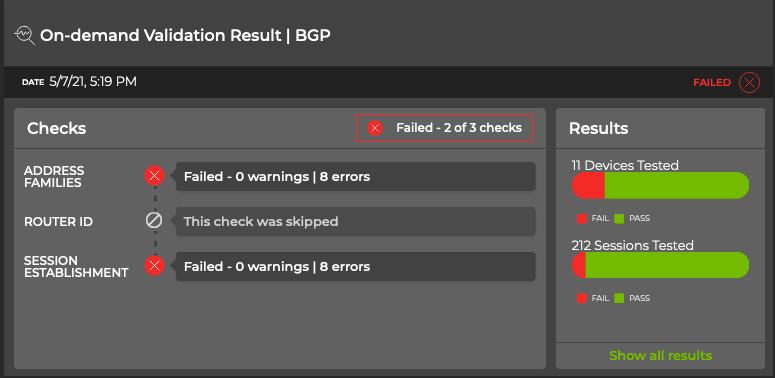
The On-demand Validation Result card workflow enables you to view the results of on-demand validation requests. When a request has started processing, the associated large Validation Result card is displayed on your workbench with an indicator that it is running. When multiple network protocols or services are included in a validation, a validation result card is opened for each protocol and service. After an on-demand validation request has completed, the results are available in the same Validation Result cards.
It might take a few minutes for results to appear if the load on the NetQ system is heavy at the time of the run.
To view the results:
-
Locate the large On-demand Validation Result card on your workbench for the protocol or service check that was run.
You can identify it by the on-demand result icon,
, protocol or service name, and the date and time that it was run.

You can have more than one card open for a given protocol or service, so be sure to use the date and time on the card to ensure you are viewing the correct card.
-
Note the total number and distribution of results for the tested devices and sessions (when appropriate). Are there many failures?
-
Hover over the charts to view the total number of warnings or failures and what percentage of the total results that represents for both devices and sessions.
-
To get more information about the errors reported, hover over the right side of the test and click More Details.
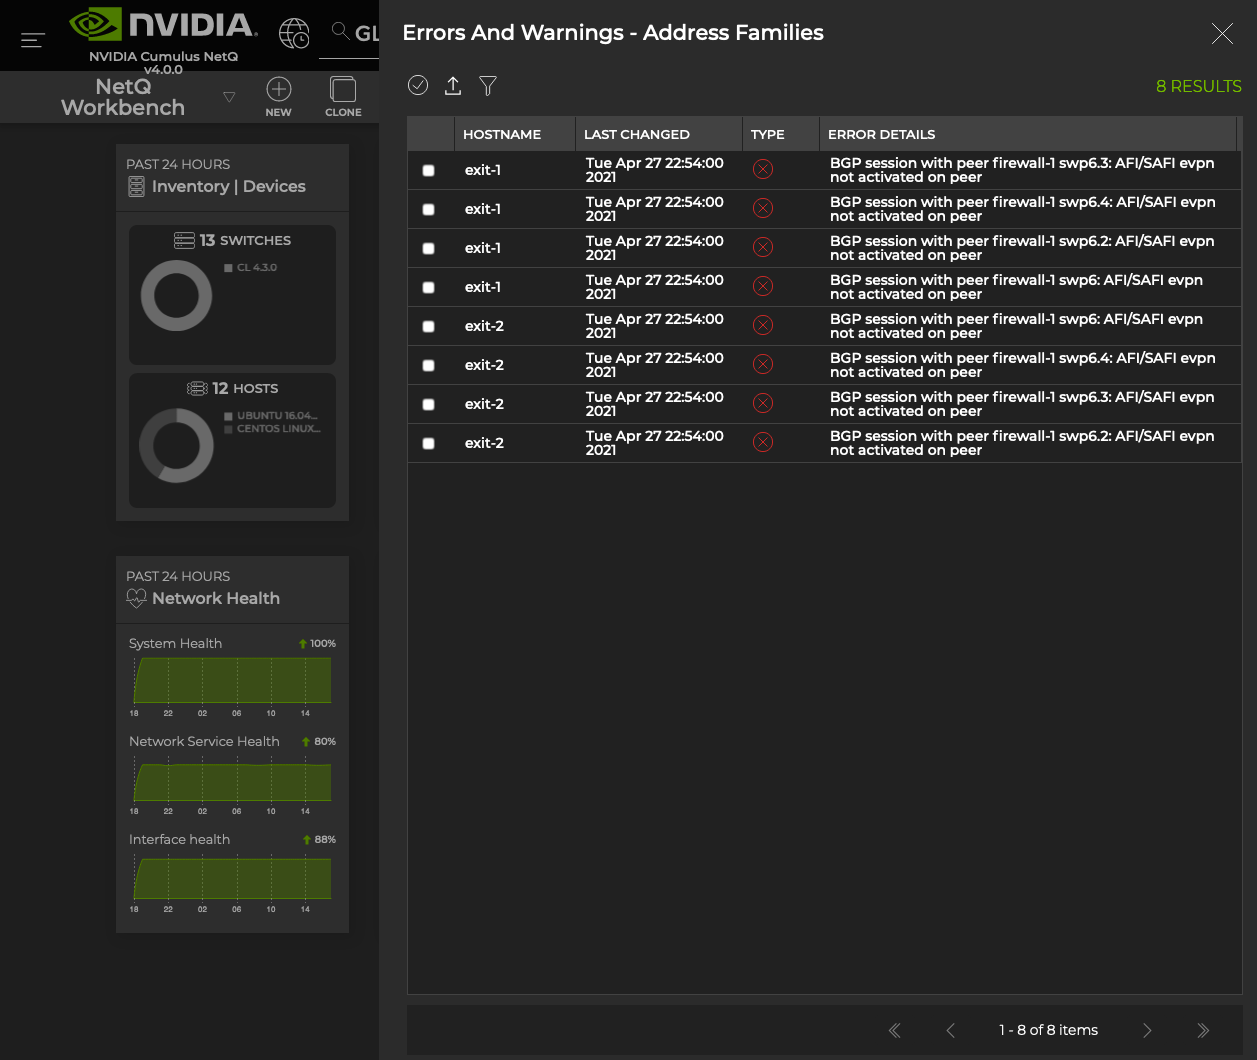
- To view all data available for all on-demand validation results for a given protocol, click Show All Results to switch to the full screen card.
Comparing various results can give you a clue as to why certain devices are experiencing more warnings or failures. For example, more failures occurred between certain times or on a particular device.
netq check command are displayed in the terminal window where you ran the command. See On-demand CLI Validation Examples below.
netq add validation command are displayed in the terminal window where you ran the command. See On-demand CLI Validation Examples below.
On-Demand CLI Validation Examples
This section provides on-demand validation examples for a variety of protocols and elements.
The default validation confirms that the NetQ Agent is running on all monitored nodes and provides a summary of the validation results. This example shows the results of a fully successful validation.
cumulus@switch:~$ netq check agents
agent check result summary:

Checked nodes       : 13
Total nodes         : 13
Rotten nodes        : 0
Failed nodes        : 0
Warning nodes       : 0

Agent Health Test   : passed
Refer to NetQ Agent Validation Tests for descriptions of these tests.
The default validation runs a networkwide BGP connectivity and configuration check on all nodes running the BGP service:
cumulus@switch:~$ netq check bgp
bgp check result summary:

Checked nodes       : 8
Total nodes         : 8
Rotten nodes        : 0
Failed nodes        : 0
Warning nodes       : 0

Additional summary:
Total Sessions      : 30
Failed Sessions     : 0

Session Establishment Test   : passed
Address Families Test        : passed
Router ID Test               : passed
This example indicates that all nodes running BGP and all BGP sessions are running properly. If there were issues with any of the nodes, NetQ would provide information about each node to aid in resolving the issues.
Perform a BGP Validation for a Particular VRF
Using the vrf <vrf> option of the netq check bgp command, you can validate the BGP service where communication is occurring through a particular virtual route. In this example, the name of the VRF of interest is vrf1.
cumulus@switch:~$ netq check bgp vrf vrf1
bgp check result summary:

Checked nodes       : 2
Total nodes         : 2
Rotten nodes        : 0
Failed nodes        : 0
Warning nodes       : 0

Additional summary:
Total Sessions      : 2
Failed Sessions     : 0

Session Establishment Test   : passed
Address Families Test        : passed
Router ID Test               : passed
Perform a BGP Validation with Selected Tests
Using the include <bgp-number-range-list> and exclude <bgp-number-range-list> options, you can include or exclude one or more of the various checks performed during the validation. You can select from the following BGP validation tests:
| Test Number | Test Name |
|---|---|
| 0 | Session Establishment |
| 1 | Address Families |
| 2 | Router ID |
Refer to BGP Validation Tests for a description of these tests.
To include only the session establishment and router ID tests during a validation, run either of these commands:
cumulus@switch:~$ netq check bgp include 0,2

cumulus@switch:~$ netq check bgp exclude 1
Either way, a successful validation output should be similar to the following:
bgp check result summary:

Checked nodes       : 8
Total nodes         : 8
Rotten nodes        : 0
Failed nodes        : 0
Warning nodes       : 0

Additional summary:
Total Sessions      : 30
Failed Sessions     : 0

Session Establishment Test   : passed,
Address Families Test        : skipped
Router ID Test               : passed,
Perform a BGP Validation and Output Results to JSON File
This example shows the default BGP validation results as it appears in a JSON file.
cumulus@switch:~$ netq check bgp json
{
    "tests":{
        "Session Establishment":{
            "suppressed_warnings":0,
            "errors":[

            ],
            "suppressed_errors":0,
            "passed":true,
            "warnings":[

            ],
            "duration":0.0000853539,
            "enabled":true,
            "suppressed_unverified":0,
            "unverified":[

            ]
        },
        "Address Families":{
            "suppressed_warnings":0,
            "errors":[

            ],
            "suppressed_errors":0,
            "passed":true,
            "warnings":[

            ],
            "duration":0.0002634525,
            "enabled":true,
            "suppressed_unverified":0,
            "unverified":[

            ]
        },
        "Router ID":{
            "suppressed_warnings":0,
            "errors":[

            ],
            "suppressed_errors":0,
            "passed":true,
            "warnings":[

            ],
            "duration":0.0001821518,
            "enabled":true,
            "suppressed_unverified":0,
            "unverified":[

            ]
        }
    },
    "failed_node_set":[

    ],
    "summary":{
        "checked_cnt":8,
        "total_cnt":8,
        "rotten_node_cnt":0,
        "failed_node_cnt":0,
        "warn_node_cnt":0
    },
    "rotten_node_set":[

    ],
    "warn_node_set":[

    ],
    "additional_summary":{
        "total_sessions":30,
        "failed_sessions":0
    },
    "validation":"bgp"
}
The default validation (using no options) checks that all switches in the network have a consistent version.
cumulus@switch:~$ netq check cl-version
version check result summary:

Checked nodes       : 12
Total nodes         : 12
Rotten nodes        : 0
Failed nodes        : 0
Warning nodes       : 0


Cumulus Linux Image Version Test   : passed
Refer to Cumulus Linux Version Tests for descriptions of these tests.
The default validation runs a networkwide EVPN connectivity and configuration check on all nodes running the EVPN service. This example shows results for a fully successful validation.
cumulus@switch:~$ netq check evpn
evpn check result summary:

Checked nodes       : 6
Total nodes         : 6
Rotten nodes        : 0
Failed nodes        : 0
Warning nodes       : 0

Additional summary:
Failed BGP Sessions : 0
Total Sessions      : 16
Total VNIs          : 3

EVPN BGP Session Test            : passed,
EVPN VNI Type Consistency Test   : passed,
EVPN Type 2 Test                 : passed,
EVPN Type 3 Test                 : passed,
EVPN Session Test                : passed,
Vlan Consistency Test            : passed,
Vrf Consistency Test             : passed,
Perform an EVPN Validation for a Time in the Past
Using the around option, you can view the state of the EVPN service at a time in the past. Be sure to include the UOM.
cumulus@switch:~$ netq check evpn around 4d
evpn check result summary:

Checked nodes       : 6
Total nodes         : 6
Rotten nodes        : 0
Failed nodes        : 0
Warning nodes       : 0

Additional summary:
Failed BGP Sessions : 0
Total Sessions      : 16
Total VNIs          : 3

EVPN BGP Session Test            : passed,
EVPN VNI Type Consistency Test   : passed,
EVPN Type 2 Test                 : passed,
EVPN Type 3 Test                 : passed,
EVPN Session Test                : passed,
Vlan Consistency Test            : passed,
Vrf Consistency Test             : passed,
Perform an EVPN Validation with Selected Tests
Using the include <evpn-number-range-list> and exclude <evpn-number-range-list> options, you can include or exclude one or more of the various checks performed during the validation. You can select from the following EVPN validation tests:
| Test Number | Test Name |
|---|---|
| 0 | EVPN BGP Session |
| 1 | EVPN VNI Type Consistency |
| 2 | EVPN Type 2 |
| 3 | EVPN Type 3 |
| 4 | EVPN Session |
| 5 | L3 VNI RMAC |
| 6 | VLAN Consistency |
| 7 | VRF Consistency |
Refer to EVPN Validation Tests for descriptions of these tests.
To run only the EVPN Type 2 test:
cumulus@switch:~$ netq check evpn include 2
evpn check result summary:

Checked nodes       : 6
Total nodes         : 6
Rotten nodes        : 0
Failed nodes        : 0
Warning nodes       : 0

Additional summary:
Failed BGP Sessions : 0
Total Sessions      : 0
Total VNIs          : 3

EVPN BGP Session Test            : skipped
EVPN VNI Type Consistency Test   : skipped
EVPN Type 2 Test                 : passed,
EVPN Type 3 Test                 : skipped
EVPN Session Test                : skipped
Vlan Consistency Test            : skipped
Vrf Consistency Test             : skipped
To exclude the BGP session and VRF consistency tests:
cumulus@switch:~$ netq check evpn exclude 0,6
evpn check result summary:

Checked nodes       : 6
Total nodes         : 6
Rotten nodes        : 0
Failed nodes        : 0
Warning nodes       : 0

Additional summary:
Failed BGP Sessions : 0
Total Sessions      : 0
Total VNIs          : 3

EVPN BGP Session Test            : skipped
EVPN VNI Type Consistency Test   : passed,
EVPN Type 2 Test                 : passed,
EVPN Type 3 Test                 : passed,
EVPN Session Test                : passed,
Vlan Consistency Test            : passed,
Vrf Consistency Test             : skipped
To run only the first five tests:
cumulus@switch:~$ netq check evpn include 0-4
evpn check result summary:

Checked nodes       : 6
Total nodes         : 6
Rotten nodes        : 0
Failed nodes        : 0
Warning nodes       : 0

Additional summary:
Failed BGP Sessions : 0
Total Sessions      : 16
Total VNIs          : 3

EVPN BGP Session Test            : passed,
EVPN VNI Type Consistency Test   : passed,
EVPN Type 2 Test                 : passed,
EVPN Type 3 Test                 : passed,
EVPN Session Test                : passed,
Vlan Consistency Test            : skipped
Vrf Consistency Test             : skipped
The default validation runs a networkwide connectivity and configuration check on all interfaces. This example shows results for a fully successful validation.
cumulus@switch:~$ netq check interfaces
interface check result summary:

Checked nodes       : 12
Total nodes         : 12
Rotten nodes        : 0
Failed nodes        : 0
Warning nodes       : 0

Additional summary:
Unverified Ports    : 56
Checked Ports       : 108
Failed Ports        : 0

Admin State Test   : passed,
Oper State Test    : passed,
Speed Test         : passed,
Autoneg Test       : passed,
Perform an Interfaces Validation for a Time in the Past
Using the around option, you can view the state of the interfaces at a time in the past. Be sure to include the UOM.
cumulus@switch:~$ netq check interfaces around 6h
interface check result summary:

Checked nodes       : 12
Total nodes         : 12
Rotten nodes        : 0
Failed nodes        : 0
Warning nodes       : 0

Additional summary:
Unverified Ports    : 56
Checked Ports       : 108
Failed Ports        : 0


Admin State Test   : passed,
Oper State Test    : passed,
Speed Test         : passed,
Autoneg Test       : passed,
Perform an Interfaces Validation with Selected Tests
Using the include <interface-number-range-list> and exclude <interface-number-range-list> options, you can include or exclude one or more of the various checks performed during the validation. You can select from the following interface validation tests:
| Test Number | Test Name |
|---|---|
| 0 | Admin State |
| 1 | Oper State |
| 2 | Speed |
| 3 | Autoneg |
Refer to Interface Validation Tests for descriptions of these tests.
The default validate verifies that all corresponding interface links have matching MTUs. This example shows no mismatches.
cumulus@switch:~$ netq check mtu
mtu check result summary:

Checked nodes       : 12
Total nodes         : 12
Rotten nodes        : 0
Failed nodes        : 0
Warning nodes       : 0

Additional summary:
Warn Links          : 0
Failed Links        : 0
Checked Links       : 196

Link MTU Consistency Test   : passed,
VLAN interface Test         : passed,
Bridge interface Test       : passed,
Refer to Link MTU Validation Tests for descriptions of these tests.
The default validation runs a networkwide MLAG connectivity and configuration check on all nodes running the MLAG service. This example shows results for a fully successful validation.
cumulus@switch:~$ netq check mlag
mlag check result summary:

Checked nodes       : 4
Total nodes         : 4
Rotten nodes        : 0
Failed nodes        : 0
Warning nodes       : 0

Peering Test             : passed,
Backup IP Test           : passed,
Clag SysMac Test         : passed,
VXLAN Anycast IP Test    : passed,
Bridge Membership Test   : passed,
Spanning Tree Test       : passed,
Dual Home Test           : passed,
Single Home Test         : passed,
Conflicted Bonds Test    : passed,
ProtoDown Bonds Test     : passed,
SVI Test                 : passed,
You can also run this check using netq check clag and get the same results.
This example shows representative results for one or more failures, warnings, or errors. In particular, you can see that you have duplicate system MAC addresses.
cumulus@switch:~$ netq check mlag
mlag check result summary:

Checked nodes       : 4
Total nodes         : 4
Rotten nodes        : 0
Failed nodes        : 2
Warning nodes       : 0

Peering Test             : passed,
Backup IP Test           : passed,
Clag SysMac Test         : 0 warnings, 2 errors,
VXLAN Anycast IP Test    : passed,
Bridge Membership Test   : passed,
Spanning Tree Test       : passed,
Dual Home Test           : passed,
Single Home Test         : passed,
Conflicted Bonds Test    : passed,
ProtoDown Bonds Test     : passed,
SVI Test                 : passed,

Clag SysMac Test details:
Hostname          Reason
----------------- ---------------------------------------------
leaf01            Duplicate sysmac with leaf02/None
leaf03            Duplicate sysmac with leaf04/None
Perform an MLAG Validation with Selected Tests
Using the include <mlag-number-range-list> and exclude <mlag-number-range-list> options, you can include or exclude one or more of the various checks performed during the validation. You can select from the following MLAG validation tests:
| Test Number | Test Name |
|---|---|
| 0 | Peering |
| 1 | Backup IP |
| 2 | Clag Sysmac |
| 3 | VXLAN Anycast IP |
| 4 | Bridge Membership |
| 5 | Spanning Tree |
| 6 | Dual Home |
| 7 | Single Home |
| 8 | Conflicted Bonds |
| 9 | ProtoDown Bonds |
| 10 | SVI |
Refer to MLAG Validation Tests for descriptions of these tests.
To include only the CLAG SysMAC test during a validation:
cumulus@switch:~$ netq check mlag include 2
mlag check result summary:

Checked nodes       : 4
Total nodes         : 4
Rotten nodes        : 0
Failed nodes        : 2
Warning nodes       : 0

Peering Test             : skipped
Backup IP Test           : skipped
Clag SysMac Test         : 0 warnings, 2 errors,
VXLAN Anycast IP Test    : skipped
Bridge Membership Test   : skipped
Spanning Tree Test       : skipped
Dual Home Test           : skipped
Single Home Test         : skipped
Conflicted Bonds Test    : skipped
ProtoDown Bonds Test     : skipped
SVI Test                 : skipped

Clag SysMac Test details:
Hostname          Reason
----------------- ---------------------------------------------
leaf01            Duplicate sysmac with leaf02/None
leaf03            Duplicate sysmac with leaf04/None
To exclude the backup IP, CLAG SysMAC, and VXLAN anycast IP tests during a validation:
cumulus@switch:~$ netq check mlag exclude 1-3
mlag check result summary:

Checked nodes       : 4
Total nodes         : 4
Rotten nodes        : 0
Failed nodes        : 0
Warning nodes       : 0

Peering Test             : passed,
Backup IP Test           : skipped
Clag SysMac Test         : skipped
VXLAN Anycast IP Test    : skipped
Bridge Membership Test   : passed,
Spanning Tree Test       : passed,
Dual Home Test           : passed,
Single Home Test         : passed,
Conflicted Bonds Test    : passed,
ProtoDown Bonds Test     : passed,
SVI Test                 : passed,
The default validation checks for synchronization of the NTP server with all nodes in the network. It is always important to have your devices in time synchronization to ensure that you can track configuration and management events and can make correlations between events.
This example shows that server04 has an error.
cumulus@switch:~$ netq check ntp
ntp check result summary:

Checked nodes       : 12
Total nodes         : 12
Rotten nodes        : 0
Failed nodes        : 1
Warning nodes       : 0

Additional summary:
Unknown nodes       : 0
NTP Servers         : 3

NTP Sync Test   : 0 warnings, 1 errors,

NTP Sync Test details:
Hostname          NTP Sync Connect Time
----------------- -------- -------------------------
server04          no       2019-09-17 19:21:47
Refer to NTP Validation Tests for descriptions of these tests.
The default validation runs a networkwide OSPF connectivity and configuration check on all nodes running the OSPF service. This example shows results several errors in the Timers and Interface MTU tests.
cumulus@switch:~# netq check ospf
Checked nodes: 8, Total nodes: 8, Rotten nodes: 0, Failed nodes: 4, Warning nodes: 0, Failed Adjacencies: 4, Total Adjacencies: 24

Router ID Test        : passed
Adjacency Test        : passed
Timers Test           : 0 warnings, 4 errors
Network Type Test     : passed
Area ID Test          : passed
Interface Mtu Test    : 0 warnings, 2 errors
Service Status Test   : passed

Timers Test details:
Hostname          Interface                 PeerID                    Peer IP                   Reason                                        Last Changed
----------------- ------------------------- ------------------------- ------------------------- --------------------------------------------- -------------------------
spine-1           downlink-4                torc-22                   uplink-1                  dead time mismatch                            Mon Jul  1 16:18:33 2019
spine-1           downlink-4                torc-22                   uplink-1                  hello time mismatch                           Mon Jul  1 16:18:33 2019
torc-22           uplink-1                  spine-1                   downlink-4                dead time mismatch                            Mon Jul  1 16:19:21 2019
torc-22           uplink-1                  spine-1                   downlink-4                hello time mismatch                           Mon Jul  1 16:19:21 2019

Interface Mtu Test details:
Hostname          Interface                 PeerID                    Peer IP                   Reason                                        Last Changed
----------------- ------------------------- ------------------------- ------------------------- --------------------------------------------- -------------------------
spine-2           downlink-6                0.0.0.22                  27.0.0.22                 mtu mismatch                                  Mon Jul  1 16:19:02 2019
tor-2             uplink-2                  0.0.0.20                  27.0.0.20                 mtu mismatch                                  Mon Jul  1 16:19:37 2019
Refer to OSPF Validation Tests for descriptions of these tests.
Hardware platforms have a number sensors to provide environmental data about the switches. Knowing these are all within range is a good check point for maintenance.
For example, if you had a temporary HVAC failure and you have concerns that some of your nodes are beginning to overheat, you can run this validation to determine if any switches have already reached the maximum temperature threshold.
cumulus@switch:~$ netq check sensors
sensors check result summary:

Checked nodes       : 8
Total nodes         : 8
Rotten nodes        : 0
Failed nodes        : 0
Warning nodes       : 0

Additional summary:
Checked Sensors     : 136
Failed Sensors      : 0

PSU sensors Test           : passed,
Fan sensors Test           : passed,
Temperature sensors Test   : passed,
Refer to Sensor Validation Tests for descriptions of these tests.
Validate the VLAN configuration and that they are operating properly:
cumulus@switch:~$ netq check vlan
vlan check result summary:

Checked nodes       : 12
Total nodes         : 12
Rotten nodes        : 0
Failed nodes        : 0
Warning nodes       : 0

Additional summary:
Failed Link Count   : 0
Total Link Count    : 196

Link Neighbor VLAN Consistency Test   : passed,
Clag Bond VLAN Consistency Test       : passed,
Refer to VLAN Validation Tests for descriptions of these tests.
Validate the VXLAN configuration and that they are operating properly:
cumulus@switch:~$ netq check vxlan
vxlan check result summary:

Checked nodes       : 6
Total nodes         : 6
Rotten nodes        : 0
Failed nodes        : 0
Warning nodes       : 0

Vlan Consistency Test   : passed,
BUM replication Test    : passed,
This command validates both asymmetric and symmetric VXLAN configurations.
Refer to VXLAN Validation Tests for descriptions of these tests.
Scheduled Validations
When you want to see validation results on a regular basis, it is useful to configure a scheduled validation request to avoid re-creating the request each time. You can create up to 15 scheduled validations for a given NetQ system.
By default, a scheduled validation for each protocol and service runs every hour. You do not need to create a scheduled validation for these unless you want it to run at a different interval. You cannot remove the default validations, but they do not count as part of the 15-validation limit.
Create a Scheduled Validation
You can create scheduled validations using the NetQ UI and the NetQ CLI.
You might want to create a scheduled validation that runs more often than the default validation if you are investigating an issue with a protocol or service. You might also want to create a scheduled validation that runs less often than the default validation if you prefer a longer term performance trend. Use the following instructions based on how you want to create the validation.
Sometimes it is useful to run validations on more than one protocol simultaneously. This gives a view into any potential relationship between the protocols or services status. For example, you might want to compare NTP with Agent validations if NetQ Agents are losing connectivity or the data appears to be collected at the wrong time. It would help determine if loss of time synchronization is causing the issue. You create simultaneous validations using the NetQ UI only.
-
Open the Validate Network card.
Click
(Validation), then click Create a validation.
-
On the left side of the card, select the protocols or services you want to validate by clicking on their names, then click Next.
-
Select whether you want to run the check now or later, and on which workbench.
To run the check now, select how frequently it repeats and on which workbench to run the check.
To run the check later, click Later then choose when to start the check, how frequently to repeat the check (every 30 minutes, 1 hour, 3 hours, 6 hours, 12 hours, or 1 day), and on which workbench to run the check.

-
Click Schedule to schedule the check.
To see the card with the other network validations, click View. If you selected more than one protocol or service, a card opens for each selection.
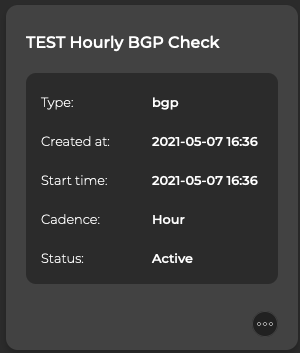
To view the card on your workbench, click Open card. If you selected more than one protocol or service, a card opens for each selection.
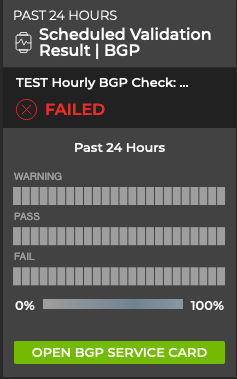
To create a scheduled request containing checks on a single protocol or service in the NetQ CLI, run:
netq add validation name <text-new-validation-name> type (agents | bgp | evpn | interfaces | mlag | mtu | ntp | ospf | sensors | vlan | vxlan) interval <text-time-min>
This example shows the creation of a BGP validation run every 15 minutes for debugging.
cumulus@switch:~$ netq add validation name Bgp15m type bgp interval 15m
Successfully added Bgp15m running every 15m
The associated Validation Result card is accessible from the full-screen Scheduled Validation Result card. Refer to View Scheduled Validation Results.
You might want to remove this validation after you complete your analysis. Refer to Delete a Scheduled Validation.
View Scheduled Validation Results
After creating scheduled validations with either the NetQ UI or the NetQ CLI, the results appear in the Scheduled Validation Result card. When a request has completed processing, you can access the Validation Result card from the full-screen Validations card. Each protocol and service has its own validation result card, but the content is similar on each.
Granularity of Data Shown Based on Time Period
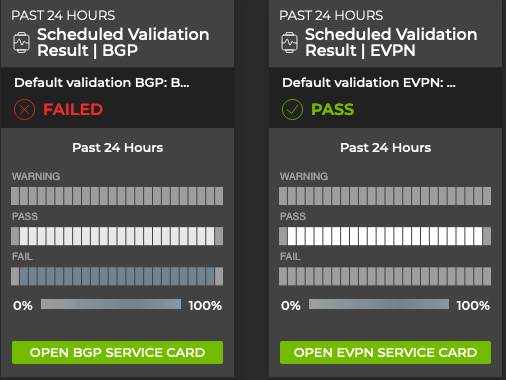
On the medium and large Validation Result cards, vertically stacked heat maps represent the status of the runs; one for passing runs, one for runs with warnings, and one for runs with failures. Depending on the time period of data on the card, the number of smaller time blocks indicate that the status varies. A vertical stack of time blocks, one from each map, includes the results from all checks during that time. The results appear by how saturated the color is for each block. If all validations during that time period pass, then the middle block is 100% saturated (white) and the warning and failure blocks are zero % saturated (gray). As warnings and errors increase in saturation, the passing block is proportionally reduced in saturation. The example heat map for a time period of 24 hours shown here uses the most common time periods from the table showing the resulting time blocks and regions.
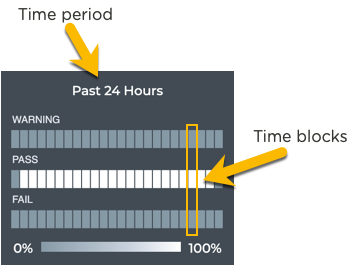
| Time Period | Number of Runs | Number Time Blocks | Amount of Time in Each Block |
|---|---|---|---|
| 6 hours | 18 | 6 | 1 hour |
| 12 hours | 36 | 12 | 1 hour |
| 24 hours | 72 | 24 | 1 hour |
| 1 week | 504 | 7 | 1 day |
| 1 month | 2,086 | 30 | 1 day |
| 1 quarter | 7,000 | 13 | 1 week |
Access and Analyze the Scheduled Validation Results
Once a scheduled validation request has completed, the results are available in the corresponding Validation Result card.
To access the results:
-
Open the Validate Network card.
Click
(Validation), then click Open an existing validation.
-
Select the validation results you want to view, then click View results.
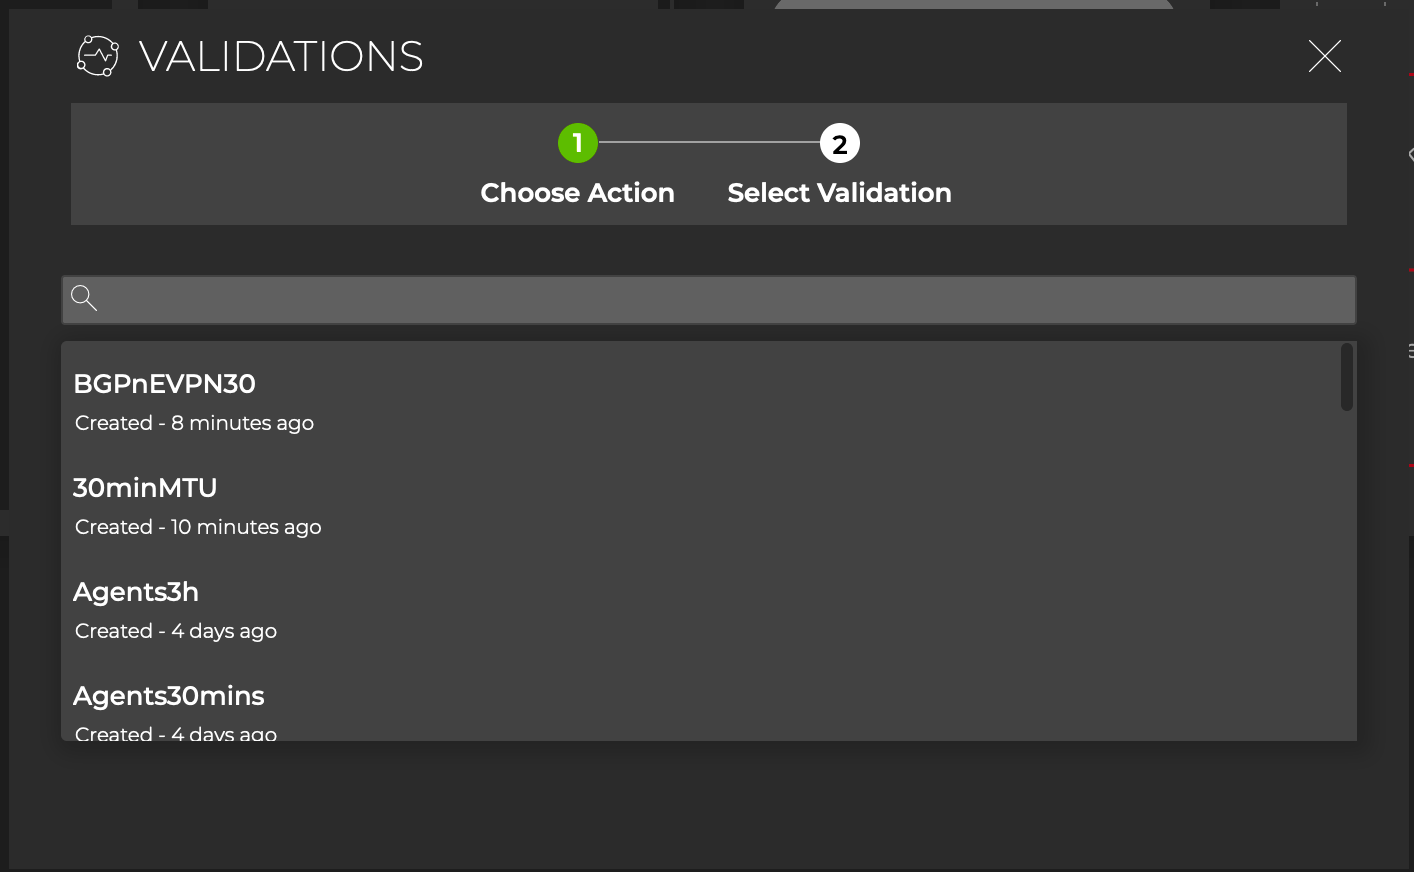
-
The medium Scheduled Validation Result card(s) for the selected items open.
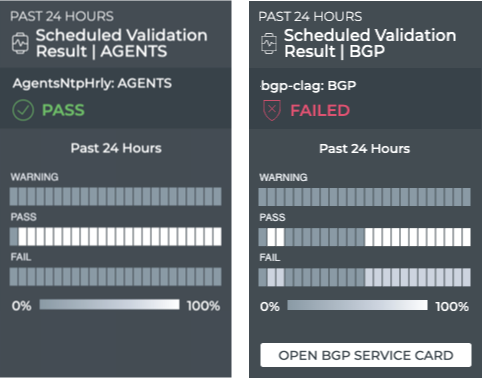
To analyze the results:
-
Note the distribution of results. Are there many failures? Are they concentrated together in time? Has the protocol or service recovered after the failures?
-
Hover over the heat maps to view the status numbers and what percentage of the total results that represents for a given region. The tooltip also shows the number of devices included in the validation and the number with warnings and/or failures. This is useful when you see the failures occurring on a small set of devices, as it might point to an issue with the devices rather than the network service.
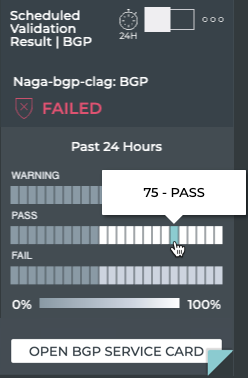
-
Optionally, click Open <network service> Card link to open the medium individual Network Services card. Your current card does not close.
-
Switch to the large Scheduled Validation card using the card size picker.
-
Click
to expand the chart.
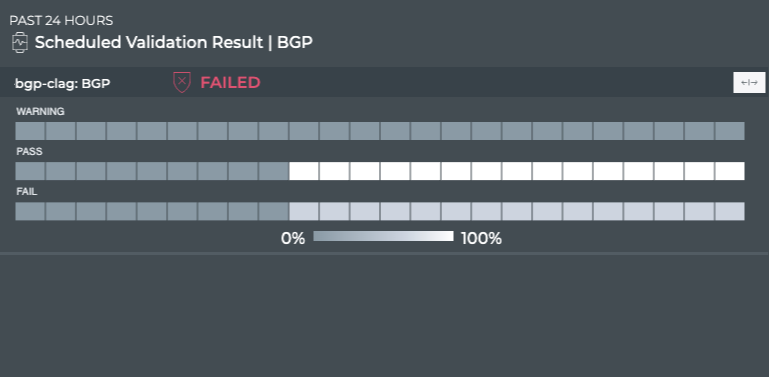
-
Collapse the heat map by clicking
.
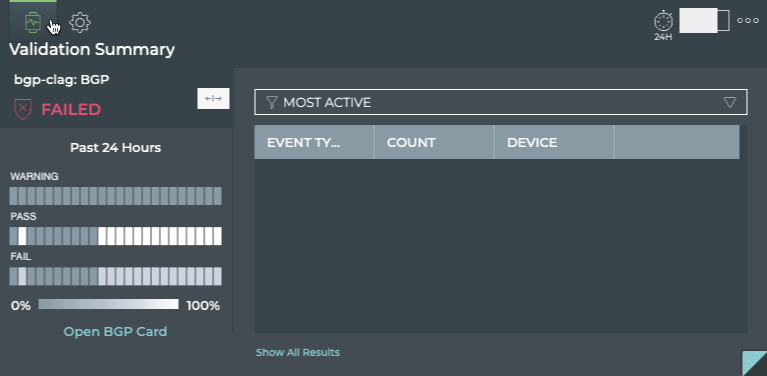
-
If there are a large number of warnings or failures, view the devices with the most issues by clicking Most Active in the filter above the table. This might help narrow the failures down to a particular device or small set of devices that you can investigate further.
-
Select the Most Recent filter above the table to see the events that have occurred in the near past at the top of the list.
-
Optionally, view the health of the protocol or service as a whole by clicking Open <network service> Card (when available).
-
You can view the configuration of the request that produced the results shown on this card workflow, by hovering over the card and clicking
. If you want to change the configuration, click Edit Config to open the large Validate Network card, pre-populated with the current configuration. Follow the instructions in Modify a Scheduled Validation to make your changes.
-
To view all data available for all scheduled validation results for the given protocol or service, click Show All Results or switch to the full screen card.

-
Look for changes and patterns in the results. Scroll to the right. Are there more failed sessions or nodes during one or more validations?
-
Double-click in a given result row to open details about the validation.
From this view you can:
-
See a summary of the validation results by clicking
in the banner under the title. Toggle the arrow to close the summary.
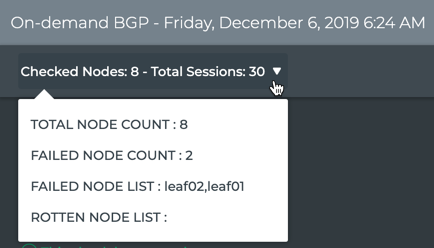
-
See detailed results of each test run to validate the protocol or service. When errors or warnings are present, the nodes and relevant detail is provided.

-
Export the data by clicking Export.
-
Return to the validation jobs list by clicking
.
Comparing various results can give you a clue as to why certain devices are experiencing more warnings or failures. For example, more failures occurred between certain times or on a particular device.
-
Manage Scheduled Validations
You can modify any scheduled validation that you created or remove it altogether at any time. Default validations cannot be removed, modified, or disabled.
Modify a Scheduled Validation
At some point you might want to change the schedule or validation types that are specified in a scheduled validation request. This creates a new validation request and the original validation has the (old) label applied to the name. The old validation can no longer be edited.
When you update a scheduled request, the results for all future runs of the validation will be different than the results of previous runs of the validation.
To modify a scheduled validation:
-
Open the Validate Network card.
Click
(Validation), then click Show all scheduled validations.
-
Hover over the validation then click
to edit it.
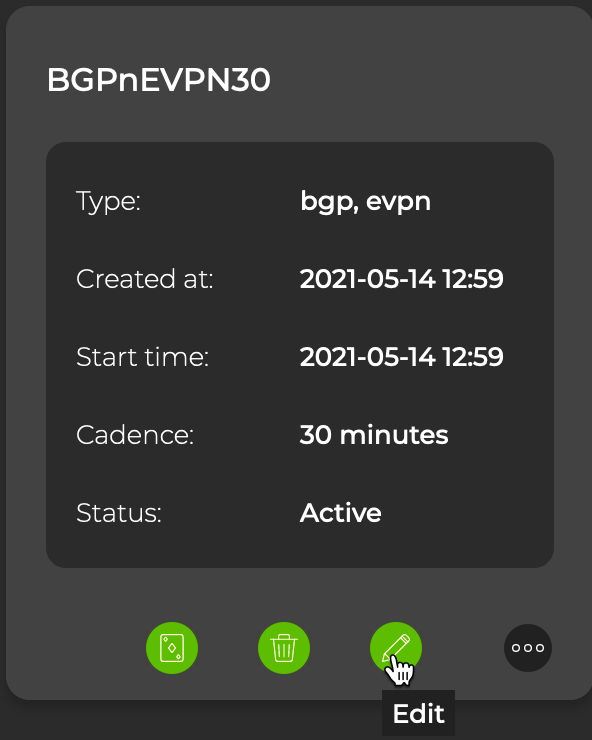
-
Select which checks to add or remove from the validation request.
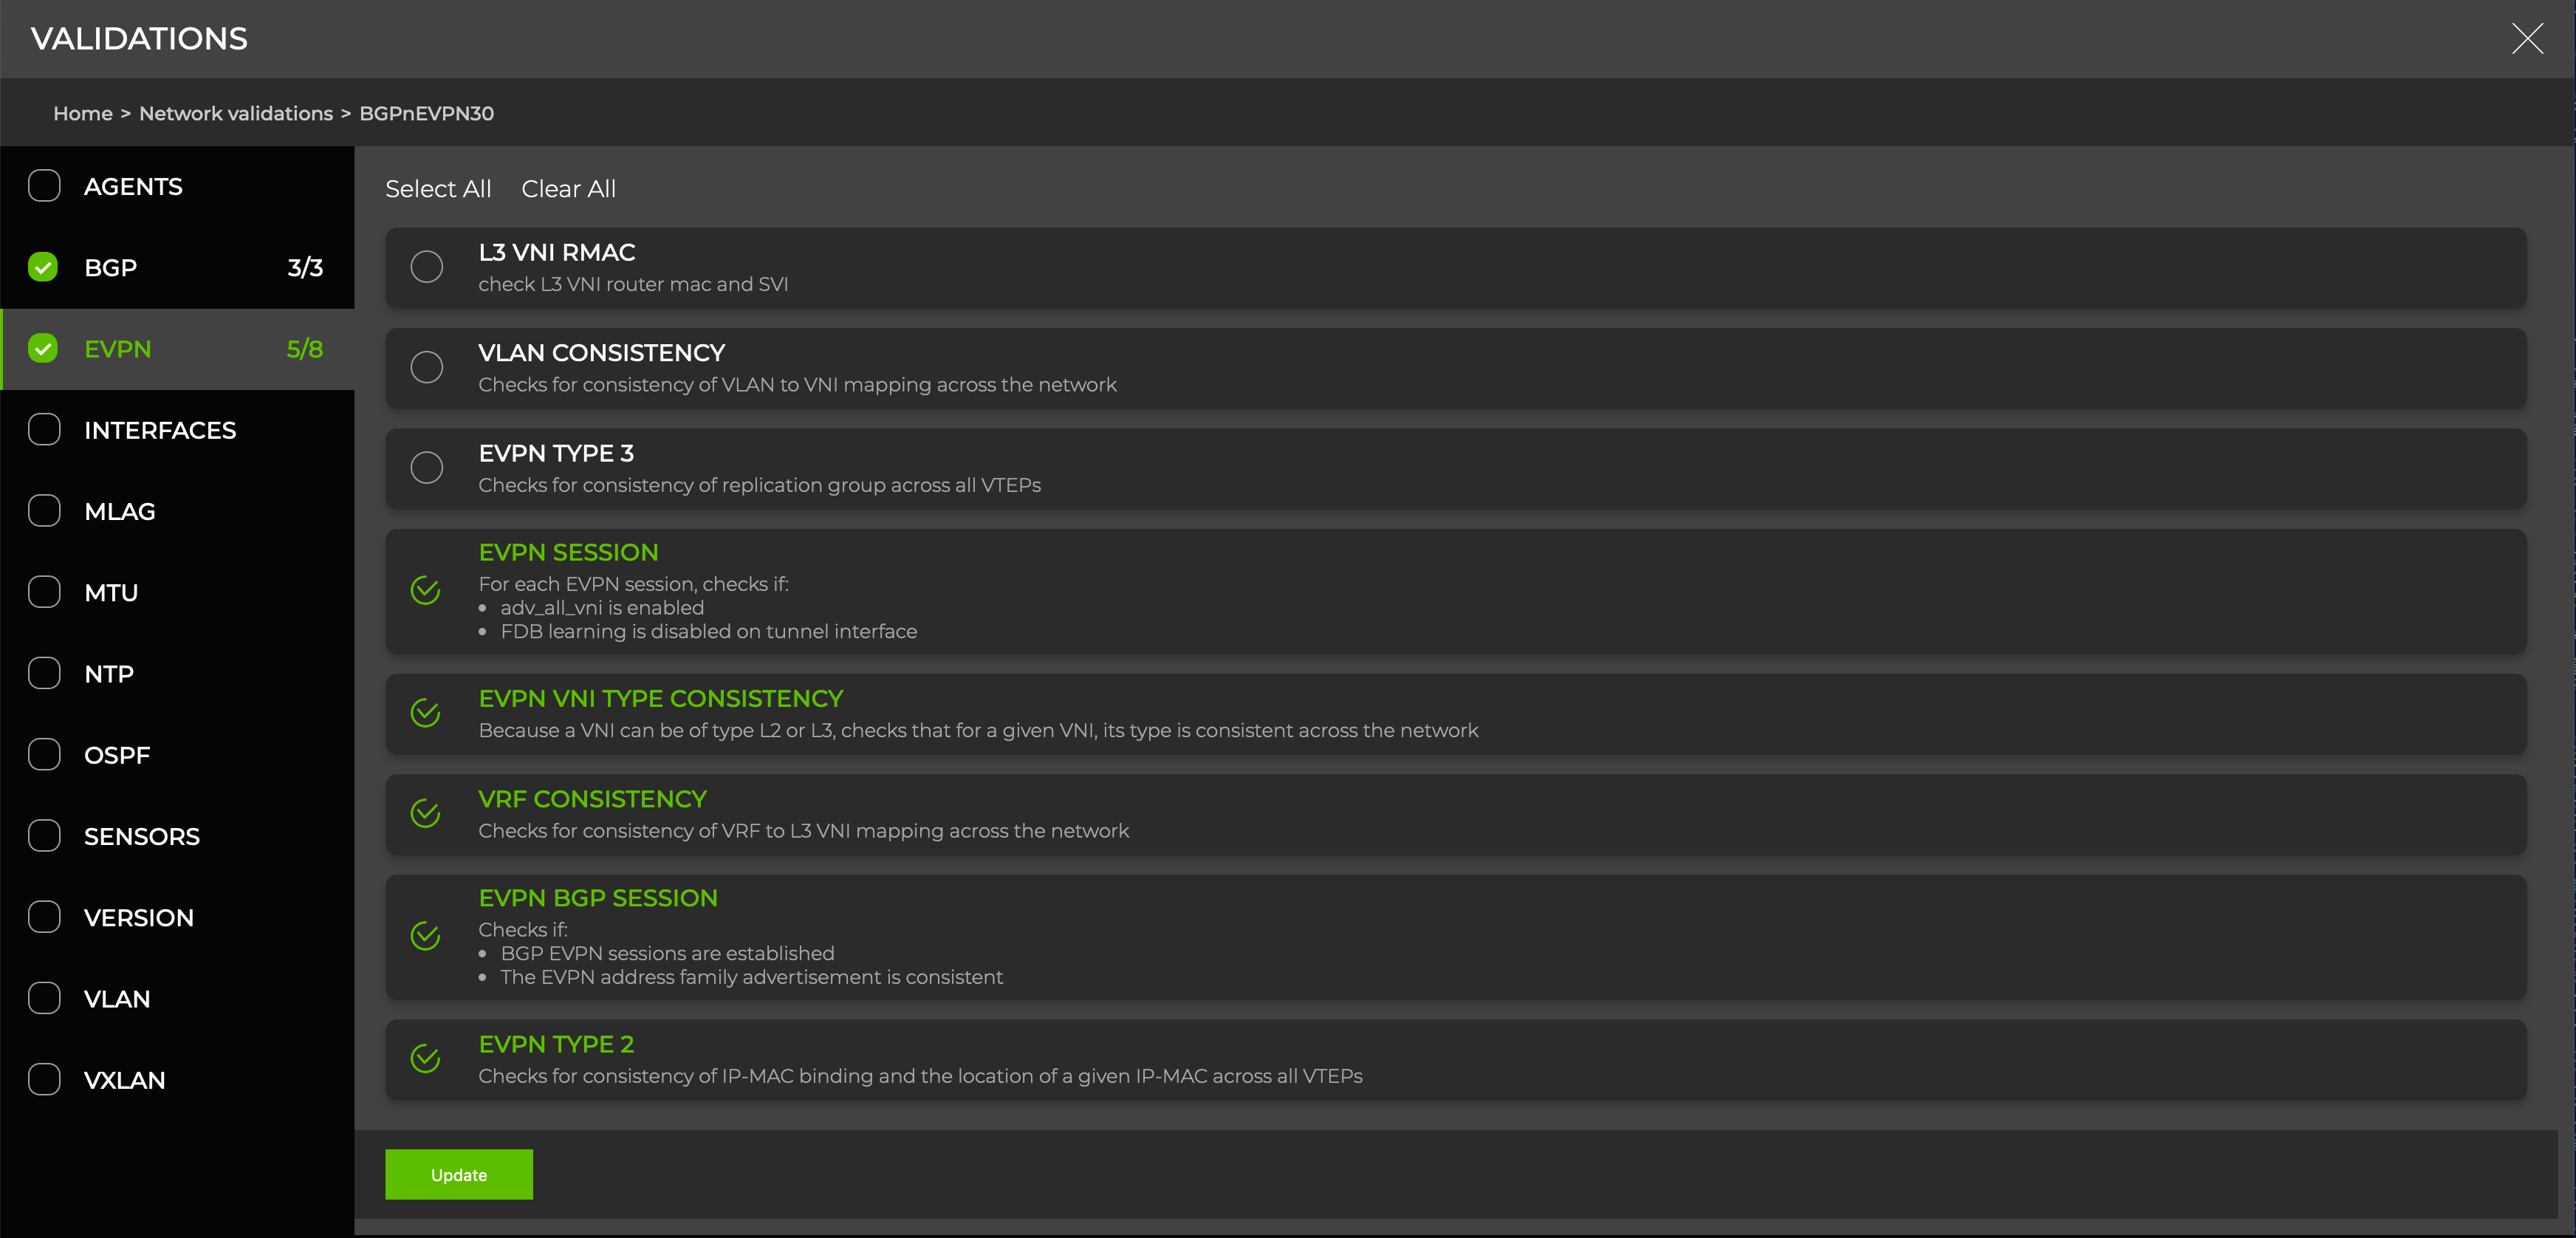
-
Click Update.
-
Change the schedule for the validation, then click Update.
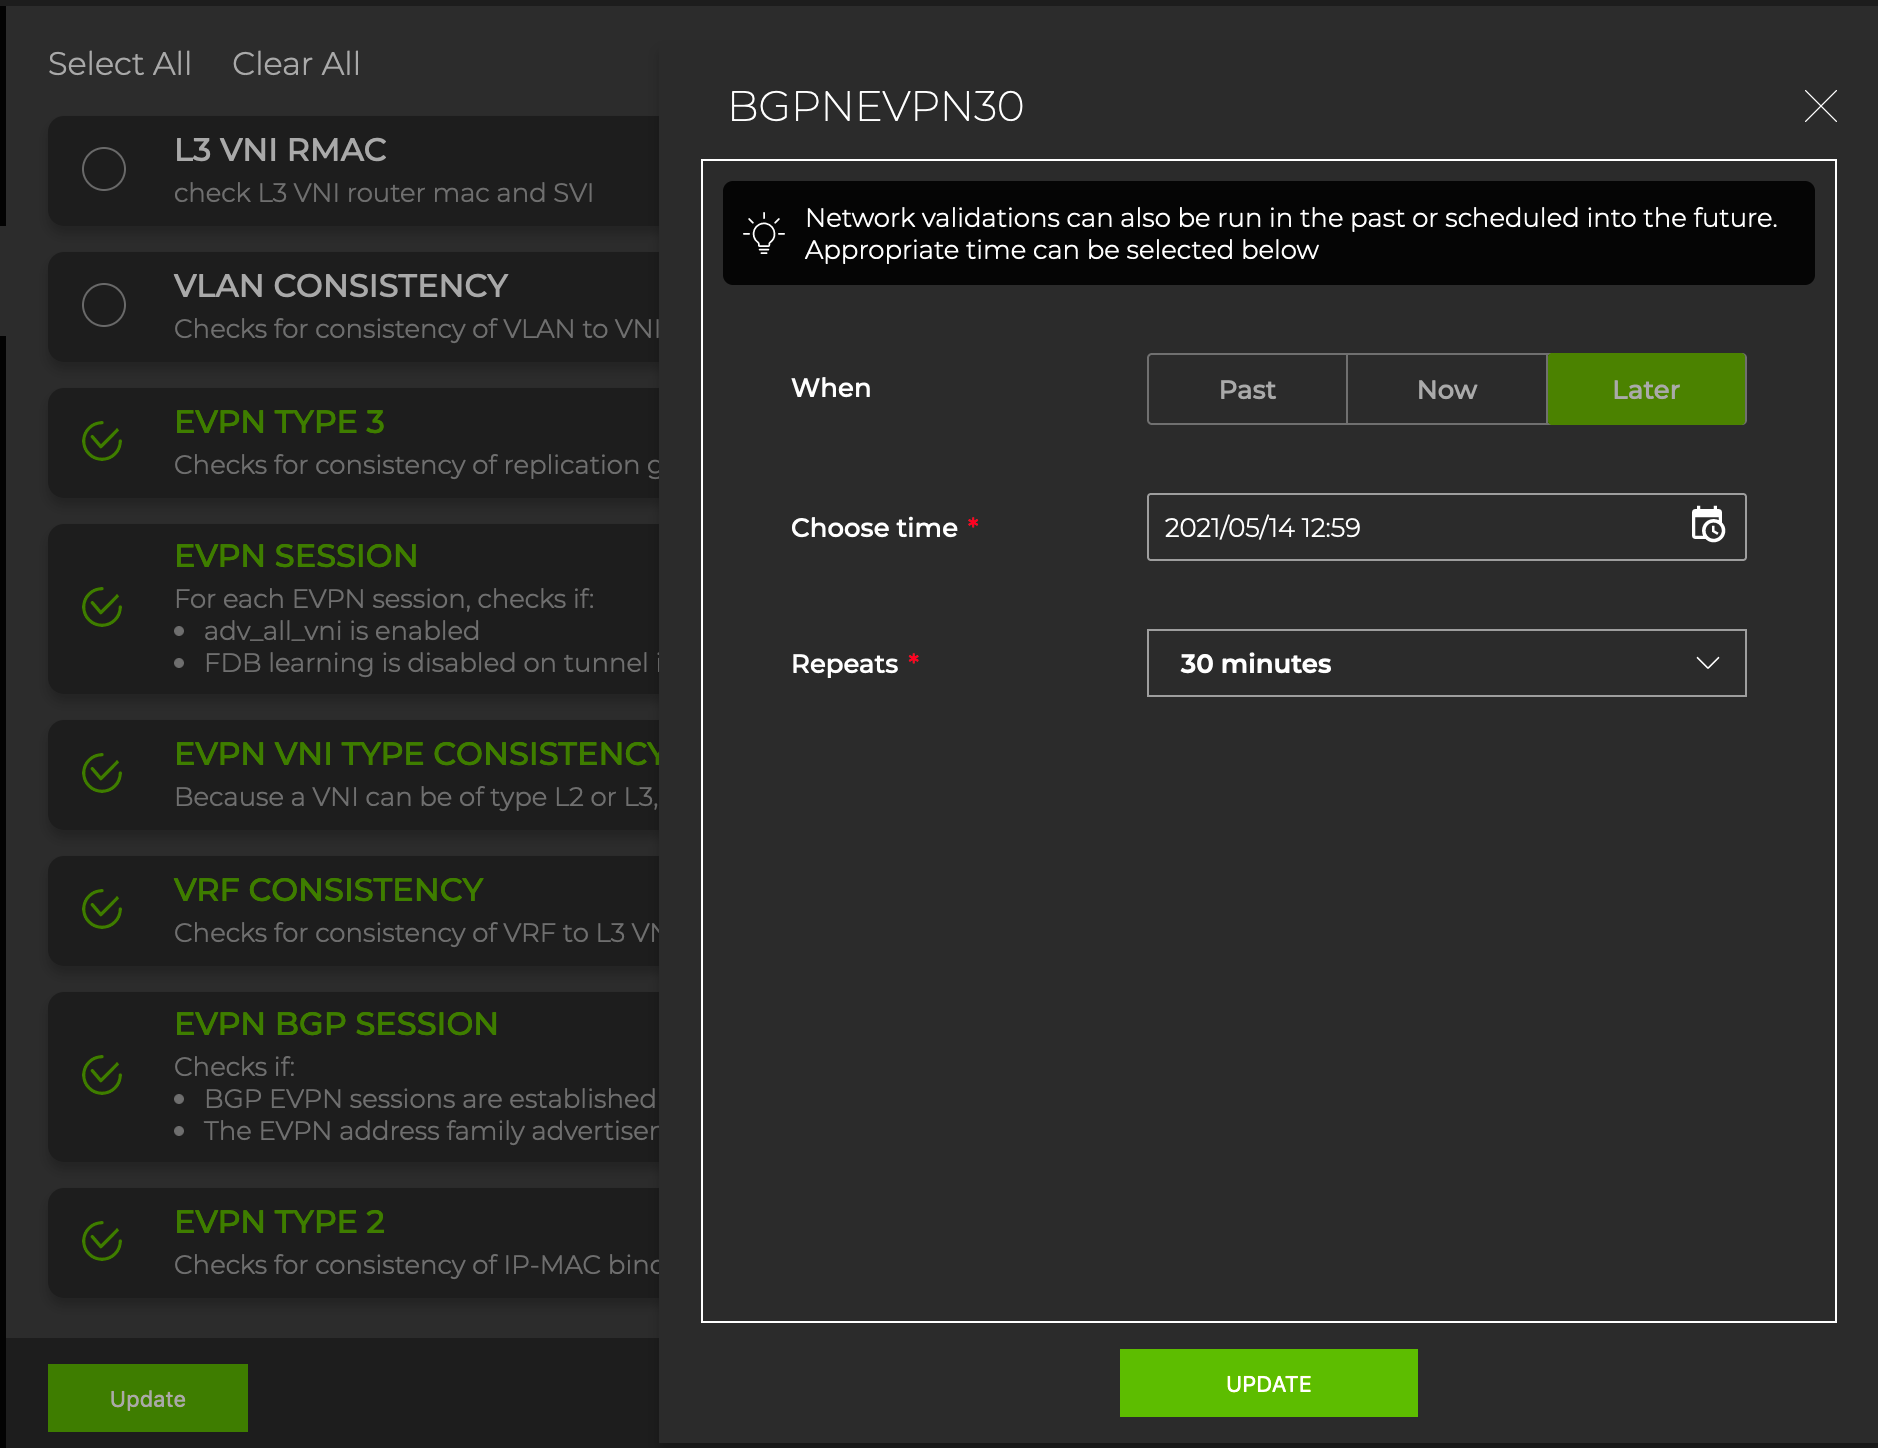
The validation can now be selected from the Validation list (on the small, medium or large size card) and run immediately using Open an existing validation, or you can wait for it to run the first time according to the schedule you specified. Refer to View Scheduled Validation Results.
Delete a Scheduled Validation
You can remove a user-defined scheduled validation at any time using the NetQ UI or the NetQ CLI. Default validations cannot be removed.
-
Open the Validate Network card.
Click
(Validation), then click Show all scheduled validations.
-
Hover over the validation you want to remove.
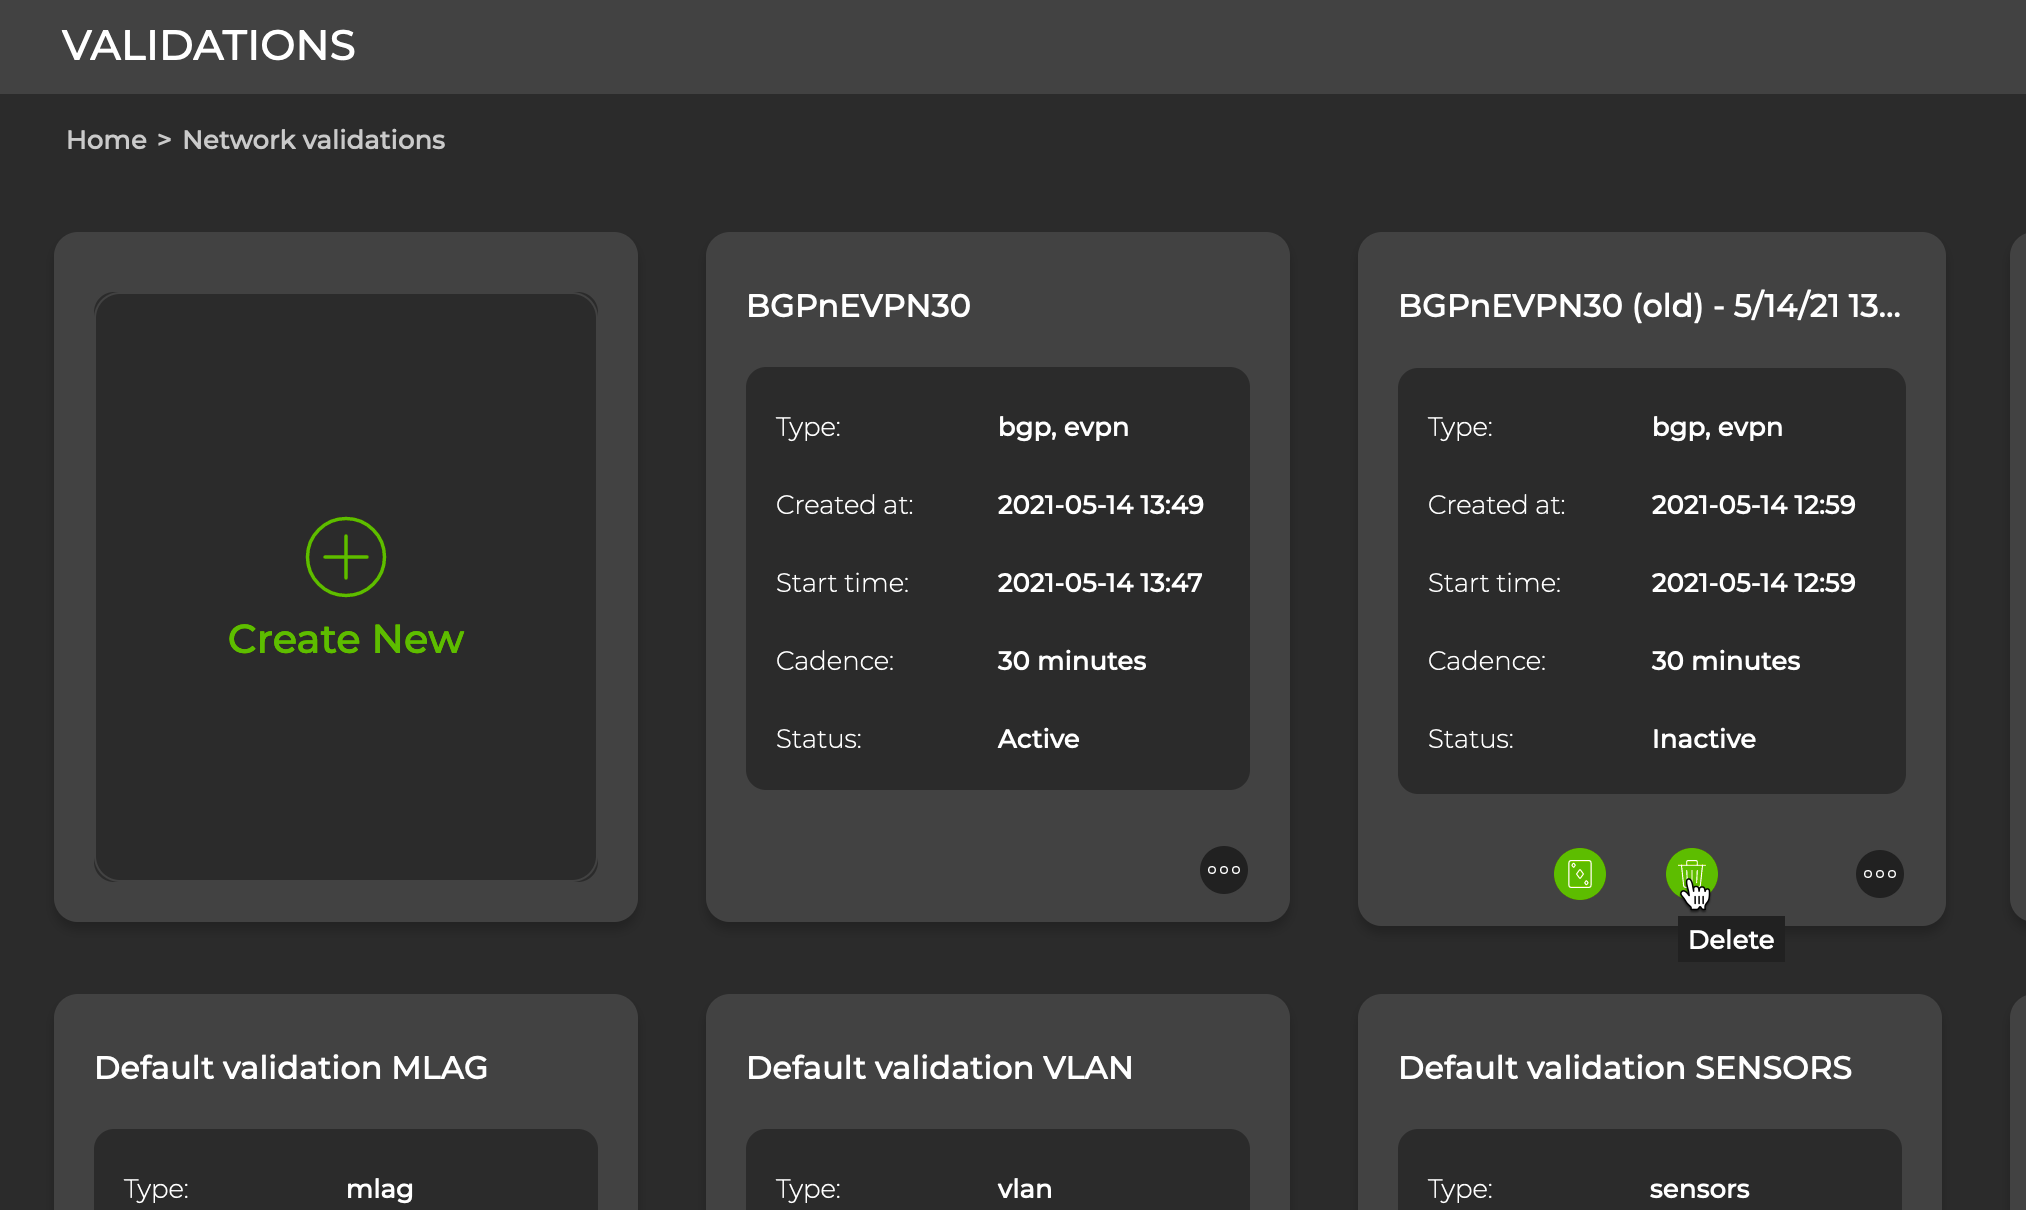
- Click
, then click Yes to confirm.
-
Determine the name of the scheduled validation you want to remove. Run:
netq show validation summary [name <text-validation-name>] type (agents | bgp | evpn | interfaces | mlag | mtu | ntp | ospf | sensors | vlan | vxlan) [around <text-time-hr>] [json]This example shows all scheduled validations for BGP.
cumulus@switch:~$ netq show validation summary type bgp Name Type Job ID Checked Nodes Failed Nodes Total Nodes Timestamp --------------- ---------------- ------------ -------------------------- ------------------------ ---------------------- ------------------------- Bgp30m scheduled 4c78cdf3-24a 0 0 0 Thu Nov 12 20:38:20 2020 6-4ecb-a39d- 0c2ec265505f Bgp15m scheduled 2e891464-637 10 0 10 Thu Nov 12 20:28:58 2020 a-4e89-a692- 3bf5f7c8fd2a Bgp30m scheduled 4c78cdf3-24a 0 0 0 Thu Nov 12 20:24:14 2020 6-4ecb-a39d- 0c2ec265505f Bgp30m scheduled 4c78cdf3-24a 0 0 0 Thu Nov 12 20:15:20 2020 6-4ecb-a39d- 0c2ec265505f Bgp15m scheduled 2e891464-637 10 0 10 Thu Nov 12 20:13:57 2020 a-4e89-a692- 3bf5f7c8fd2a ... -
Remove the validation. Run:
netq del validation <text-validation-name>This example removes the scheduled validation named Bgp15m.
cumulus@switch:~$ netq del validation Bgp15m Successfully deleted validation Bgp15m -
Repeat these steps for additional scheduled validations you want to remove.