Validate Network Protocol and Service Operations
NetQ lets you validate the operation of the network protocols and services running in your network either on demand or on a scheduled basis. NetQ provides three NetQ UI card workflows and several NetQ CLI validation commands to accomplish these checks on protocol and service operations:
- Validation Request card
- Create a new on-demand or scheduled validation request or run a scheduled validation on demand
- View a preview of all scheduled validations
- On-demand Validation Result card
- View the number of devices and sessions tested and their status
- View job configuration
- Scheduled Validation Result card
- View the number and status of runs, filter by failures, paths, and warnings
- View job configuration
netq checkcommand- Create and run an on-demand validation
- View summary results, individual test status, and protocol or service specific info in the terminal window
netq add validationcommand- Create an on-demand or scheduled validation
- View results on On-demand and Scheduled Validation Result cards
For a more general understanding of how well your network is operating, refer to the Validate Overall Network Health topic.
Create On-demand Validations
When you want to validate the operation of one or more network protocols and services right now, you can create and run on-demand validations using the NetQ UI or the NetQ CLI.
Create an On-demand Validation for a Single Protocol or Service
You can create on-demand validations that contain checks for a single protocol or service if you suspect that service may have issues.
To create and run a request containing checks on a single protocol or service all within the NetQ UI:
-
Open the Validation Request card.
Click
 . Click Validation. Click on card. Click Open Cards.
 -
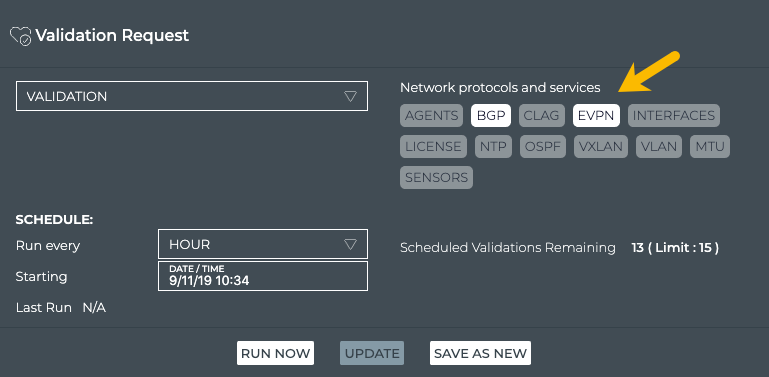
On the right side of the card, select the protocol or service you want to validate by clicking on its name.
When selected it becomes highlighted and Run Now and Save as New become active. Click the name again to remove it to select a different protocol or service.
This example shows the selection of BGP.

-
Click Run Now.
The associated Validation Result card is opened on your workbench. Refer to View On-demand Validation Results.
To create and run a request containing checks on a single protocol or service all within the NetQ CLI, run the relevant netq check command:
netq check agents [hostnames <text-list-hostnames>] [include <agent-number-range-list> | exclude <agent-number-range-list>] [around <text-time>] [json]
netq check bgp [hostnames <text-list-hostnames>] [vrf <vrf>] [include <bgp-number-range-list | |exclude <bgp-number-range-list>] [around <text-time>] [json | summary]
netq check clag [hostnames <text-list-hostnames> ] [include <clag-number-range-list> | exclude <clag-number-range-list>] [around <text-time>] [json | summary]
netq check cl-version [hostnames <text-list-hostnames>] [match-version <cl-ver> | min-version <cl-ver>] [include <version-number-range-list> | exclude <version-number-range-list>] [around <text-time>] [json | summary]
netq check evpn [mac-consistency] [hostnames <text-list-hostnames>] [include <evpn-number-range-list> | exclude <evpn-number-range-list>] [around <text-time>] [json | summary]
netq check interfaces [hostnames <text-list-hostnames>] [include <interface-number-range-list> | exclude <interface-number-range-list>] [around <text-time>] [json | summary]
netq check license [hostnames <text-list-hostnames>] [include <license-number-range-list> | exclude <license-number-range-list>] [around <text-time>] [json | summary]netq check mlag [hostnames <text-list-hostnames> ] [include <mlag-number-range-list> | exclude <mlag-number-range-list>] [around <text-time>] [json | summary]
netq check mtu [hostnames <text-list-hostnames>] [unverified] [include <mtu-number-range-list> | exclude <mtu-number-range-list>] [around <text-time>] [json | summary]
netq check ntp [hostnames <text-list-hostnames>] [include <ntp-number-range-list> | exclude <ntp-number-range-list>] [around <text-time>] [json | summary]
netq check ospf [hostnames <text-list-hostnames>] [include <ospf-number-range-list> | exclude <ospf-number-range-list>] [around <text-time>] [json | summary]
netq check sensors [hostnames <text-list-hostnames>] [include <sensors-number-range-list> | exclude <sensors-number-range-list>] [around <text-time>] [json | summary]
netq check vlan [hostnames <text-list-hostnames>] [unverified] [include <vlan-number-range-list> | exclude <vlan-number-range-list>] [around <text-time>] [json | summary]
netq check vxlan [hostnames <text-list-hostnames>] [include <vxlan-number-range-list> | exclude <vxlan-number-range-list>] [around <text-time>] [json | summary]
All of the netq check commands have a summary and test results section. Some have additional summary information.
This example shows a validation of the EVPN protocol.
cumulus@switch:~$ netq check evpn
evpn check result summary:

Total nodes         : 6
Checked nodes       : 6
Failed nodes        : 0
Rotten nodes        : 0
Warning nodes       : 0

Additional summary:
Total VNIs          : 5
Failed BGP Sessions : 0
Total Sessions      : 30

EVPN BGP Session Test            : passed
EVPN VNI Type Consistency Test   : passed
EVPN Type 2 Test                 : skipped
EVPN Type 3 Test                 : passed
EVPN Session Test                : passed
Vlan Consistency Test            : passed
Vrf Consistency Test             : passed
L3 VNI RMAC Test                 : skipped
Refer to Vaildation Examples for similar examples with other protocols and services.
To create a request containing checks on a single protocol or service in the NetQ CLI and view results in the NetQ UI, run:
netq add validation type (ntp | interfaces | license | sensors | evpn | vxlan | agents | mlag | vlan | bgp | mtu | ospf)
This example shows the creation of an on-demand BGP validation.
cumulus@switch:~$ netq add validation type bgp
Running job 7958faef-29e0-432f-8d1e-08a0bb270c91 type bgp
The associated Validation Result card is accessible from the full-screen Validation Request card. Refer to View On-demand Validation Results.
Create an On-demand Validation for Multiple Protocols or Services
You can create on-demand validations that contain checks for more than on protocol or service at the same time using the NetQ UI. This is handy when the protocols are strongly related with respect to a possible issue or if you only want to create one validation request.
To create and run a request containing checks for more than one protocol and/or service:
-
Open the Validation Request card.
Click
. Click Validation. Click on card. Click Open Cards. -
On the right side of the card, select the protocols and services you want to validate by clicking on their names.
This example shows the selection of BGP and EVPN.
-
Click Run Now to start the validation.
The associated on-demand validation result cards (one per protocol and service selected) are accessible from the full-screen Validation Request card. Refer to View On-demand Validation Results.
Create an On-demand Validation with Selected Tests
Using the include <bgp-number-range-list> and exclude <bgp-number-range-list> options of the netq check command, you can include or exclude one or more of the various checks performed during the validation.
First determine the number of the tests you want to include or exclude. Refer to BGP Validation Tests for a description of these tests. Then run the check command.
This example shows a BGP validation that includes only the session establishment and router ID tests. Note that you can obtain the same results using either of the include or exclude options and that the test that is not run is marked as skipped.
cumulus@switch:~$ netq show unit-tests bgp
   0 : Session Establishment     - check if BGP session is in established state
   1 : Address Families          - check if tx and rx address family advertisement is consistent between peers of a BGP session
   2 : Router ID                 - check for BGP router id conflict in the network

Configured global result filters:
Configured per test result filters:

cumulus@switch:~$ netq check bgp include 0,2
bgp check result summary:

Total nodes         : 10
Checked nodes       : 10
Failed nodes        : 0
Rotten nodes        : 0
Warning nodes       : 0

Additional summary:
Total Sessions      : 54
Failed Sessions     : 0

Session Establishment Test   : passed
Address Families Test        : skipped
Router ID Test               : passed

cumulus@switch:~$ netq check bgp exclude 1
bgp check result summary:

Total nodes         : 10
Checked nodes       : 10
Failed nodes        : 0
Rotten nodes        : 0
Warning nodes       : 0

Additional summary:
Total Sessions      : 54
Failed Sessions     : 0

Session Establishment Test   : passed
Address Families Test        : skipped
Router ID Test               : passed
Refer to Vaildation Examples for similar examples with other protocols and services.
Run an Existing Scheduled Validation On Demand
You may find that although you have a validation scheduled to run at a later time, you would like to run it now.
To run a scheduled validation now:
-
Open the Validation Request card.
Click
. Click Validation. Click on card. Click Open Cards.Optionally, change to the small or medium card using the card size picker.
-
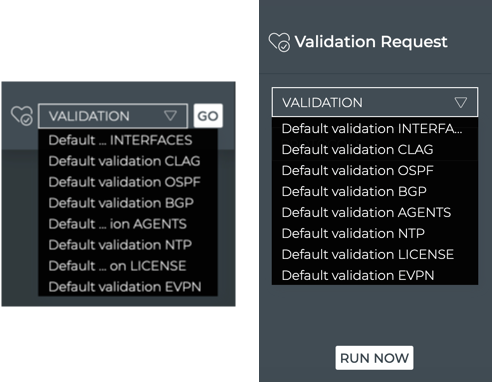
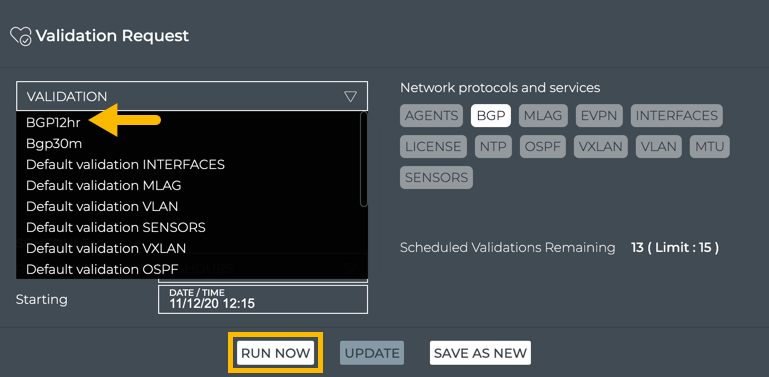
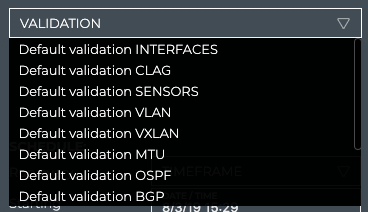
Select the validation from the Validation dropdown list.
-
Click Go or Run Now.
The associated Validation Result card is opened on your workbench. Refer to View On-demand Validation Results.

View On-demand Validation Results
After you have started an on-demand trace, the results are displayed based on how you created the validation request.
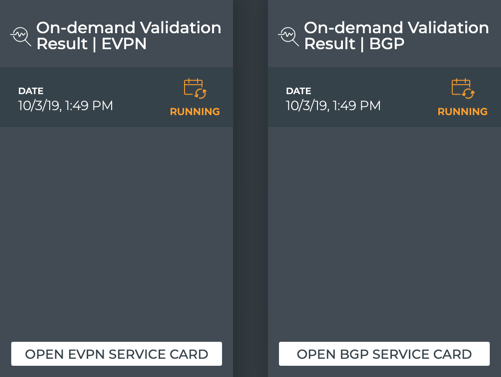
The On-demand Validation Result card workflow enables you to view the results of on-demand validation requests. When a request has started processing, the associated medium Validation Result card is displayed on your workbench with an indicator that it is running. When multiple network protocols or services are included in a validation, a validation result card is opened for each protocol and service. After an on-demand validation request has completed, the results are available in the same Validation Result card/s.
It may take a few minutes for all results to be presented if the load on the NetQ system is heavy at the time of the run.
To view the results:
-
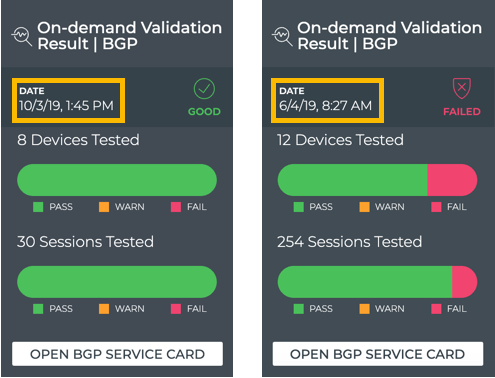
Locate the medium On-demand Validation Result card on your workbench for the protocol or service that was run.
You can identify it by the on-demand result icon,
 , protocol or service name, and the date and time that it was run.
Note: You may have more than one card open for a given protocol or service, so be sure to use the date and time on the card to ensure you are viewing the correct card.
-
Note the total number and distribution of results for the tested devices and sessions (when appropriate). Are there many failures?
-
Hover over the charts to view the total number of warnings or failures and what percentage of the total results that represents for both devices and sessions.
-
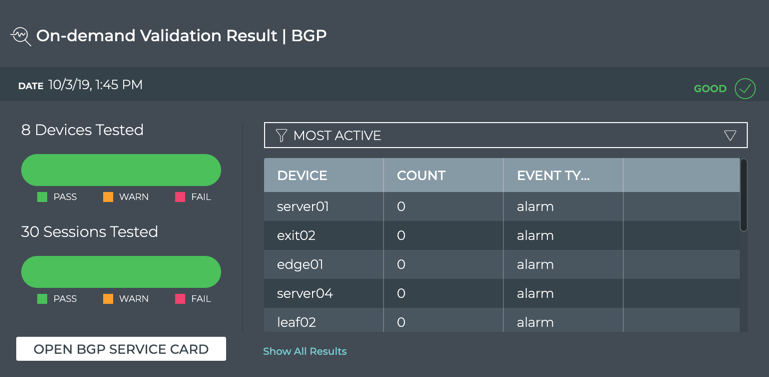
Switch to the large on-demand Validation Result card using the card size picker.
-
If there are a large number of device warnings or failures, view the devices with the most issues in the table on the right. By default, this table displays the Most Active devices. Click on a device name to open its switch card on your workbench.
-
To view the most recent issues, select Most Recent from the filter above the table.
-
If there are a large number of devices or sessions with warnings or failures, the protocol or service may be experiencing issues. View the health of the protocol or service as a whole by clicking Open <network service> Card when available.
-
To view all data available for all on-demand validation results for a given protocol, switch to the full screen card.

-
Double-click in a given result row to open details about the validation.
From this view you can:
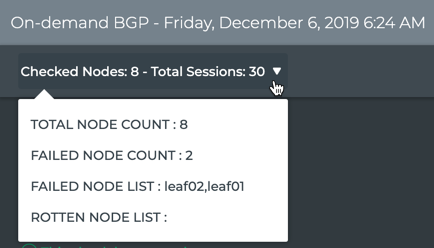
- See a summary of the validation results by clicking
 in the banner under the title. Toggle the arrow to close the summary.
- See detailed results of each test run to validate the protocol or service. When errors or warnings are present, the nodes and relevant detail is provided.
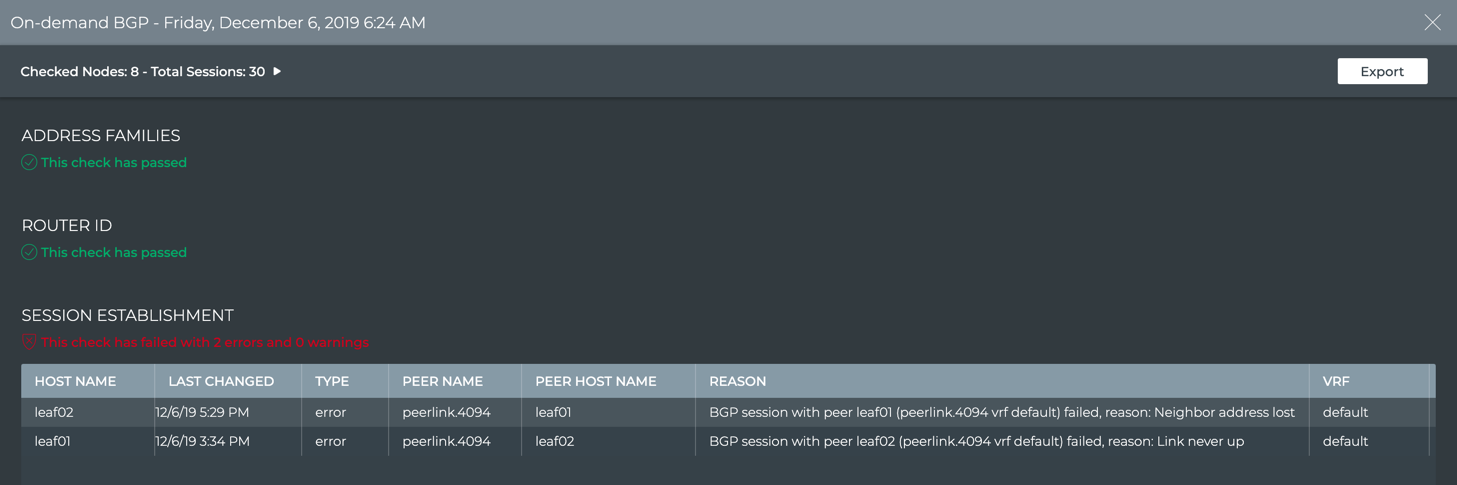
- Export the data by clicking Export.
- Return to the validation jobs list by clicking
 .
.
You may find that comparing various results gives you a clue as to why certain devices are experiencing more warnings or failures. For example, more failures occurred between certain times or on a particular device.
netq check command are displayed in the terminal window where you ran the command. Refer to Create On-demand Validations.
After you have run the netq add validation command, you are able to view the results in the NetQ UI.
-
Open the NetQ UI and log in.
-
Open the xxxx workbench where the associated On-demand Trace Result card has been placed.
To view more details for this and other traces, refer to Detailed On-demand Trace Results.
On-Demand CLI Validation Examples
This section provides on-demand validation examples for a variety of protocols and elements.
Create Scheduled Validations
When you want to see validation results on a regular basis, it is useful to configure a scheduled validation request to avoid re-creating the request each time. You can create up to 15 scheduled validations for a given NetQ system.
By default a scheduled validation for each protocol and service is run every hour. You do not need to create a scheduled validation for these unless you want it to run at a different interval. Default validations cannot be removed, but are not counted as part of the 15-validation limit.
You can create scheduled validations using the NetQ UI and the NetQ CLI.
Create a Scheduled Validation for a Single Protocol or Service
You might want to create a scheduled validation that runs more often than the default validation if you are investigating an issue with a protocol or service. You might also want to create a scheduled validation that runs less often than the default validation if you are interested in a longer term performance trend. Use the following instructions based on how you want to create the validation.
-
Open the Validation Request card.
Click
. Click Validation. Click on card. Click Open Cards. -
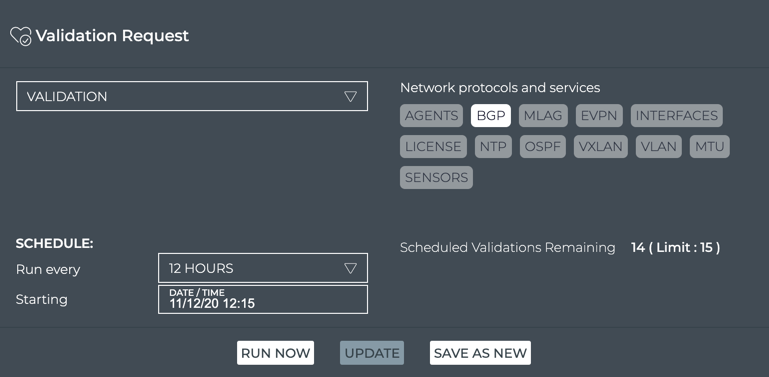
On the right side of the card, select the protocol or service you want to validate by clicking on its name.
When selected it becomes highlighted and Run Now and Save as New become active. Click the name again to remove it to select a different protocol or service.
This example shows the selection of BGP.
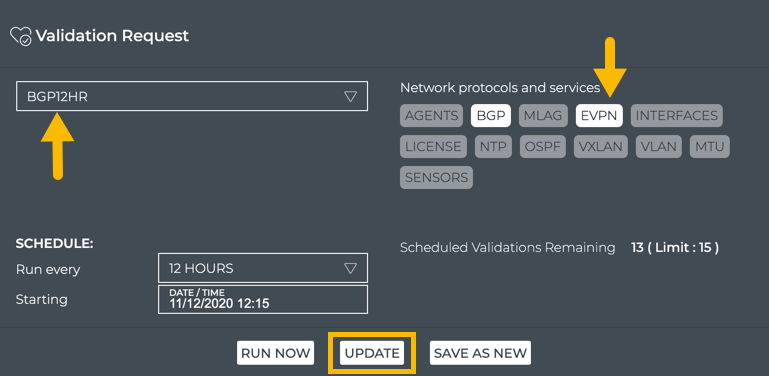
- Enter the schedule frequency (30 min, 1 hour, 3 hours, 6 hours, 12 hours, or 1 day) by selecting it from the Run every list. Default is hourly.

-
Select the time to start the validation runs, by clicking in the Starting field. Select a day and click Next, then select the starting time and click OK.

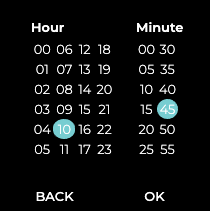
-
Verify the selections were made correctly.
This example shows a scheduled validation for BGP to run avery 12 hours beginning November 12th at 12:15 p.m.
-
Click Save As New.
-
Enter a name for the validation.
Spaces and special characters are not allowed in validation request names.
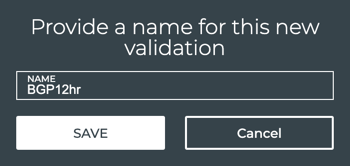
-
Click Save.
The validation can now be selected from the Validation listing (on the small, medium or large size card) and run immediately using Run Now, or you can wait for it to run the first time according to the schedule you specified. Refer to View Scheduled Validation Results. Note that the number of scheduled validations is now two (15 allowed minus 13 remaining = 2).
To create a scheduled request containing checks on a single protocol or service in the NetQ CLI and view results in the NetQ UI, run:
netq add validation name <text-new-validation-name> type (ntp | interfaces | license | sensors | evpn | vxlan | agents | mlag | vlan | bgp | mtu | ospf) interval <text-time-min>
This example shows the creation of a BGP validation run every 15 minutes for debugging.
cumulus@switch:~$ netq add validation name Bgp15m type bgp interval 15m
Successfully added Bgp15m running every 15m
The associated Validation Result card is accessible from the full-screen Scheduled Validation Result card. Refer to View Scheduled Validation Results.
You might want to remove this validation once you complete your analysis. Refer to Delete a Scheduled Validation.
Create a Scheduled Validation for Multiple Protocols or Services
Sometimes it is useful to run validations on more than one protocol simultaneously. This gives a view into any potential relationship between the protocols or services status. For example, you might want to compare NTP with Agent validations if NetQ Agents are losing connectivity or the data appears to be collected at the wrong time. It would help determine if loss of time synchronization is causing the issue.
You can create simultaneous validations using the NetQ UI. You can come close using the NetQ CLI.
-
Open the Validation Request card.
Click
. Click Validation. Click on card. Click Open Cards. -
On the right side of the card, select the protocols and services you want to include in the validation. In this example we have chosen the Agents and NTP services.
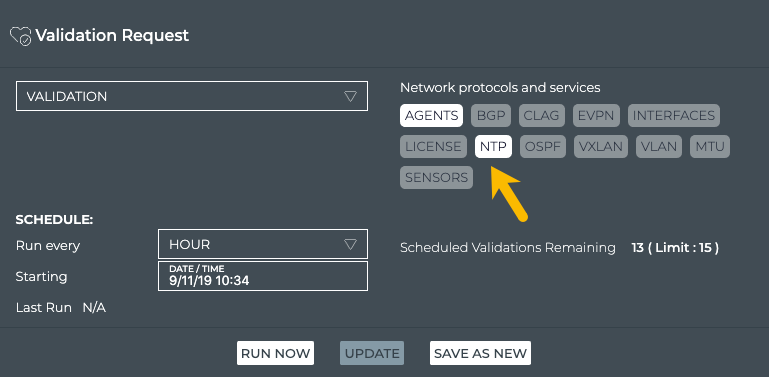
- Enter the schedule frequency (30 min, 1 hour, 3 hours, 6 hours, 12 hours, or 1 day) by selecting it from the Run every list. Default is hourly.
-
Select the time to start the validation runs, by clicking in the Starting field. Select a day and click Next, then select the starting time and click OK.
-
Verify the selections were made correctly.
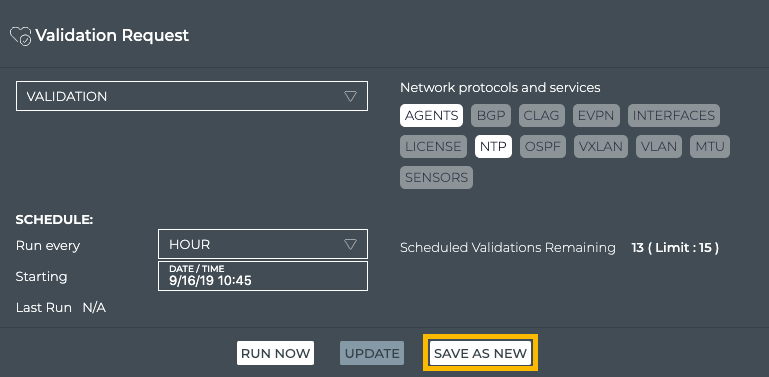
-
Click Save As New.
-
Enter a name for the validation.
Spaces and special characters are not allowed in validation request names.
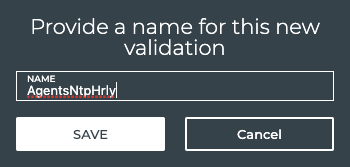
-
Click Save.
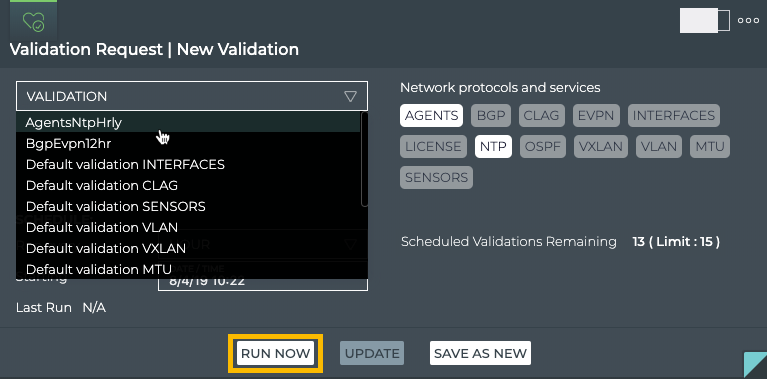
The validation can now be selected from the Validation listing (on the small, medium or large size card) and run immediately using Run Now, or you can wait for it to run the first time according to the schedule you specified. Refer to View Scheduled Validation Results. Note that the number of scheduled validations is now two (15 allowed minus 13 remaining = 2).
To create simultaneous validations for multiple protocols and services with the NetQ CLI, you create each of the desired validations as quickly as possible so they start as close to the same time. To schedule multiple protocol and service validations, run:
netq add validation name <text-new-validation-name> type (ntp | interfaces | license | sensors | evpn | vxlan | agents | mlag | vlan | bgp | mtu | ospf) interval <text-time-min>
This example creates scheduled validations for Agents and NTP:
cumulus@switch:~$ netq add validation name Agents30m type agents interval 30m
Successfully added Agents30m running every 30m
cumulus@switch:~$ netq add validation name Ntp30m type ntp interval 30m
Successfully added Ntp30m running every 30m
The associated Validation Result cards are accessible from the full-screen Scheduled Validation Result card. Refer to View Scheduled Validation Results.
View Scheduled Validation Results
After creating scheduled validations with either the NetQ UI or the NetQ CLI, the results are shown in the Scheduled Validation Result card. When a request has completed processing, you can access the Validation Result card from the full-screen Validation Request card. Each protocol and service has its own validation result card, but the content is similar on each.
Granularity of Data Shown Based on Time Period
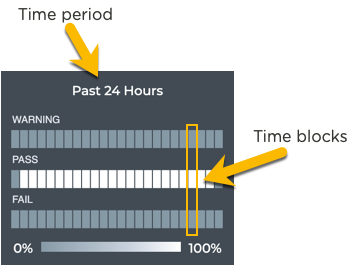
On the medium and large Validation Result cards, the status of the runs is represented in heat maps stacked vertically; one for passing runs, one for runs with warnings, and one for runs with failures. Depending on the time period of data on the card, the number of smaller time blocks used to indicate the status varies. A vertical stack of time blocks, one from each map, includes the results from all checks during that time. The results are shown by how saturated the color is for each block. If all validations during that time period pass, then the middle block is 100% saturated (white) and the warning and failure blocks are zero % saturated (gray). As warnings and errors increase in saturation, the passing block is proportionally reduced in saturation. An example heat map for a time period of 24 hours is shown here with the most common time periods in the table showing the resulting time blocks and regions.
| Time Period | Number of Runs | Number Time Blocks | Amount of Time in Each Block |
|---|---|---|---|
| 6 hours | 18 | 6 | 1 hour |
| 12 hours | 36 | 12 | 1 hour |
| 24 hours | 72 | 24 | 1 hour |
| 1 week | 504 | 7 | 1 day |
| 1 month | 2,086 | 30 | 1 day |
| 1 quarter | 7,000 | 13 | 1 week |
Access and Analyze the Scheduled Validation Results
Once a scheduled validation request has completed, the results are available in the corresponding Validation Result card.
To access the results:
-
Open the Validation Request card.
Click
. Click Validation. Click on card. Click Open Cards. -
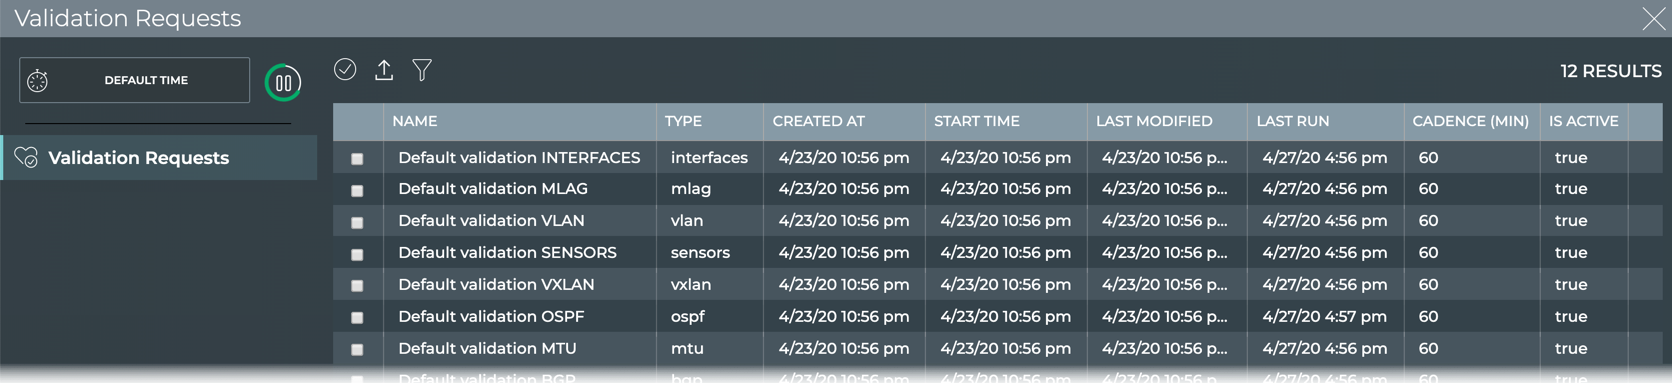
Change to the full-screen card using the card size picker to view all scheduled validations.
-
Select the validation results you want to view.
-
Click
(Open Card). This opens the medium Scheduled Validation Result card/s for the selected items.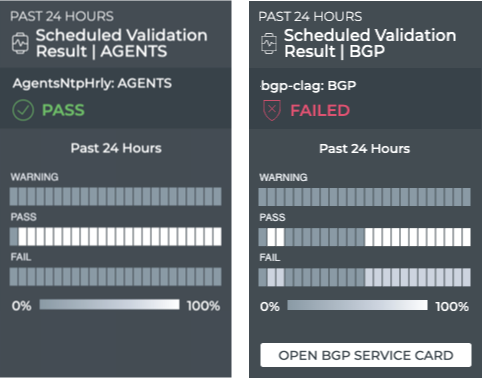
To analyze the results:
-
Note the distribution of results. Are there many failures? Are they concentrated together in time? Has the protocol or service recovered after the failures?
-
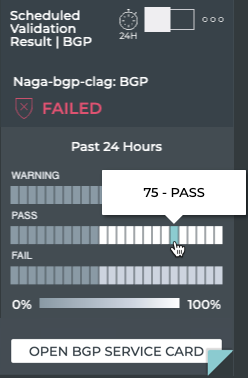
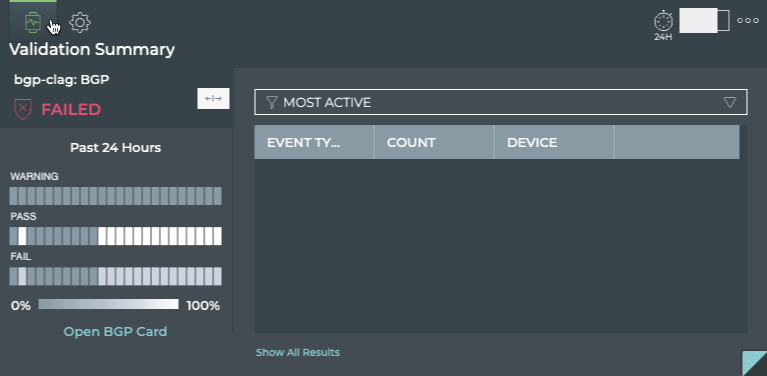
Hover over the heat maps to view the status numbers and what percentage of the total results that represents for a given region. The tooltip also shows the number of devices included in the validation and the number with warnings and/or failures. This is useful when you see the failures occurring on a small set of devices, as it might point to an issue with the devices rather than the network service.
-
Optionally, click Open <network service> Card link to open the medium individual Network Services card. Your current card is not closed.
-
Switch to the large Scheduled Validation card using the card size picker.
-
Click
 to expand the chart.
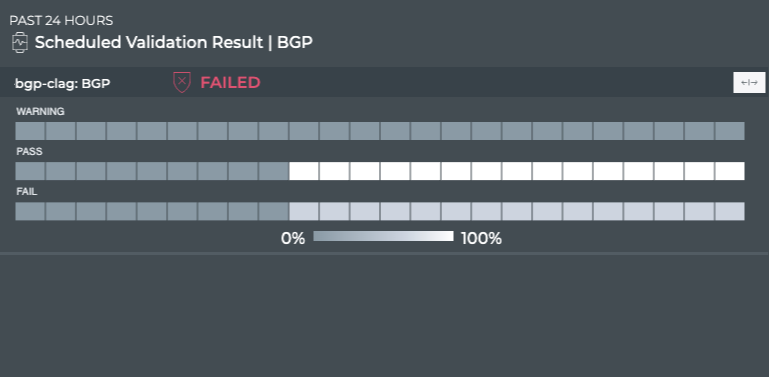
-
Collapse the heat map by clicking
.
-
If there are a large number of warnings or failures, view the devices with the most issues by clicking Most Active in the filter above the table. This might help narrow the failures down to a particular device or small set of devices that you can investigate further.
-
Select the Most Recent filter above the table to see the events that have occurred in the near past at the top of the list.
-
Optionally, view the health of the protocol or service as a whole by clicking Open <network service> Card (when available).
-
You can view the configuration of the request that produced the results shown on this card workflow, by hovering over the card and clicking
 . If you want to change the configuration, click Edit Config to open the large Validation Request card, pre-populated with the current configuration. Follow the instructions in Modify a Scheduled Validation to make your changes.
 -
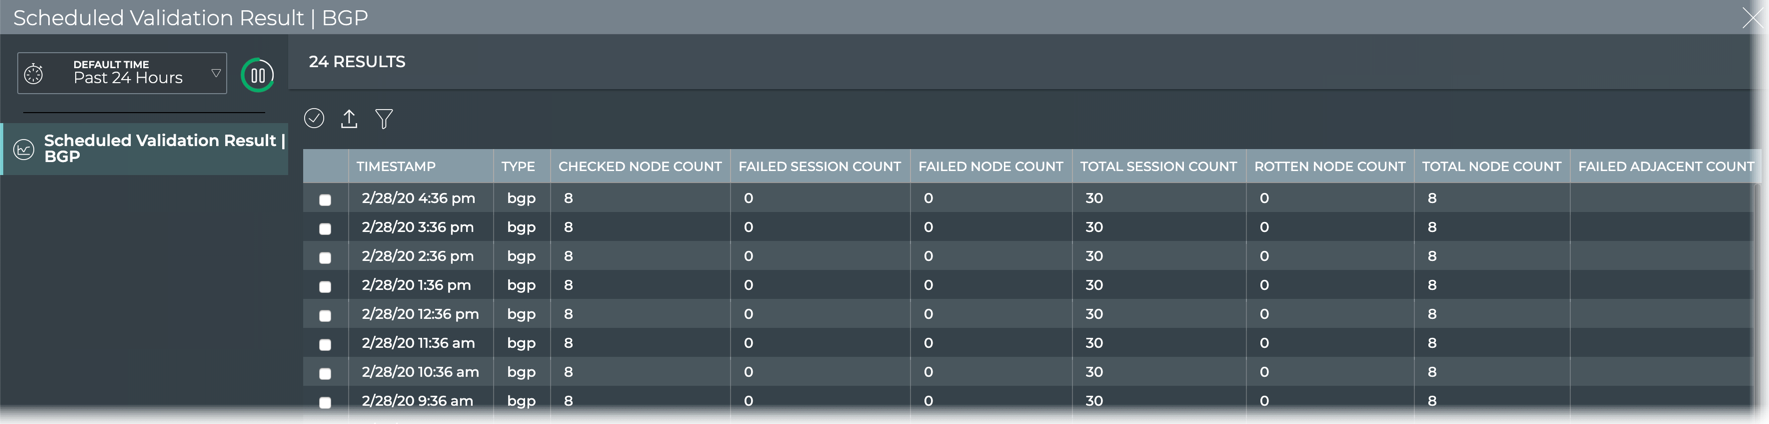
To view all data available for all scheduled validation results for the given protocol or service, click Show All Results or switch to the full screen card.
-
Look for changes and patterns in the results. Scroll to the right. Are there more failed sessions or nodes during one or more validations?
-
Double-click in a given result row to open details about the validation.
From this view you can:
-
See a summary of the validation results by clicking
in the banner under the title. Toggle the arrow to close the summary.
-
See detailed results of each test run to validate the protocol or service. When errors or warnings are present, the nodes and relevant detail is provided.
-
Export the data by clicking Export.
-
Return to the validation jobs list by clicking
.
You may find that comparing various results gives you a clue as to why certain devices are experiencing more warnings or failures. For example, more failures occurred between certain times or on a particular device.
-
Manage Scheduled Validations
You can modify any scheduled validation that you created or remove it altogether at any time. Default validations cannot be removed, modified, or disabled.
Modify a Scheduled Validation
At some point you might want to change the schedule or validation types that are specified in a scheduled validation request.
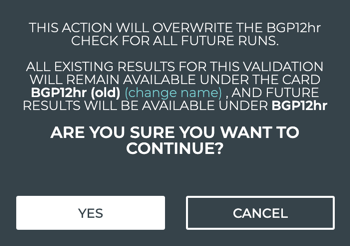
When you update a scheduled request, the results for all future runs of the validation will be different than the results of previous runs of the validation.
To modify a scheduled validation:
-
Open the Validation Request card.
Click
. Click Validation. Click on card. Click Open Cards. -
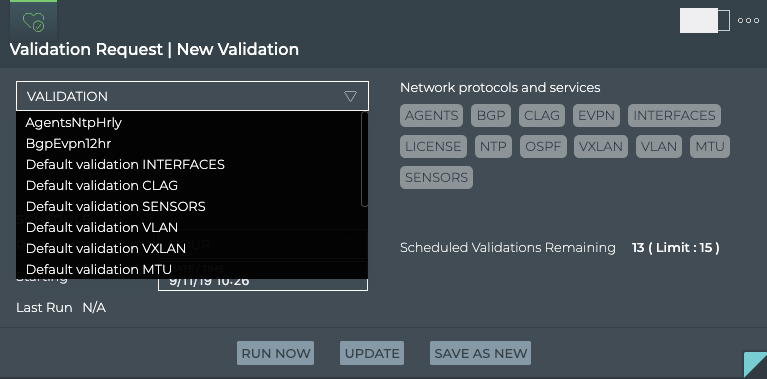
Select the validation from the Validation dropdown list.
-
Edit the schedule or validation types.
This example adds EVPN to the validation.
-
Click Update.
-
Click Yes to complete the changes, or change the name of the previous version of this scheduled validation.
-
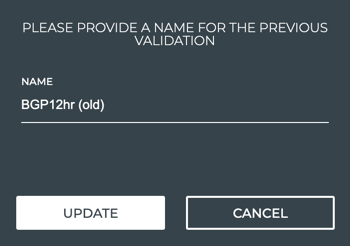
Click the change name link.
-
Edit the name.
-
Click Update.
-
Click Yes to complete the changes, or repeat these steps until you have the name you want.
The validation can now be selected from the Validation listing (on the small, medium or large size card) and run immediately using Run Now, or you can wait for it to run the first time according to the schedule you specified. Refer to View Scheduled Validation Results.
-
Delete a Scheduled Validation
You can remove a user-defined scheduled validation at any time using the NetQ UI or the NetQ CLI. Default validations cannot be removed.
-
Open the Validation Request card.
Click
. Click Validation. Click on card. Click Open Cards. -
Change to the full-screen card using the card size picker.
-
Select one or more validations to remove.
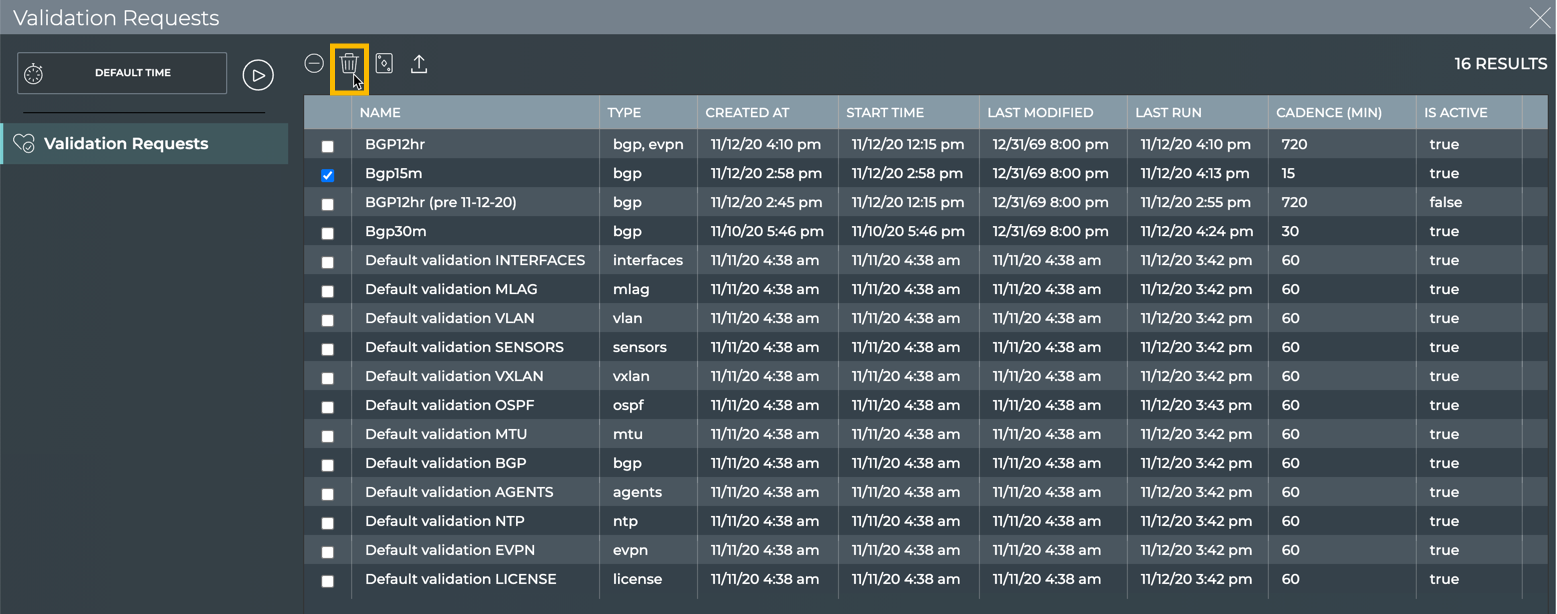
- Click
 .
.
-
Determine the name of the scheduled validation you want to remove. Run:
netq show validation summary [name <text-validation-name>] type (ntp | interfaces | license | sensors | evpn | vxlan | agents | mlag | vlan | bgp | mtu | ospf) [around <text-time-hr>] [json]This example shows all scheduled validations for BGP.
cumulus@switch:~$ netq show validation summary type bgp Name Type Job ID Checked Nodes Failed Nodes Total Nodes Timestamp --------------- ---------------- ------------ -------------------------- ------------------------ ---------------------- ------------------------- Bgp30m scheduled 4c78cdf3-24a 0 0 0 Thu Nov 12 20:38:20 2020 6-4ecb-a39d- 0c2ec265505f Bgp15m scheduled 2e891464-637 10 0 10 Thu Nov 12 20:28:58 2020 a-4e89-a692- 3bf5f7c8fd2a Bgp30m scheduled 4c78cdf3-24a 0 0 0 Thu Nov 12 20:24:14 2020 6-4ecb-a39d- 0c2ec265505f Bgp30m scheduled 4c78cdf3-24a 0 0 0 Thu Nov 12 20:15:20 2020 6-4ecb-a39d- 0c2ec265505f Bgp15m scheduled 2e891464-637 10 0 10 Thu Nov 12 20:13:57 2020 a-4e89-a692- 3bf5f7c8fd2a Bgp30m scheduled 4c78cdf3-24a 0 0 0 Thu Nov 12 20:13:29 2020 6-4ecb-a39d- 0c2ec265505f Bgp30m scheduled 4c78cdf3-24a 0 0 0 Thu Nov 12 20:12:25 2020 6-4ecb-a39d- 0c2ec265505f BGP12hr scheduled 5818f911-d9e 10 0 10 Thu Nov 12 20:10:09 2020 2-4927-9cc1- 6972899a3422 Bgp30m scheduled 4c78cdf3-24a 10 0 10 Thu Nov 12 20:08:46 2020 6-4ecb-a39d- 0c2ec265505f Bgp30m scheduled 4c78cdf3-24a 0 0 0 Thu Nov 12 20:08:20 2020 6-4ecb-a39d- 0c2ec265505f Bgp15m scheduled 2e891464-637 10 0 10 Thu Nov 12 19:58:57 2020 a-4e89-a692- 3bf5f7c8fd2a Bgp15m scheduled 2e891464-637 10 0 10 Thu Nov 12 19:54:47 2020 a-4e89-a692- 3bf5f7c8fd2a Bgp30m scheduled 4c78cdf3-24a 0 0 0 Thu Nov 12 19:54:15 2020 6-4ecb-a39d- 0c2ec265505f Bgp30m scheduled 4c78cdf3-24a 0 0 0 Thu Nov 12 19:45:21 2020 6-4ecb-a39d- 0c2ec265505f Bgp30m scheduled 4c78cdf3-24a 0 0 0 Thu Nov 12 19:43:33 2020 6-4ecb-a39d- 0c2ec265505f Default validat scheduled dec4c560-ebd 10 0 10 Thu Nov 12 19:42:25 2020 ion 0-4e57-8203- 4bd872d7ca28 ... -
Remove the validation. Run:
netq del validation <text-validation-name>This example removes the scheduled validation named Bgp15m.
cumulus@switch:~$ netq del validation Bgp15m Successfully deleted validation Bgp15m -
Repeat these steps for additional scheduled validations you want to remove.