Upgrade Cumulus NetQ Agent Using LCM
The lifecycle management (LCM) feature enables you to upgrade to Cumulus NetQ 3.2.0 on switches with an existing NetQ Agent 2.4.x, 3.0.0, or 3.1.0 release using the NetQ UI. You can upgrade only the NetQ Agent or upgrade both the NetQ Agent and the NetQ CLI at the same time. Up to five jobs can be run simultaneously; however, a given switch can only be contained in one running job at a time.
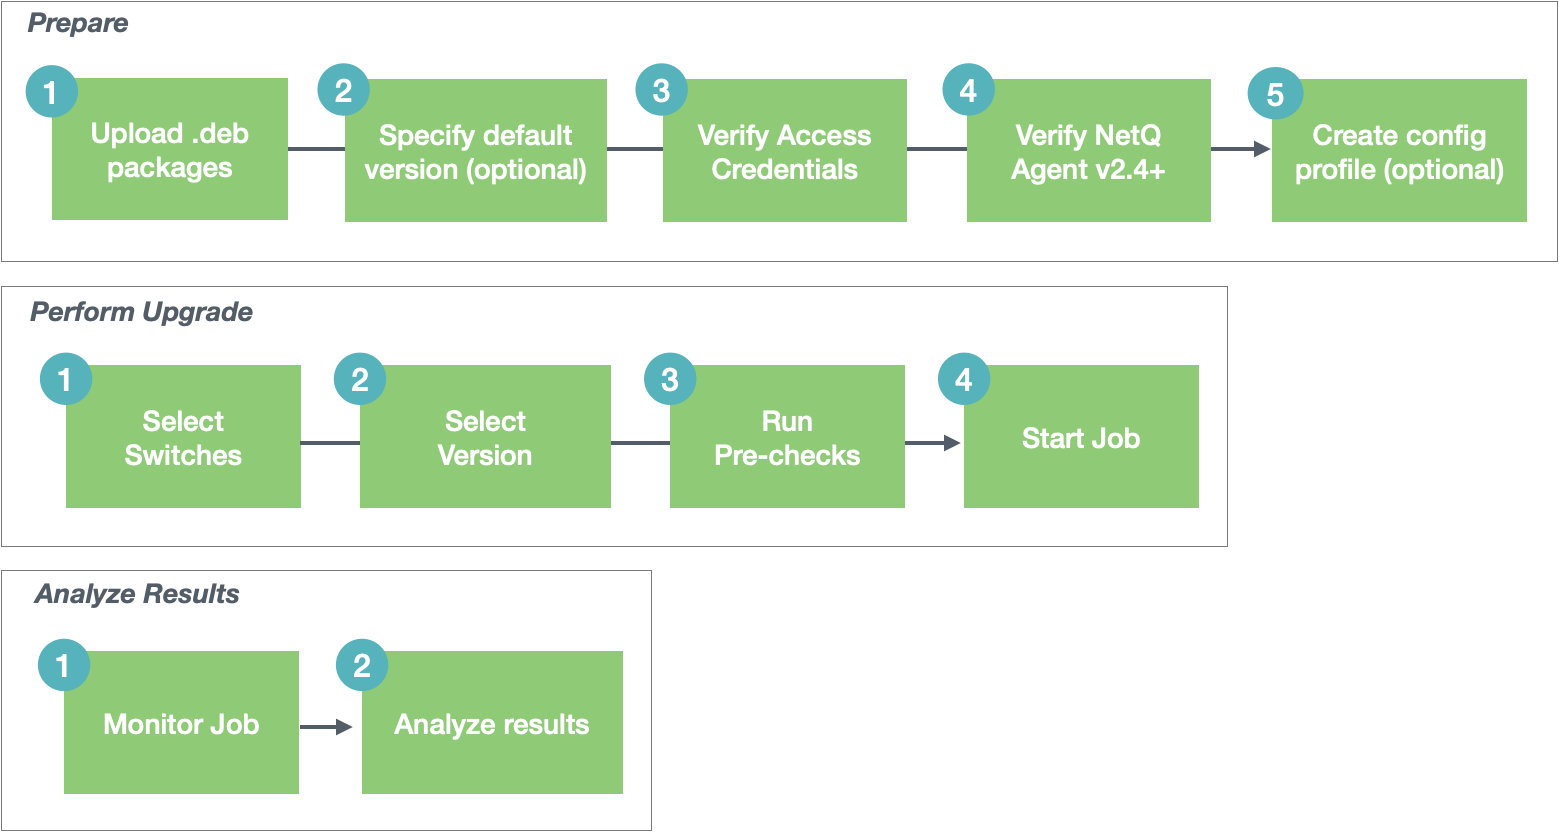
The upgrade workflow includes the following steps:
Upgrades can be performed from NetQ Agents of 2.4.x, 3.0.0, and 3.1.0 releases to the NetQ 3.2.0 release. Lifecycle management does not support upgrades from NetQ 2.3.1 or earlier releases; you must perform a new installation in these cases. Refer to Install NetQ Agents.
Prepare for a Cumulus NetQ Agent Upgrade
Prepare for NetQ Agent upgrade on switches as follows:
-
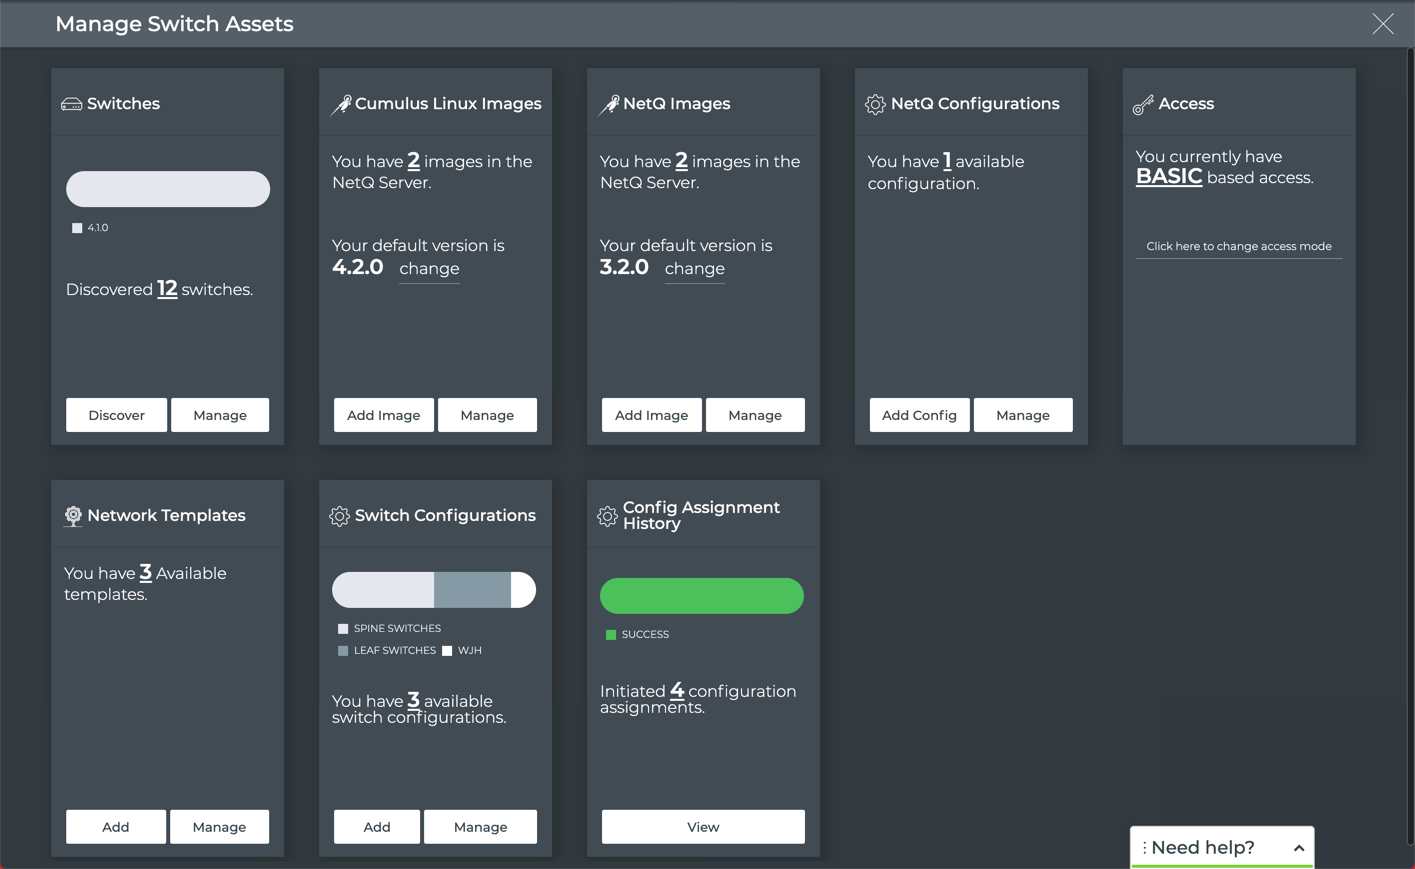
Click
 (Switches) in the workbench header, then click Manage switches, or click
  (Main Menu) and select Manage Switches.
 -
Add the upgrade images.
-
Optionally, specify a default upgrade version.
-
Verify or add switch access credentials.
-
Optionally, create a new switch configuration profile.
Your LCM dashboard should look similar to this after you have completed the above steps:
-
Verify or add switch access credentials.
-
Configure switch roles to determine the order in which the switches get upgraded.
-
Upload the Cumulus Linux install images.
Perform a Cumulus NetQ Agent Upgrade
You can upgrade Cumulus NetQ Agents on switches as follows:
-
Click Manage on the Switches card.
-
Select the individual switches (or click
 to select all switches) with older NetQ releases that you want to upgrade. If needed, use the filter to narrow the listing and find the relevant switches.
 -
Click
 (Upgrade NetQ) above the table.
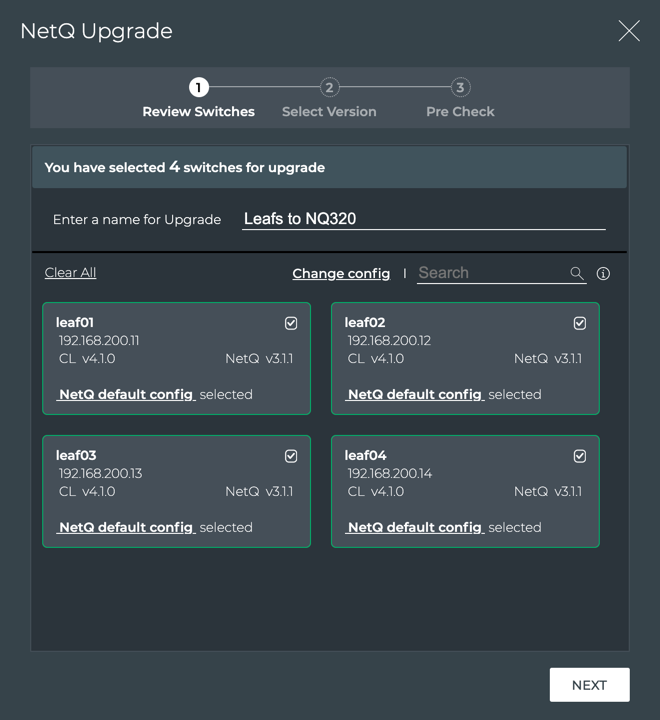
From this point forward, the software walks you through the upgrade process, beginning with a review of the switches that you selected for upgrade.
-
Verify that the number of switches selected for upgrade matches your expectation.
-
Enter a name for the upgrade job. The name can contain a maximum of 22 characters (including spaces).
-
Review each switch:
- Is the NetQ Agent version between 2.4.0 and 3.1.1? If not, this switch can only be upgraded through the switch discovery process.
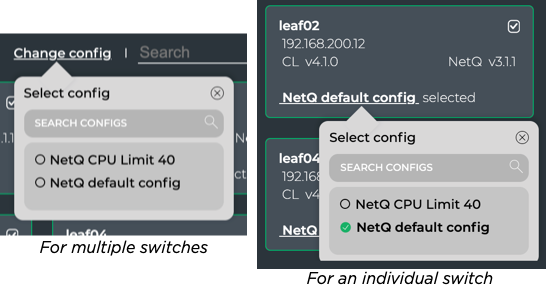
- Is the configuration profile the one you want to apply? If not, click Change config, then select an alternate profile to apply to all selected switches.
You can apply different profiles to switches in a single upgrade job by selecting a subset of switches (click checkbox for each switch) and then choosing a different profile. You can also change the profile on a per switch basis by clicking the current profile link and selecting an alternate one.
Scroll down to view all selected switches or use Search to find a particular switch of interest.
-
After you are satisfied with the included switches, click Next.
-
Review the summary indicating the number of switches and the configuration profile to be used. If either is incorrect, click Back and review your selections.
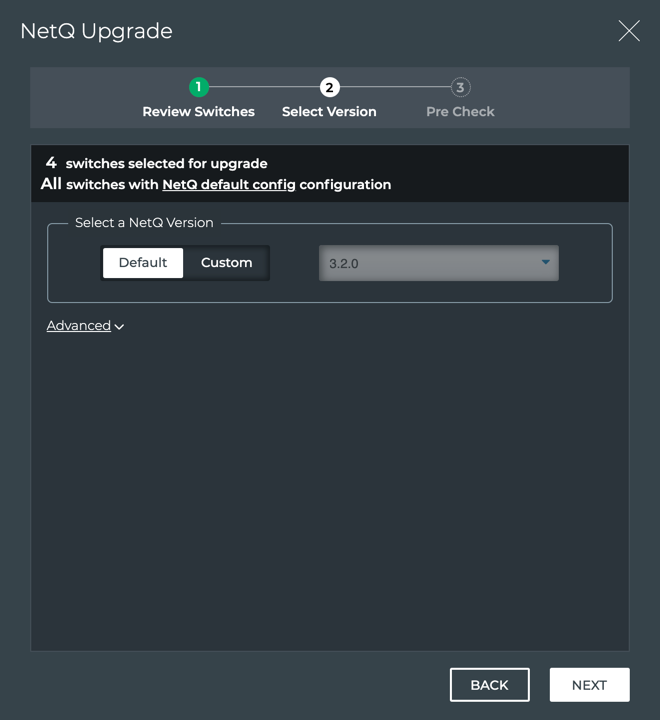
- Select the version of NetQ Agent for upgrade. If you have designated a default version, keep the Default selection. Otherwise, select an alternate version by clicking Custom and selecting it from the list.
By default, the NetQ Agent and CLI are upgraded on the selected switches. If you do not want to upgrade the NetQ CLI, click Advanced and change the selection to No.
-
Click Next.
-
Several checks are performed to eliminate preventable problems during the upgrade process.
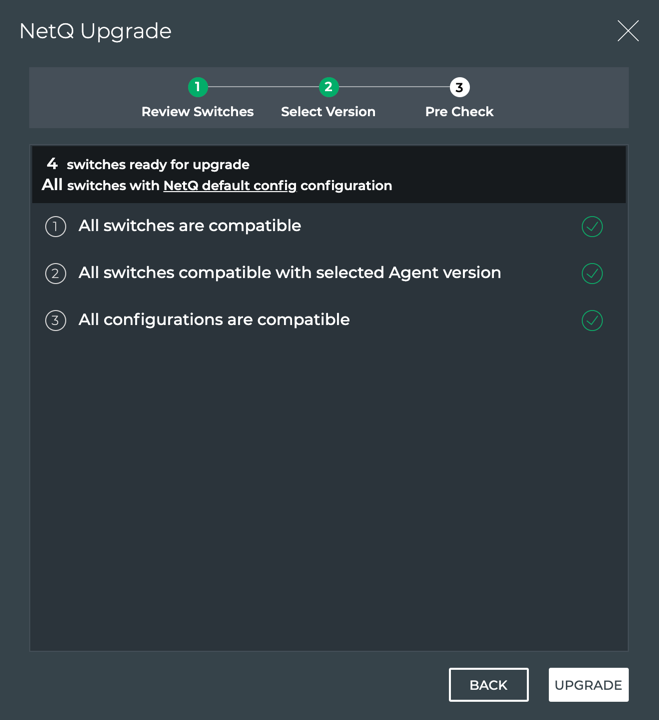
- Selected switches are not currently scheduled for, or in the middle of, a Cumulus Linux or NetQ Agent upgrade
- Selected version of NetQ Agent is a valid upgrade path
- All mandatory parameters have valid values, including MLAG configurations
- All switches are reachable
- The order to upgrade the switches, based on roles and configurations
If any of the pre-checks fail, review the error messages and take appropriate action.
If all of the pre-checks pass, click Upgrade to initiate the upgrade job.
- Watch the progress of the upgrade job.
-
Click
 to return to Switches listing.
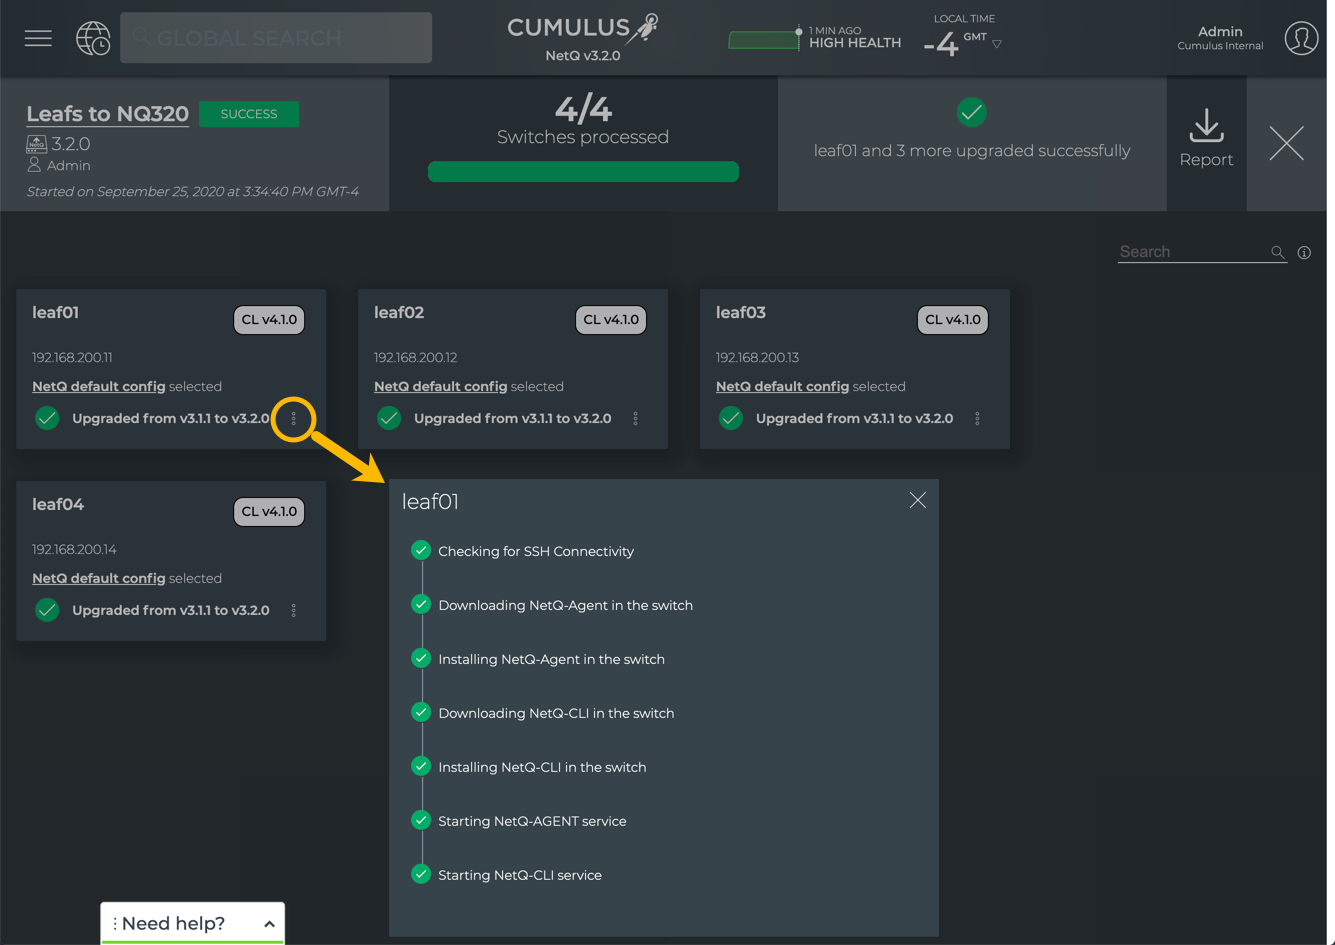
For the switches you upgraded, you can verify the version is correctly listed in the NetQ_Version column. Click
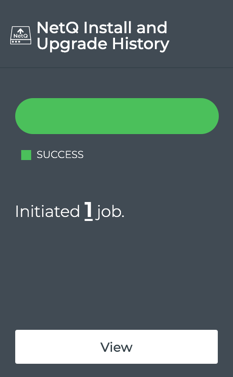
to return to the lifecycle management dashboard.The NetQ Install and Upgrade History card is now visible and shows the status of this upgrade job.
To upgrade the NetQ Agent on one or more switches, run:
netq lcm upgrade name <text-job-name> cl-version <text-cumulus-linux-version> netq-version <text-netq-version> hostnames <text-switch-hostnames> [run-restore-on-failure] [run-before-after]
This example creates a NetQ Agent upgrade job called upgrade-cl410-nq320. It upgrades the spine01 and spine02 switches with NetQ Agents version 3.2.0.
cumulus@switch:~$ netq lcm upgrade name upgrade-cl410-nq320 cl-version 4.1.0 netq-version 3.2.0 hostnames spine01,spine02
Including the run-restore-on-failure option restores the switch(es) with their earlier version of NetQ Agent should the upgrade fail. The run-before-after option generates a network snapshot before upgrade begins and another when it is completed. The snapshots are visible in the NetQ UI.
Analyze the NetQ Agent Upgrade Results
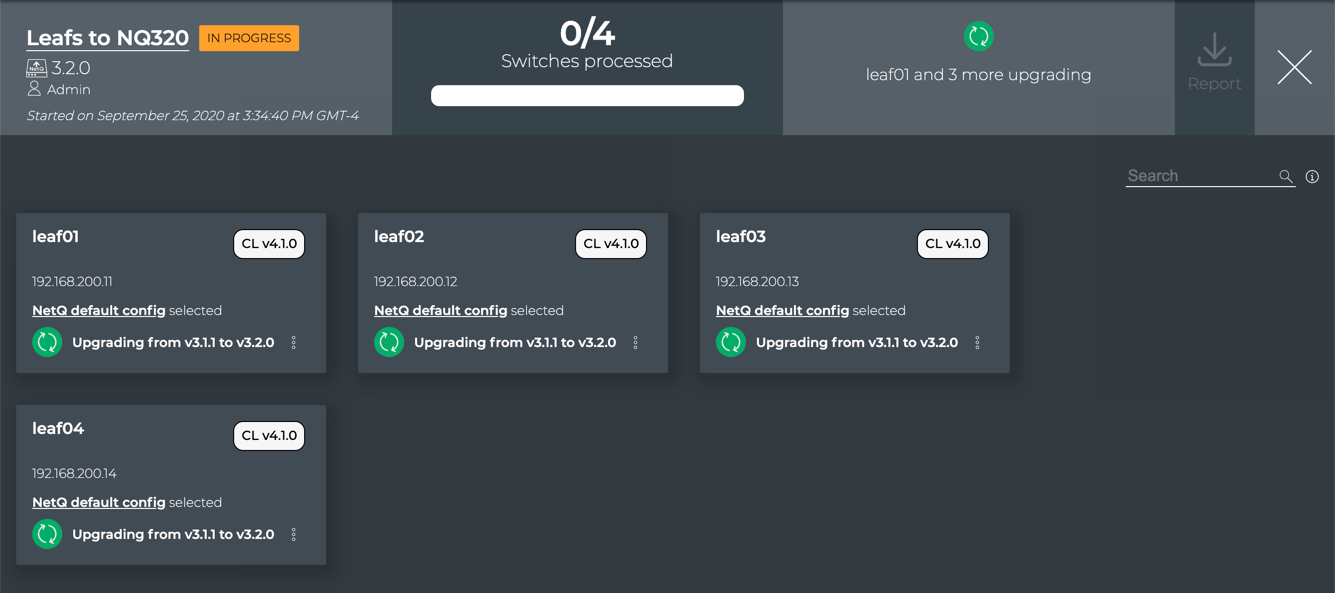
After starting the upgrade you can monitor the progress in the NetQ UI. Progress can be monitored from the preview page or the Upgrade History page.
From the preview page, a green circle with rotating arrows is shown on each switch as it is working. Alternately, you can close the detail of the job and see a summary of all current and past upgrade jobs on the NetQ Install and Upgrade History page. The job started most recently is shown at the top, and the data is refreshed periodically.
If you are disconnected while the job is in progress, it may appear as if nothing is happening. Try closing (click ![]() ) and reopening your view (click
) and reopening your view (click ![]() ), or refreshing the page.
), or refreshing the page.
Monitor the NetQ Agent Upgrade Job
Several viewing options are available for monitoring the upgrade job.
-
Monitor the job with full details open:
-
Monitor the job with only summary information in the NetQ Install and Upgrade History page. Open this view by clicking
in the full details view; useful when you have multiple jobs running simultaneously.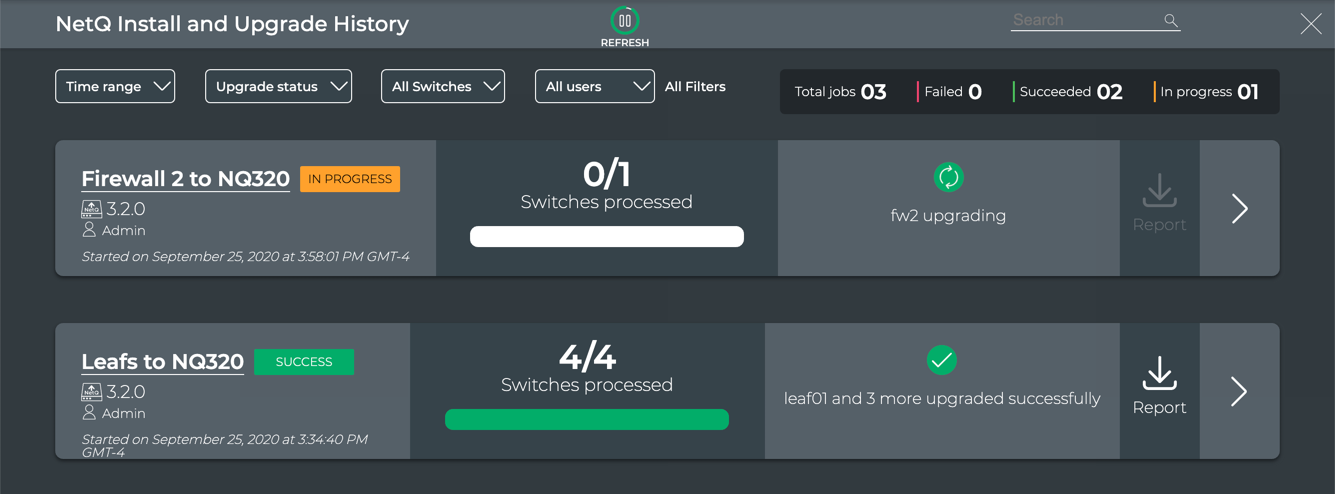
When multiple jobs are running, scroll down or use the filters above the jobs to find the jobs of interest:
- Time Range: Enter a range of time in which the upgrade job was created, then click Done.
- All switches: Search for or select individual switches from the list, then click Done.
- All switch types: Search for or select individual switch series, then click Done.
- All users: Search for or select individual users who created an upgrade job, then click Done.
- All filters: Display all filters at once to apply multiple filters at once. Additional filter options are included here. Click Done when satisfied with your filter criteria.
By default, filters show all of that items of the given filter type until it is restricted by these settings.
-
Monitor the job through the NetQ Install and Upgrade History card on the LCM dashboard. Click
twice to return to the LCM dashboard.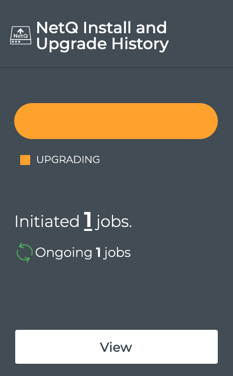
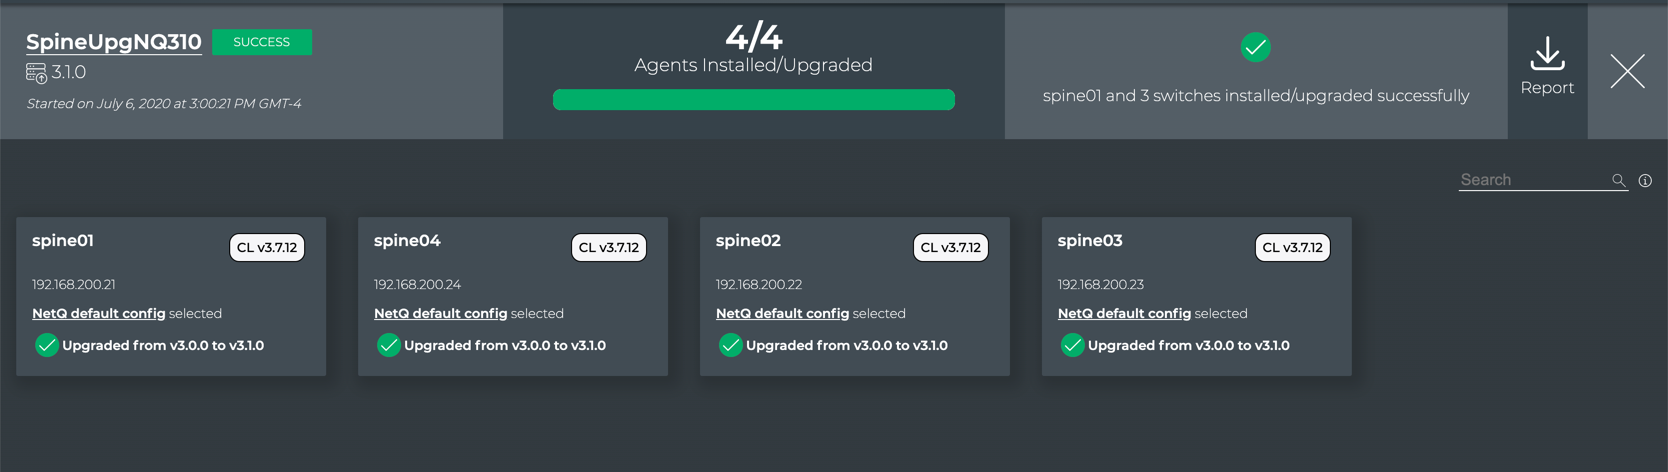
Sample Successful NetQ Agent Upgrade
This example shows that all four of the selected switches were upgraded successfully. You can see the results in the Switches list as well.
Sample Failed NetQ Agent Upgrade
This example shows that an error has occurred trying to upgrade two of the four switches in a job. The error indicates that the access permissions for the switches are invalid. In this case, you need to modify the switch access credentials and then create a new upgrade job.
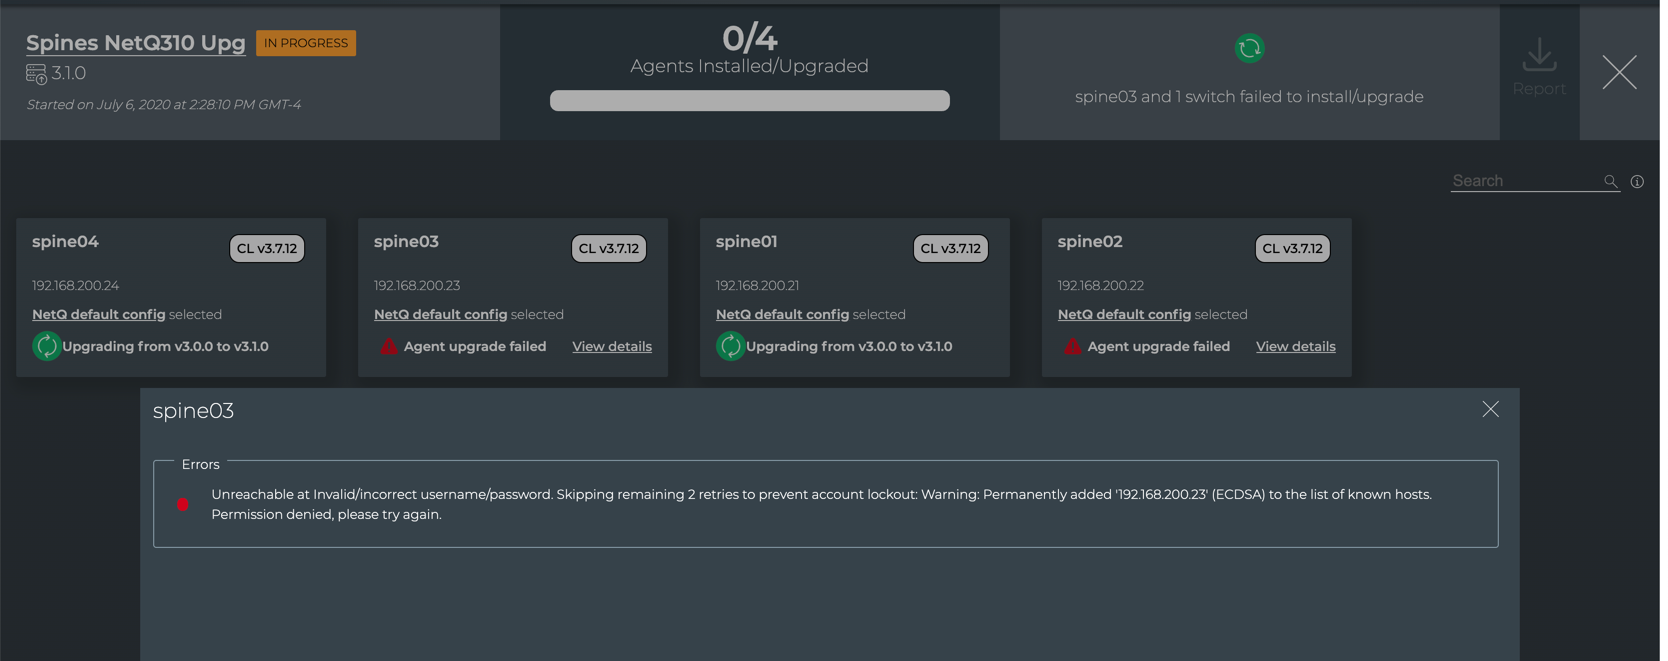
If you were watching this job from the LCM dashboard view, click View on the NetQ Install and Upgrade History card to return to the detailed view to resolve any issues that occurred.
Reasons for NetQ Agent Upgrade Failure
Upgrades can fail at any of the stages of the process, including when backing up data, upgrading the Cumulus NetQ software, and restoring the data. Failures can also occur when attempting to connect to a switch or perform a particular task on the switch.
Some of the common reasons for upgrade failures and the errors they present:
| Reason | Error Message |
|---|---|
| Switch is not reachable via SSH | Data could not be sent to remote host “192.168.0.15”. Make sure this host can be reached over ssh: ssh: connect to host 192.168.0.15 port 22: No route to host |
| Switch is reachable, but user-provided credentials are invalid | Invalid/incorrect username/password. Skipping remaining 2 retries to prevent account lockout: Warning: Permanently added ‘<hostname-ipaddr>’ to the list of known hosts. Permission denied, please try again. |
| Switch is reachable, but a valid Cumulus Linux license is not installed | 1587866683.880463 2020-04-26 02:04:43 license.c:336 CRIT No license file. No license installed! |
| Upgrade task could not be run | Failure message depends on the why the task could not be run. For example: /etc/network/interfaces: No such file or directory |
| Upgrade task failed | Failed at- <task that failed>. For example: Failed at- MLAG check for the peerLink interface status |
| Retry failed after five attempts | FAILED In all retries to process the LCM Job |