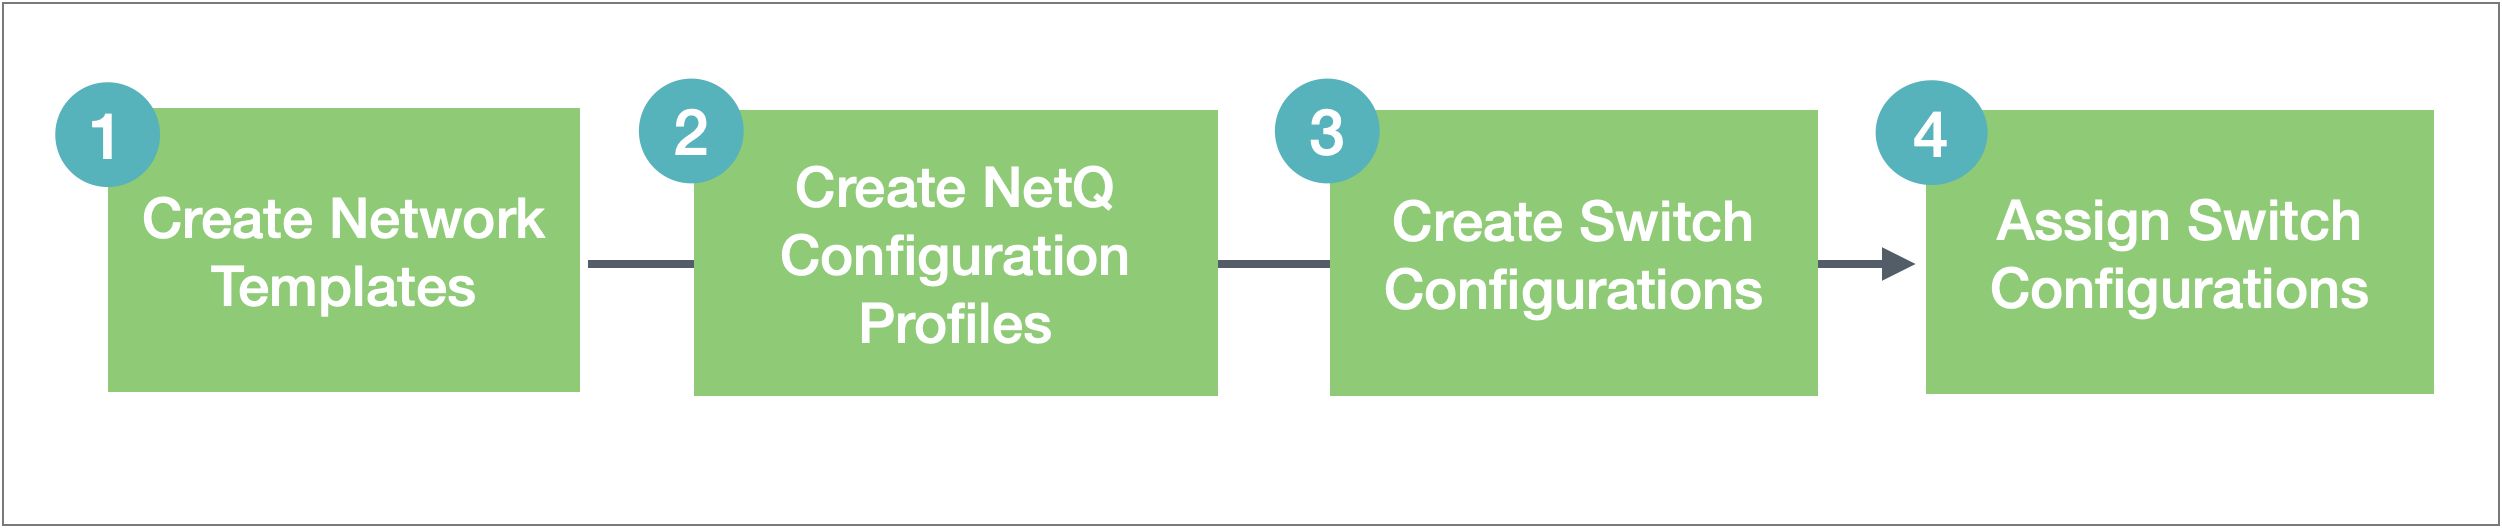
Manage Switch Configurations
You can use the NetQ UI to configure switches using one or more switch configurations. To enable consistent application of configurations, switch configurations can contain network templates for SNMP, NTP, and user accounts, and configuration profiles for Cumulus NetQ Agents.
If you intend to use network templates or configuration profiles, the recommended workflow is as follows:
Manage Network Templates
Network templates provide administrators the option to create switch configuration profiles that can be applied to multiple switches. They can help reduce inconsistencies with switch configuration and speed the process of initial configuration and upgrades. No default templates are provided.
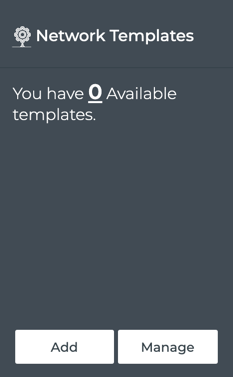
View Network Templates
You can view existing templates using the Network Templates card.
-
Open the lifecycle management (Manage Switch Assets) dashboard.
-
Locate the Network Templates card.
-
Click Manage to view the list of existing switch templates.
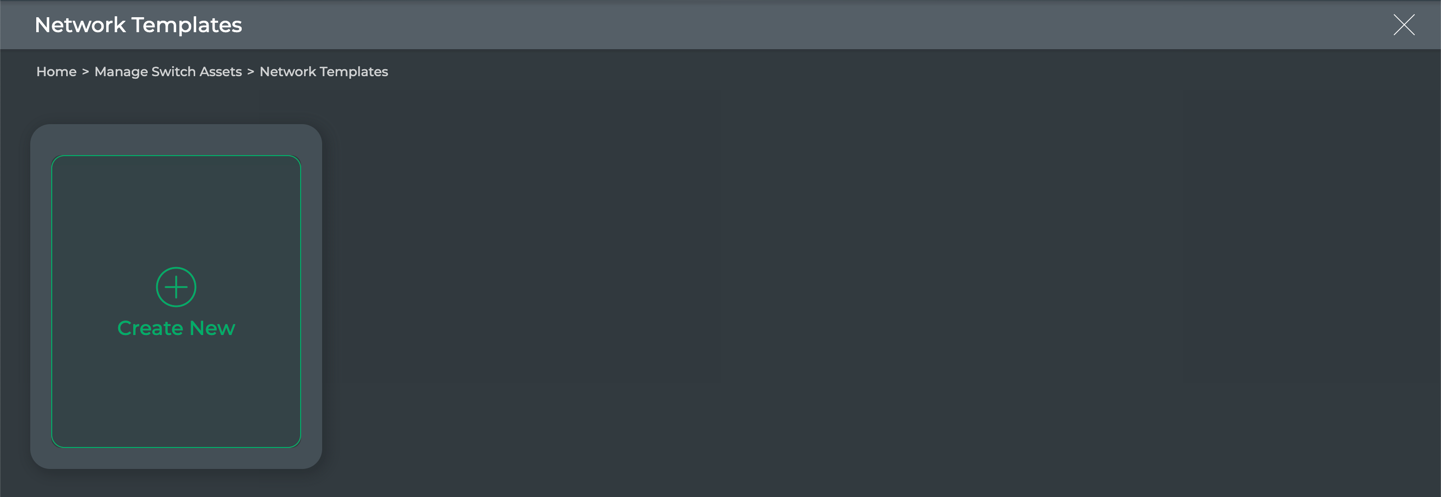
Create Network Templates
No default templates are provided on installation of NetQ. This enables you to create configurations that match your specifications.
To create a network template:
-
Open the lifecycle management (Manage Switch Assets) dashboard.
-
Click Add on the Network Templates card.
-
Click
 Create New.
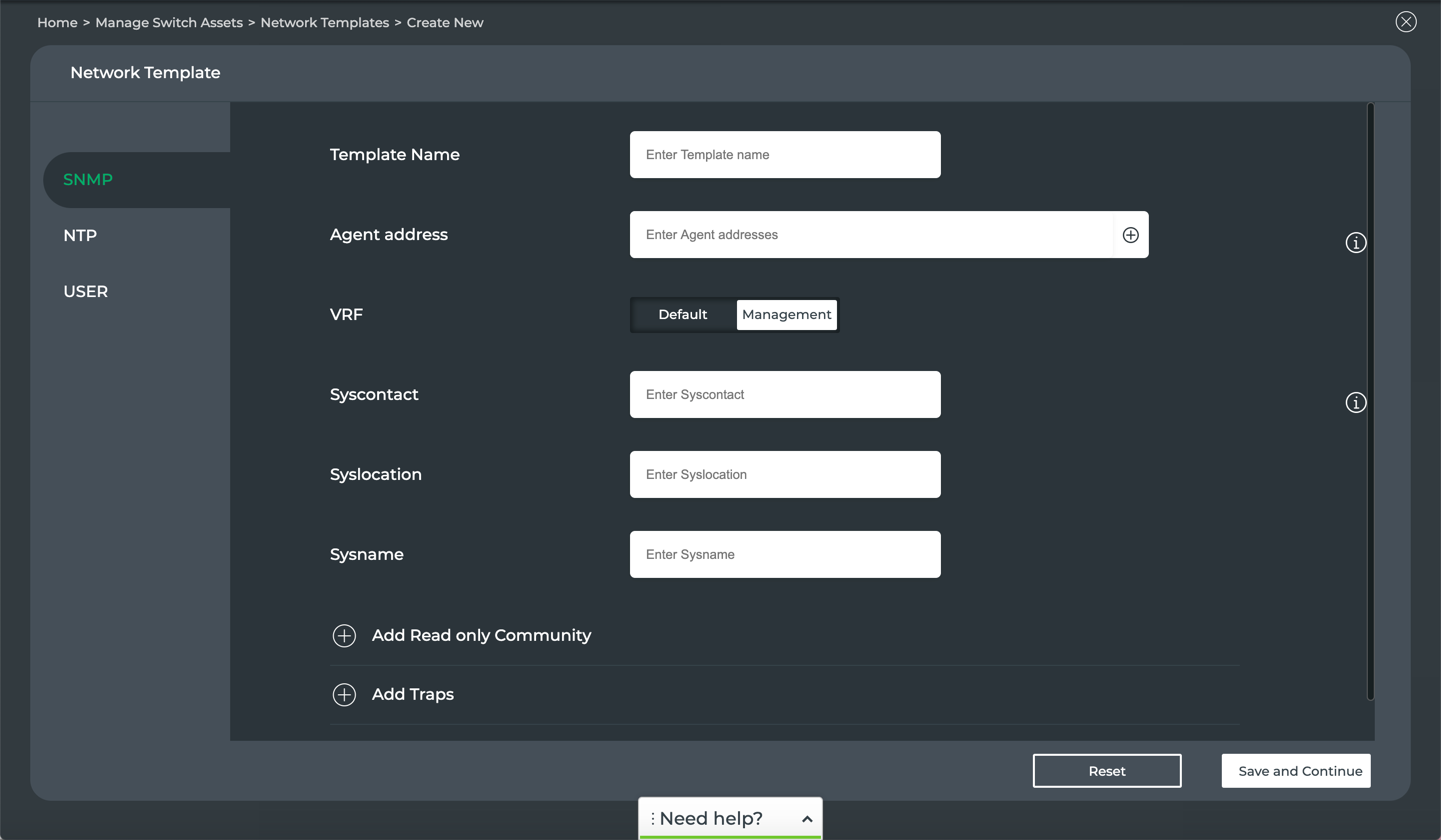
-
Decide which aspects of configuration you want included in this template: SNMP, NTP, and/or User accounts.
You can specify your template in any order, but to complete the configuration, you must open the User form to click Save and Finish.
-
Configure the template using the following instructions.
SNMP provides a way to query, monitor, and manage your devices in addition to NetQ.
To create a network template with SNMP parameters included:
-
Provide a name for the template. This field is required and can be a maximum of 22 characters, including spaces.
All other parameters are optional. Configure those as desired, and described here.
-
Enter a comma-separated list of IP addresses of the SNMP Agents on the switches and hosts in your network.
-
Accept the management VRF or change to the default VRF.
-
Enter contact information for the SNMP system administrator, including an email address or phone number, their location, and name.
-
Restrict the hosts that should accept SNMP packets:
-
Click
. -
Enter the name of an IPv4 or IPv6 community string.
-
Indicate which hosts should accept messages:
Accept any to indicate all hosts are to accept messages (default), or enter the hostnames or IP addresses of the specific hosts that should accept messages.
-
Click
to add additional community strings.
-
-
Specify traps to be included:
-
Click
. -
Specify the traps as follows:
Parameter Description Load(1 min) Threshold CPU load must cross within a minute to trigger a trap Trap link down frequency Toggle on to set the frequency at which to collect link down trap information. Default value is 60 seconds. Trap link up frequency Toggle on to set the frequency at which to collect link up trap information. Default value is 60 seconds. IQuery Secname Security name for SNMP query Trap Destination IP IPv4 or IPv6 address where the trap information is to be sent. This can be a local host or other valid location. Community Password Authorization password. Any valid string, where an exclamation mark (!) is the only allowed special character. Version SNMP version to use
-
-
If you are using SNMP version 3, specify relevant V3 support parameters:
-
Enter the user name of someone who has full access to the SNMP server.
-
Enter the user name of someone who has only read access to the SNMP server.
-
Toggle Authtrap to enable authentication for users accessing the SNMP server.
-
Select an authorization type.
For either MDS or SHA, enter an authorization key and optionally specify AES or DES encryption.
-
-
Click Save and Continue.
Switches and hosts must be kept in time synchronization with the NetQ appliance or VM to ensure accurate data reporting. NTP is one protocol that can be used to synchronize the clocks of these devices. None of the parameters are required. Specify those which apply to your configuration.
To create a network template with NTP parameters included:
- Click NTP.
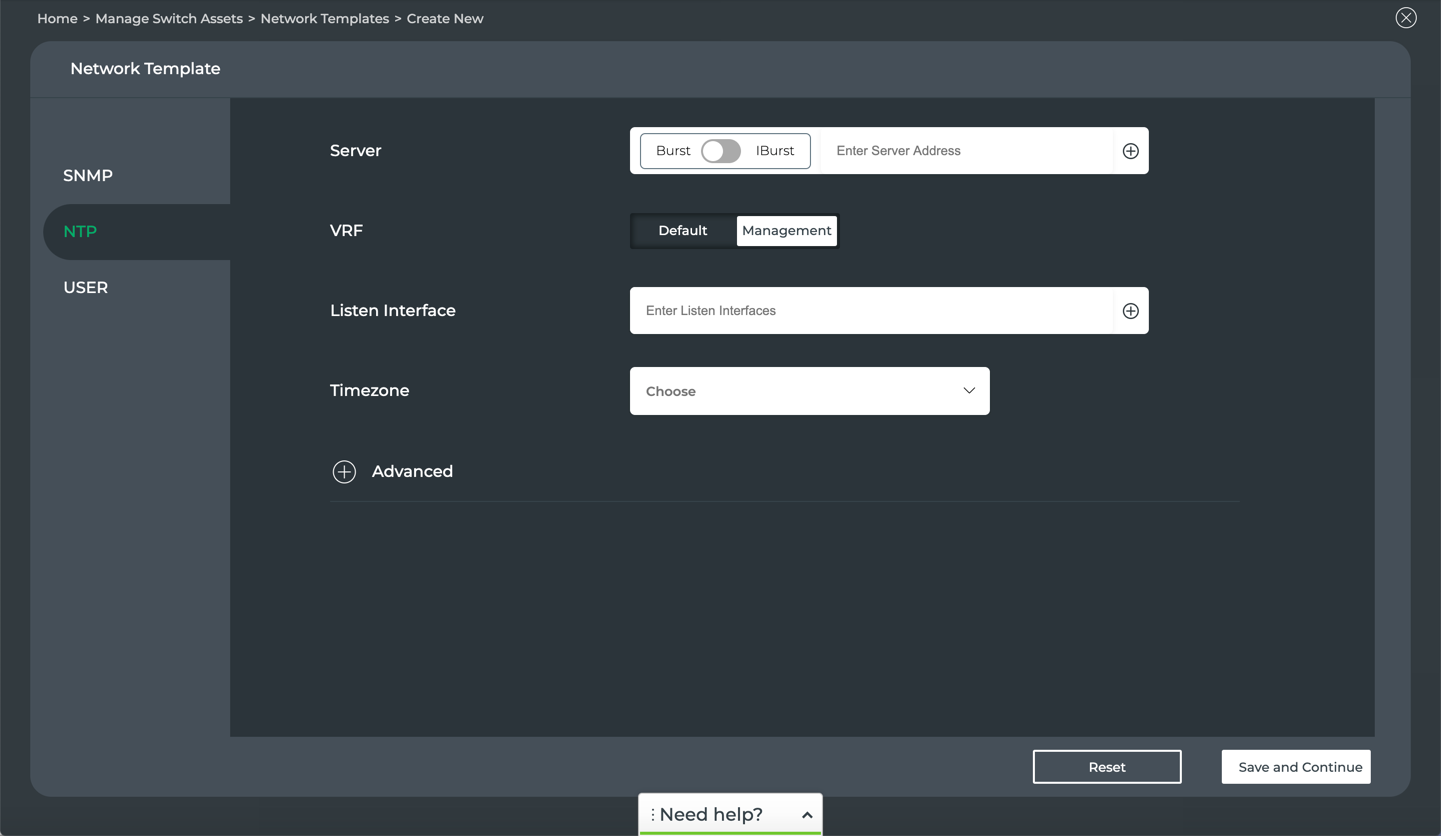
-
Enter the address of one or more of your NTP servers. Toggle to choose between Burst and IBurst to specify whether the server should send a burst of packets when the server is reachable or unreachable, respectively.
-
Specify either the Default or Management VRF for communication with the NTP server.
-
Enter the interfaces that the NTP server should listen to for synchronization. This can be a IP, broadcast, manycastclient, or reference clock address.
-
Enter the timezone of the NTP server.
-
Specify advanced parameters:
-
Click
Advanced. -
Specify the location of a Drift file containing the frequency offset between the NTP server clock and the UTC clock. It is used to adjust the system clock frequency on every system or service start. Be sure that the location you enter can be written by the NTP daemon.
-
Enter an interface for the NTP server to ignore. Click
to add more interfaces to be ignored. -
Enter one or more interfaces that xxx. Click
to add more interfaces to be dropped. -
Restrict query/configuration access to the NTP server.
Enter restrict <values>. Common values include:
Value Description default Block all queries except as explicitly indicated kod (kiss-o-death) block all, but time and statistics queries nomodify block changes to NTP configuration notrap block control message protocol traps nopeer block the creation of a peer noquery block NTP daemon queries, but allow time queries Click
to add more access control restrictions. -
Restrict administrative control (host) access to the NTP server.
Enter the IP address for a host or set of hosts, with or without a mask, followed by a restriction value (as described in step 5.) If no mask is provided, 255.255.255.255 is used. If default is specified for query/configuration access, entering the IP address and mask for a host or set of hosts in this field allows query access for these hosts (explicit indication).
Click
to add more administrative control restrictions.
-
-
Click Save and Continue.
Creating a User template controls who or what accounts can access the switch and what permissions they have with respect to the data found (read/write/execute). You can also control access using groups of users. No parameters are required. Specify parameters which apply to your specific configuration need.
To create a network template with user parameters included:
- Click User.
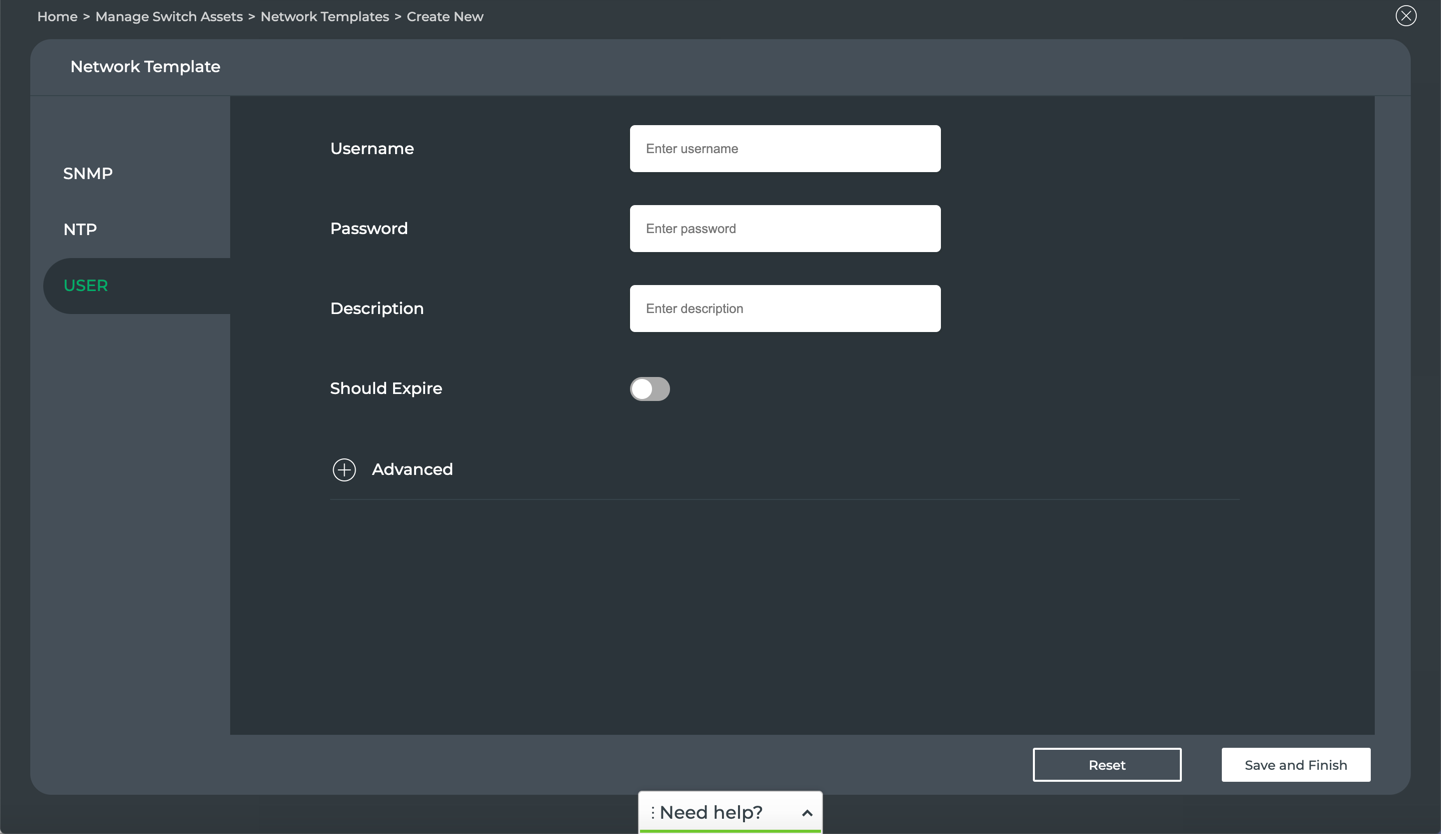
-
For individual users or accounts:
-
Enter a username and password for the individual or account.
-
Provide a description of the user.
-
Toggle Should Expire to require changes to the password to expire on a given date.
The current date and time are automatically provided to show the correct entry format. Modify this to the appropriate expiration date.
-
-
Specify advanced parameters:
-
Click
. -
If you do not want a home folder created for this user or account, toggle Create home folder.
-
Generate an SSH key pair for this user or account. Toggle Generate SSH key. When generation is selected, the key pair are stored in the /home/<user>/.ssh directory.
-
If you are looking to remove access for the user or account, toggle Delete user if present. If you do not want to remove the directories associated with this user or account at the same time, toggle Delete user directory.
-
Identify this account as a system account. Toggle Is system account.
-
To specify a group this user or account belongs to, enter the group name in the Groups field.
Click
to add additional groups.
-
-
Click Save and Finish.
-
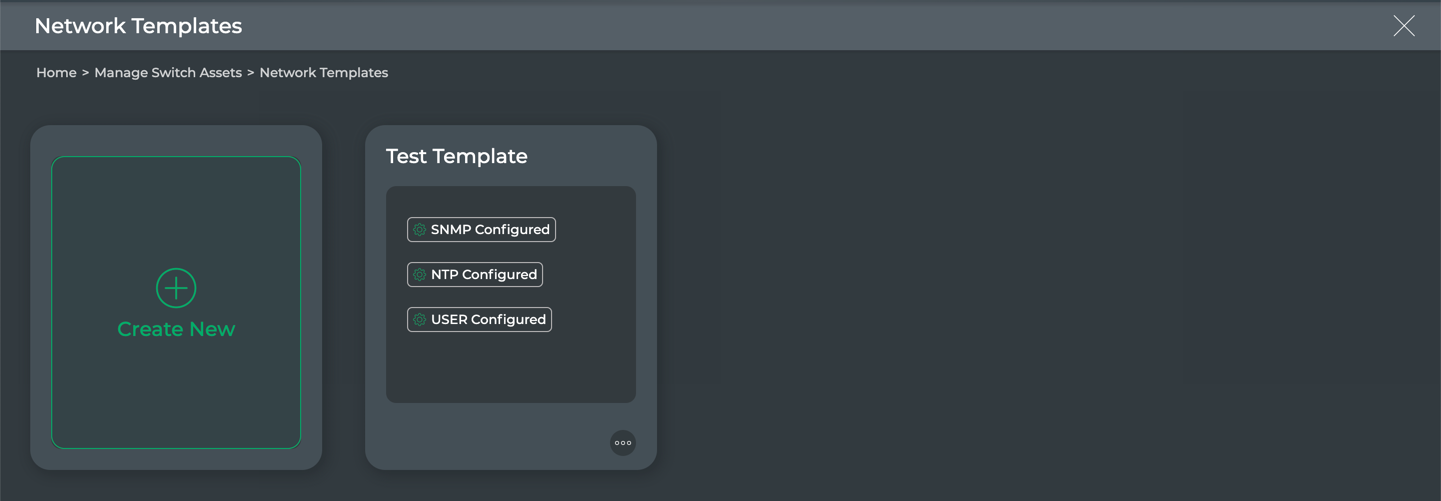
Once you have finished the template configuration, you are returned to the network templates library.
This shows the new template you created and which forms have been included in the template. You may only have one or two of the forms in a given template.
Modify Network Templates
For each template that you have created, you can edit, clone, or discard it altogether.
Edit a Network Template
You can change a switch configuration template at any time. The process is similar to creating the template.
To edit a network template:
-
Enter template edit mode in one of two ways:
-
Hover over the template , then click
 (edit).
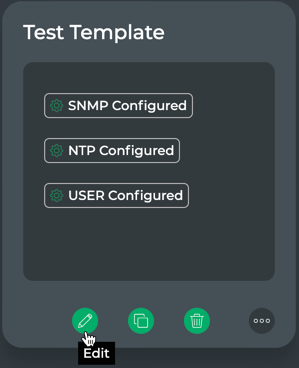
-
Click
 , then select Edit.
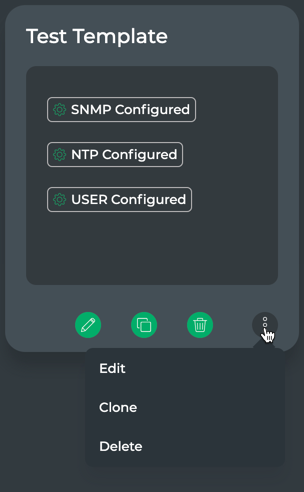
-
-
Modify the parameters of the SNMP, NTP, or User forms in the same manner as when you created the template.
-
Click User, then Save and Finish.
Clone a Network Template
You can take advantage of a template that is significantly similar to another template that you want to create by cloning an existing template. This can save significant time and reduce errors.
To clone a network template:
-
Enter template clone mode in one of two ways:
-
Hover over the template , then click
 (clone).
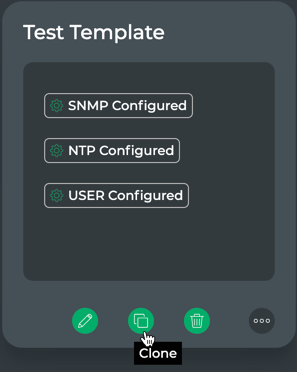
-
Click
, then select Clone.
-
-
Modify the parameters of the SNMP, NTP, or User forms in the same manner as when you created the template to create the new template.
-
Click User, then Save and Finish.
The newly cloned template is now visible on the template library.
Delete a Network Template
You can remove a template when it is no longer needed.
To delete a network template, do one of the following:
-
Hover over the template , then click
(delete).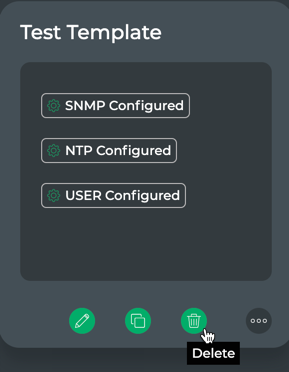
-
Click
, then select Delete.
The template is no longer visible in the network templates library.
Manage NetQ Configuration Profiles
You can set up a configuration profile to indicate how you want NetQ configured when it is installed or upgraded on your Cumulus Linux switches.
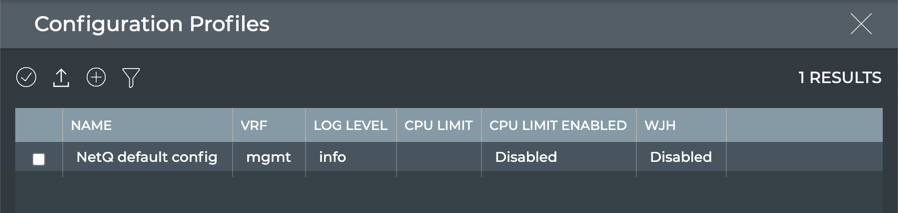
The default configuration profile, NetQ default config, is set up to run in the management VRF and provide info level logging. Both WJH and CPU Limiting are disabled.
You can view, add, and remove NetQ configuration profiles at any time.
View Cumulus NetQ Configuration Profiles
To view existing profiles:
-
Click
 (Switches) in the workbench header, then click Manage switches, or click
  (Main Menu) and select Manage Switches.
 -
Click Manage on the NetQ Configurations card.
Note that the initial value on first installation of NetQ shows one profile. This is the default profile provided with NetQ.
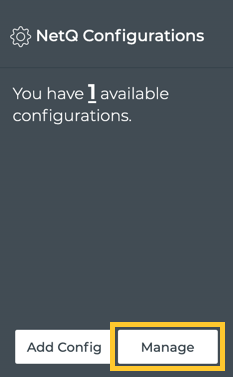
-
Review the profiles.
Create Cumulus NetQ Configuration Profiles
You can specify four options when creating NetQ configuration profiles:
- Basic: VRF assignment and Logging level
- Advanced: CPU limit and what just happened (WJH)
To create a profile:
-
Click
(Switches) in the workbench header, then click Manage switches, or click (Main Menu) and select Manage Switches. -
Click Manage on the NetQ Configurations card.
-
Click
(Add Config) above the listing.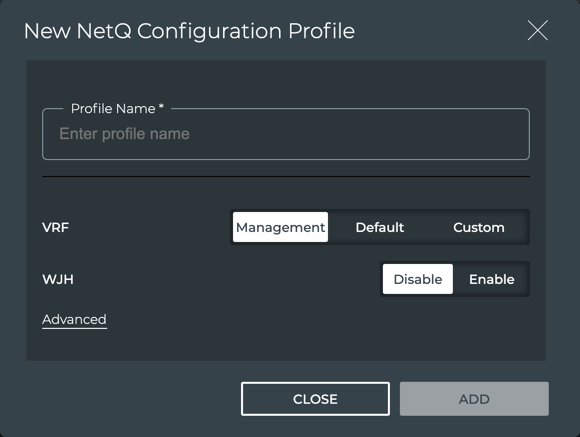
-
Enter a name for the profile. This is required.
-
If you do not want NetQ Agent to run in the management VRF, select either Default or Custom. The Custom option lets you enter the name of a user-defined VRF.
-
Optionally enable WJH.
Refer to WJH for information about this feature. WJH is only available on Mellanox switches.
-
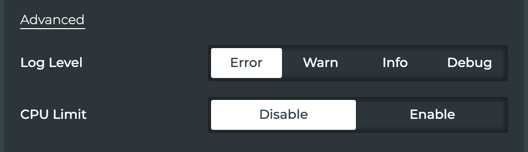
To set a logging level, click Advanced, then choose the desired level.
-
Optionally set a CPU usage limit for the NetQ Agent. Click Enable and drag the dot to the desired limit. Refer to this Knowledge Base article for information about this feature.
-
Click Add to complete the configuration or Close to discard the configuration.
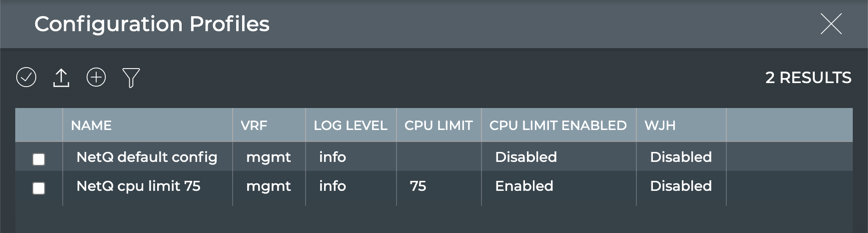
This example shows the addition of a profile with the CPU limit set to 75 percent.
Remove Cumulus NetQ Configuration Profiles
To remove a NetQ configuration profile:
-
Click
(Switches) in the workbench header, then click Manage switches, or click (Main Menu) and select Manage Switches. -
Click Manage on the NetQ Configurations card.
-
Select the profile(s) you want to remove and click
 (Delete).
Manage Switch Configuration
To ease the consistent configuration of your switches, NetQ enables you to create and manage multiple switch configuration profiles. Each configuration can contain Cumulus Linux- and NetQ Agent-related settings. These can then be applied to a group of switches at once.
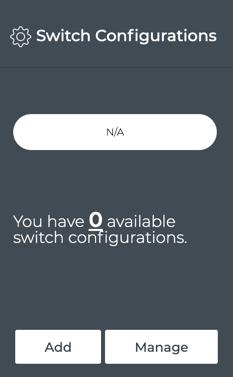
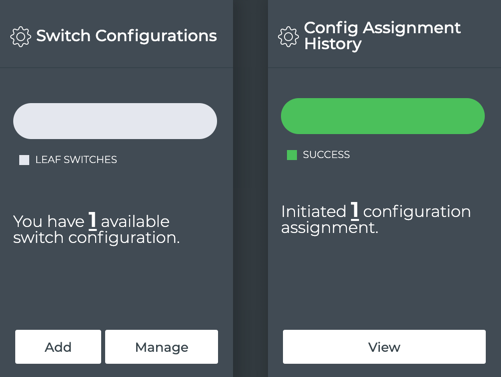
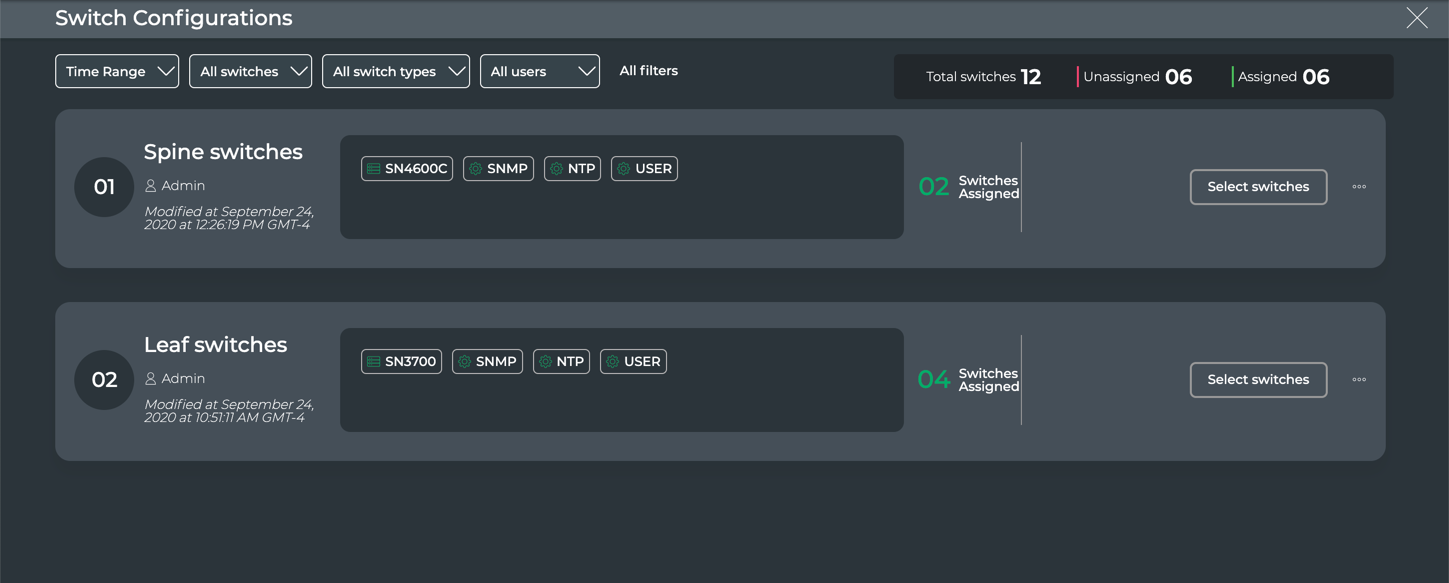
You can view, create, and modify switch configuration profiles and their assignments at any time using the Switch Configurations card.
View Switch Configuration Profiles
You can view existing switch configuration profiles using the Switch Configurations card.
-
Open the lifecycle management (Manage Switch Assets) dashboard.
-
Locate the Switch Configurations card.
-
Click Manage to view the list of existing switch templates.
Create Switch Configuration Profiles
No default configurations are provided on installation of NetQ. This enables you to create configurations that match your specifications.
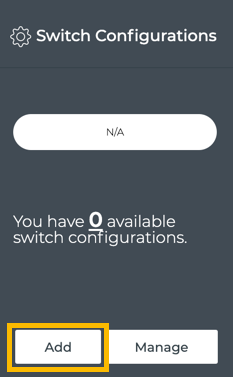
To create a switch configuration profile:
-
Open the lifecycle management (Manage Switch Assets) dashboard.
-
Click Add on the Switch Configurations card.
-
Enter a name for the configuration. This is required and must be a maximum of 22 characters, including spaces.
-
Decide which aspects of configuration you want included in this template: CL configuration and/or NetQ Agent configuration profiles.
-
Specify the settings for each using the following instructions.
Three configuration options are available for the Cumulus Linux configuration portion of the switch configuration profile. Note that two of those are required.
-
Select either the Default or Management interface to be used for communications with the switches with this profile assigned. Typically the default interface is xxx and the management interface is either eth0 or eth1.
-
Select the type of switch that will have this configuration assigned from the Choose Switch type dropdown. Currently this includes Mellanox SN series of switches.
-
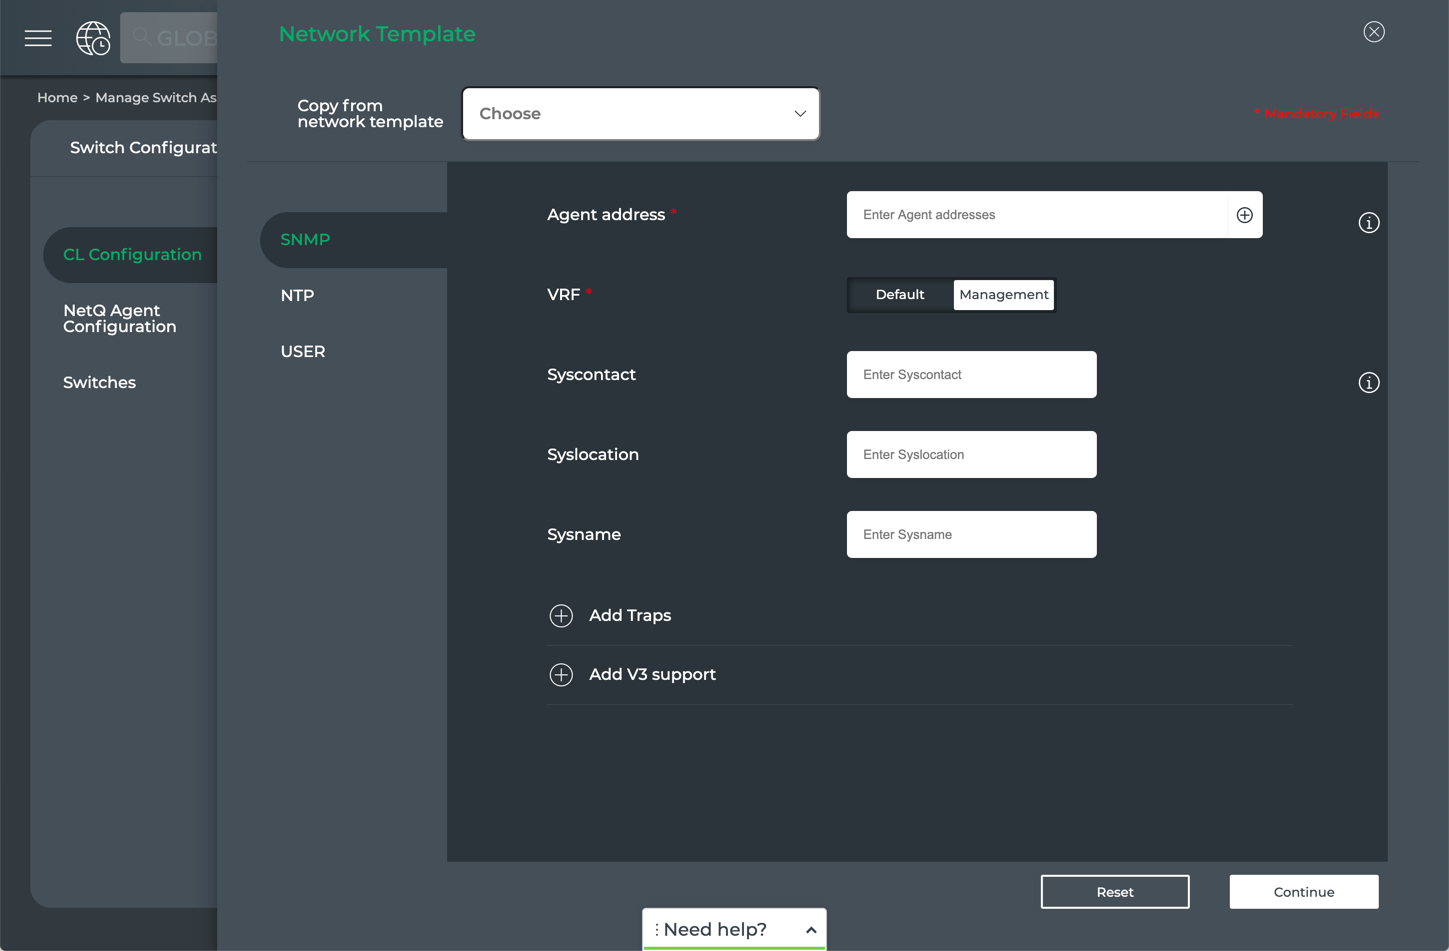
If you want to include network settings in this configuration, click Add.
This opens the Network Template forms. You can select an existing network template to pre-populate the parameters already specified in that template, or you can start from scratch to create a different set of network settings.
-
Select the template from the dropdown.
-
If you have selected a network template that has any SNMP parameters specified, you must specify the additional required parameters, then click Continue or click NTP.
-
If the selected network template has any NTP parameters specified, you must specify the additional required parameters, then click Continue or click User.
-
If the selected network template has any User parameters specified, you must specify the additional required parameters, then click Done.
-
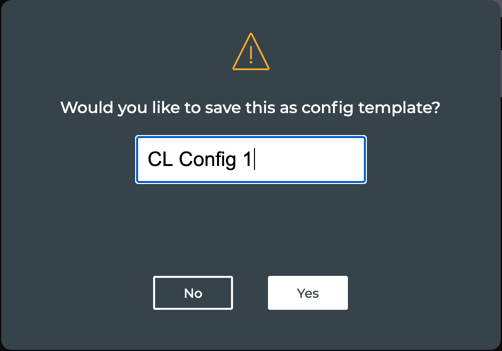
If you think this Cumulus Linux configuration is one that you will use regularly, you can make it a template. Enter a name for the configuration and click Yes.
-
Select the SNMP, NTP, or User forms to specify parameters for this configuration. Note that selected parameters are required on each form, noted by red asterisks (*). Refer to Create Network Templates for a description of the fields.
-
When you have completed the network settings, click Done.
If you are not on the User form, you need to go to that tab for the Done option to appear.
In either case, if you change your mind about including network settings, click ![]() to exit the form.
to exit the form.
- Click NetQ Agent Configuration.
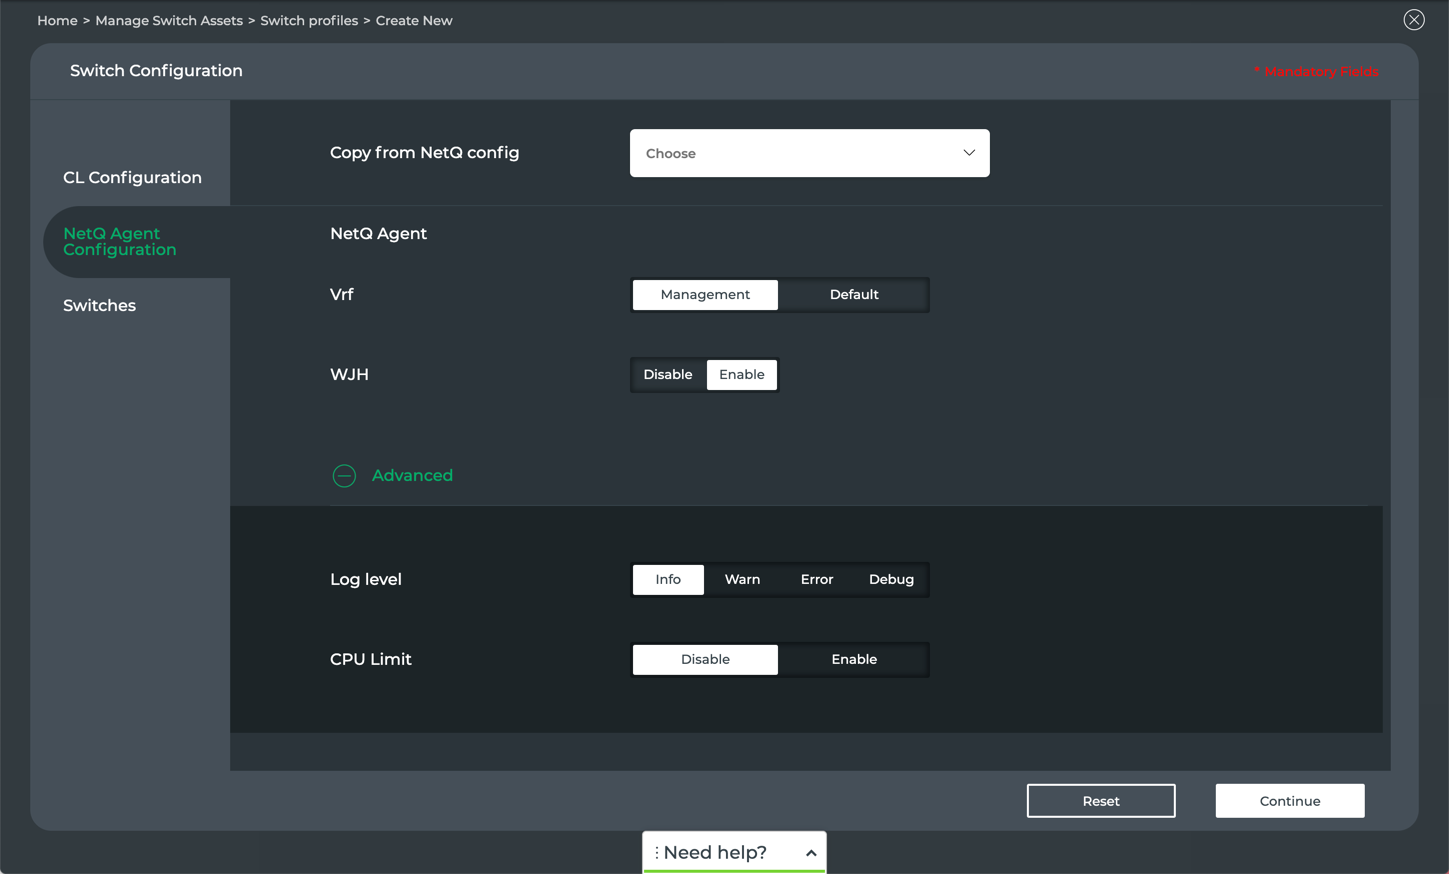
-
Select an existing NetQ Configuration profile or create a custom one.
To use an existing network template as a starting point:
-
Select the configuration profile from the dropdown.
-
Modify any of the parameters as needed or click Continue.
To create a new configuration profile:
-
Select values as appropriate for your situation. Refer to Create NetQ Configuration Profiles for descriptions of these parameters.
-
Click Continue.
-
The final step is to assign the switch configuration that you have just created to one or more switches.
To assign the configuration:
-
Click Switches.
A few items to note on this tab:
- Above the switches (left), the number of switches that can be assigned and the number of switches that have already been assigned
- Above the switches (right), management tools to help find the switches you want to assign with this configuration, including select all, clear, filter, and search.
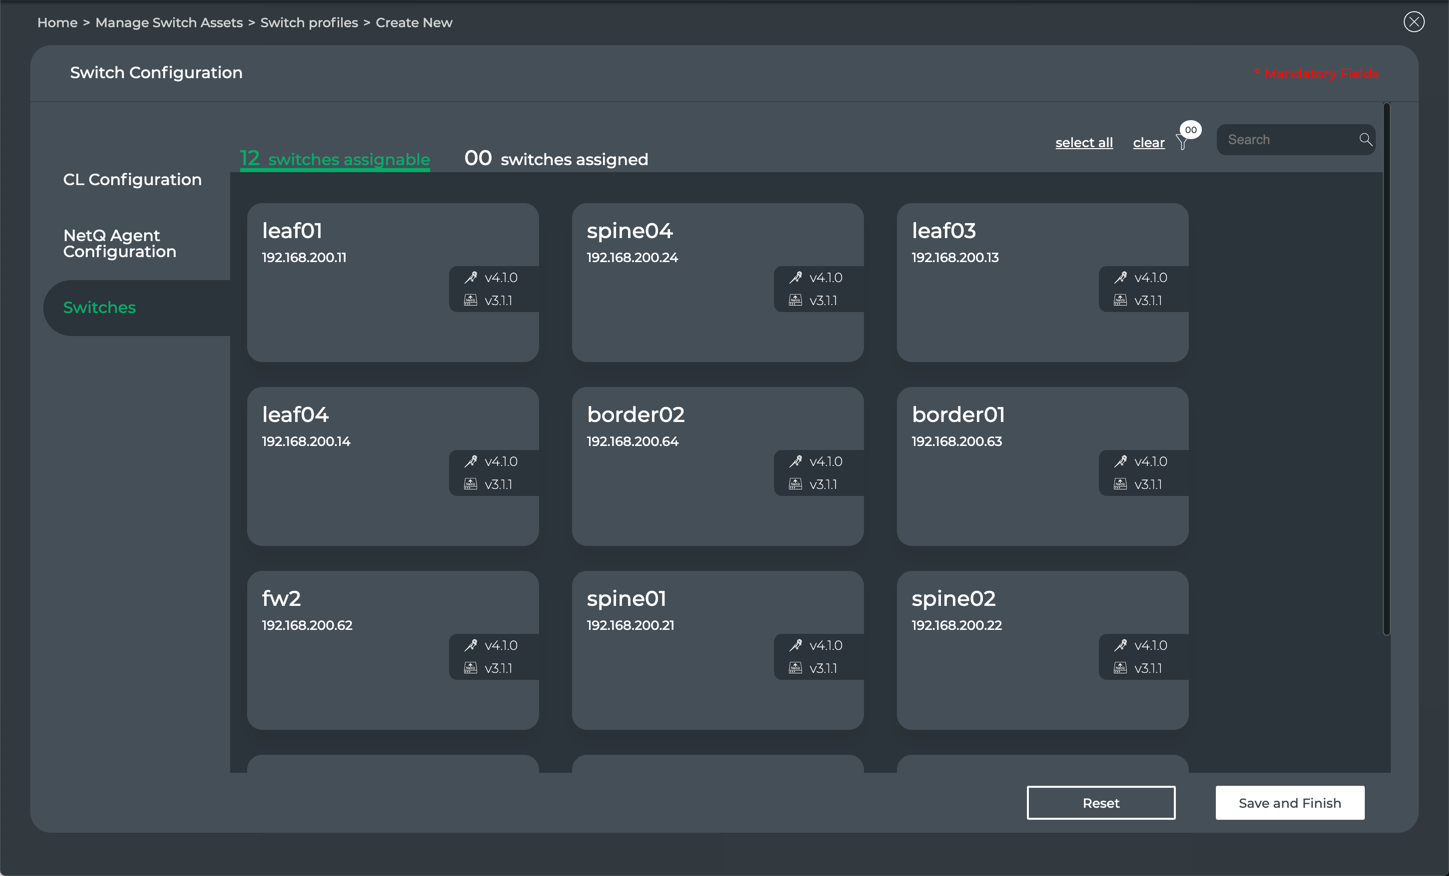
-
Select the switches to be assigned this configuration.
In this example, we searched for all leaf switches, then clicked select all.
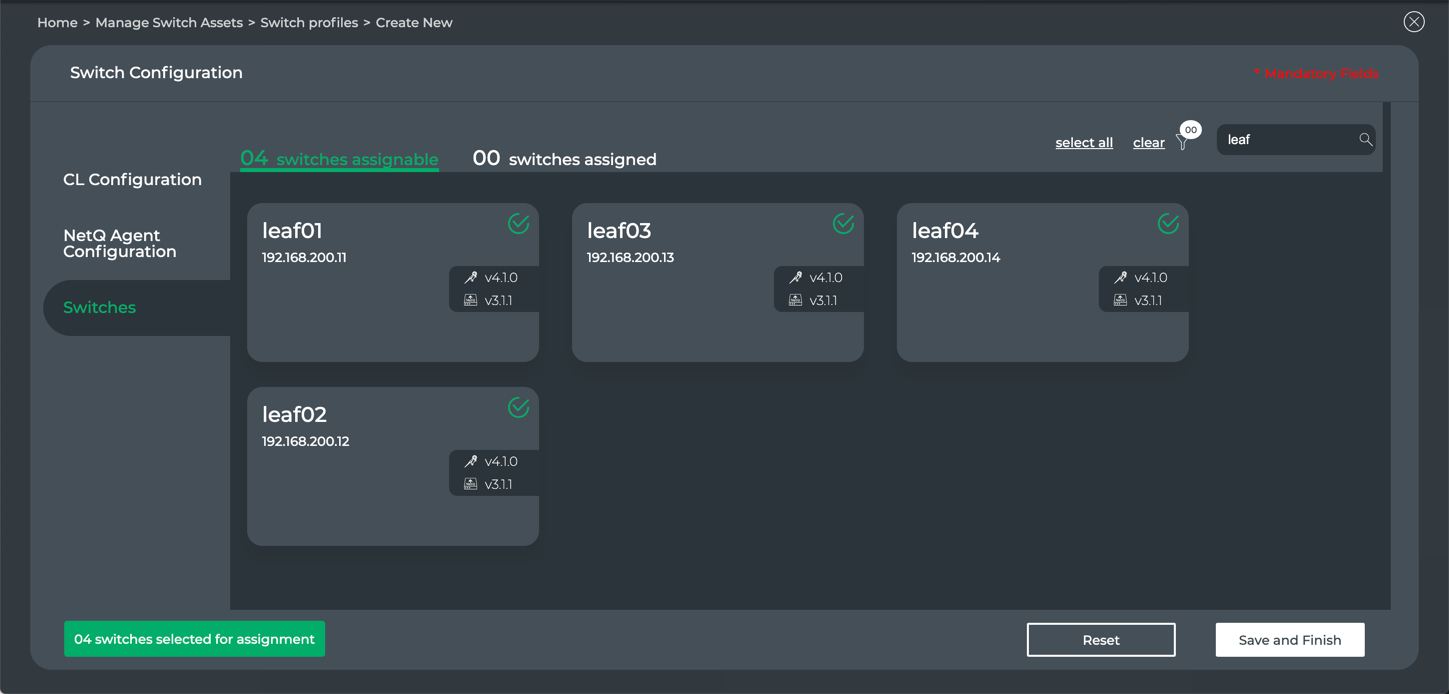
-
Click Save and Finish.
-
To run the job to apply the configuration, you first have the option to change the hostnames of the selected switches.
Either change the hostnames and then click Continue or just click Continue without changing the hostnames.
-
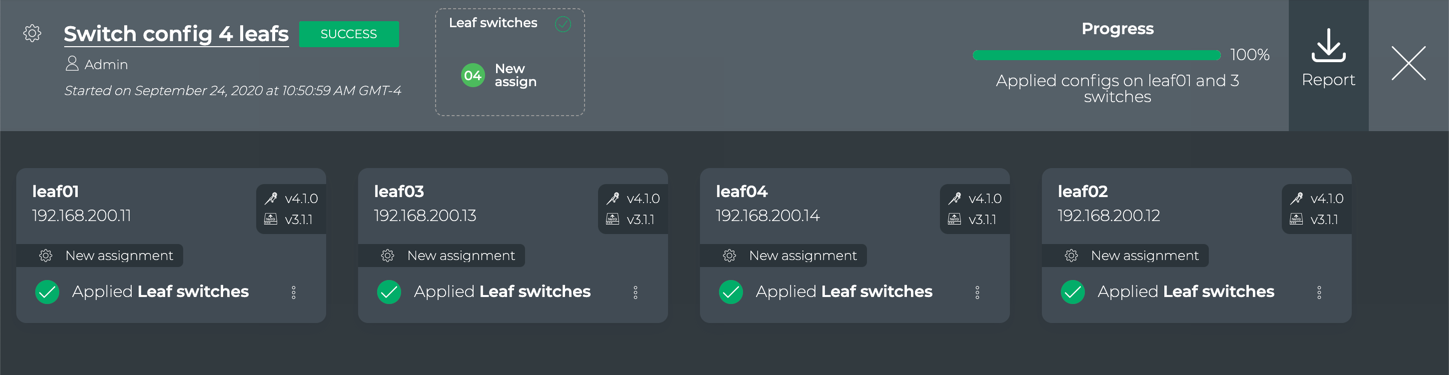
Enter a name for the job (maximum of 22 characters including spaces), then click Continue.
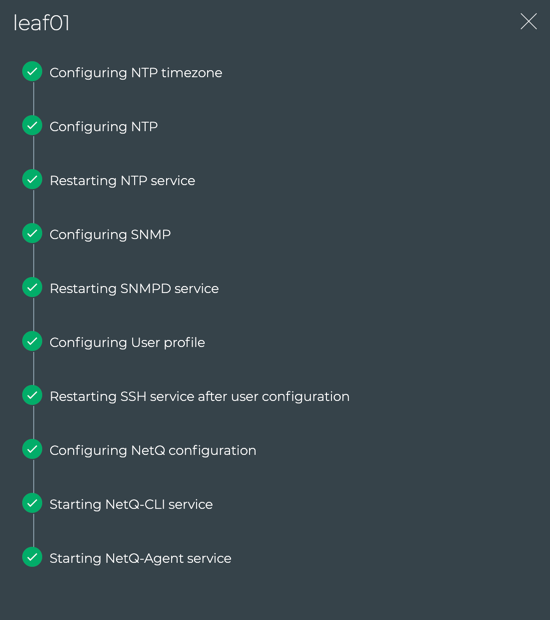
This opens the monitoring page for the assignment jobs, similar to the upgrade jobs. The job title bar indicates the name of the switch configuration being applied and the number of switches that to be assigned with the configuration. (After you have mulitple switch configurations created, you might have more than one configuration being applied in a single job.) Each switch element indicates its hostname, IP address, installed Cumulus Linux and NetQ versions, a note indicating this is a new assignment, the switch configuration being applied, and a menu that provides the detailed steps being executed. The last is useful when the assignment fails as any errors are included in this popup.
-
Click
 to return to the switch configuration page where you can either create another configuration and apply it. If you are finished assigning switch configurations to switches, click
  to return to the lifecycle management dashboard.
 -
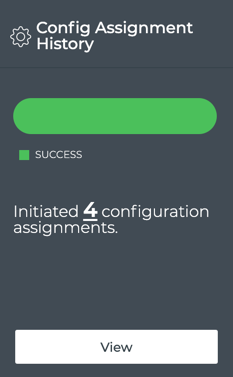
When you return the dashboard, your Switch Configurations card shows the new configurations and the Config Assignment History card appears that shows a summary status of all configuration assignment jobs attempted.
- Click View on the Config Assignment History card to open the details of all assignment jobs. Refer to Manage Switch Configurations for more detail about this card.
Edit a Switch Configuration
You can edit a switch configuration at any time. After you have made changes to the configuration, you can apply it to the same set of switches or modify the switches using the configuration as part of the editing process.
To edit a switch configuration:
-
Locate the Switch Configurations card on the lifecycle management dashboard.
-
Click Manage.
-
Locate the configuration you want to edit. Scroll down or filter the listing to help find the configuration when there are multiple configurations.
-
Click
, then select Edit. -
Follow the instructions in Create Switch Configuration Profiles, starting at Step 5, to make any required edits.
Clone a Switch Configuration
You can clone a switch configuration assignment job at any time.
To clone an assignment job:
-
Locate the Switch Configurations card on the lifecycle management dashboard.
-
Click Manage.
-
Locate the configuration you want to clone. Scroll down or filter the listing to help find the configuration when there are multiple configurations.
-
Click
, then select Clone. -
Click
, then select Edit. -
Change the Configuration Name.
-
Follow the instructions in Create Switch Configuration Profiles, starting at Step 5, to make any required edits.
Remove a Switch Configuration
You can remove a switch configuration at any time; however if there are switches with the given configuration assigned, you must first assign an alternate configuration to those switches.
To remove a switch configuration:
-
Locate the Switch Configurations card on the lifecycle management dashboard.
-
Click Manage.
-
Locate the configuration you want to remove. Scroll down or filter the listing to help find the configuration when there are multiple configurations.
-
Click
, then select Delete.-
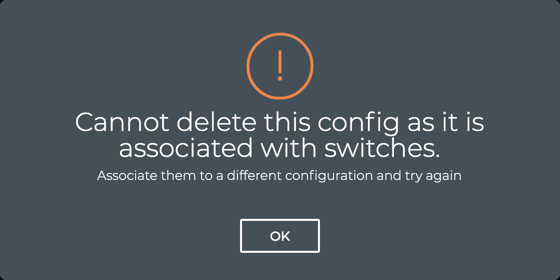
If any switches are assigned to this configuration, an error message appears. Assign a different switch configuration to the relevant switches and repeat the removal steps.
-
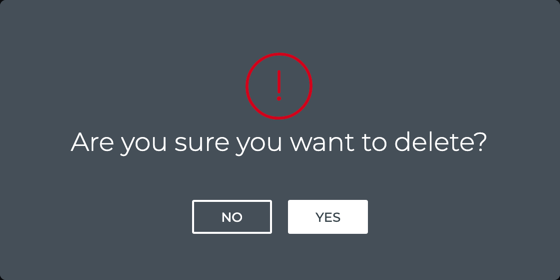
Otherwise, confirm the removal by clicking Yes.
-
Assign Existing Switch Configuration Profiles
You can assign existing switch configurations to one or more switches at any time. You can also change the switch configuration already assigned to a switch.
If you need to create a new switch configuration, follow the instructions in Create Switch Configuration Profiles.
Add an Assignment
As new switches are added to your network, you might want to use a switch configuration to speed the process and make sure it matches the configuration of similarly designated switches.
To assign an existing switch configuration to switches:
-
Locate the Switch Configurations card on the lifecycle management dashboard.
-
Click Manage.
-
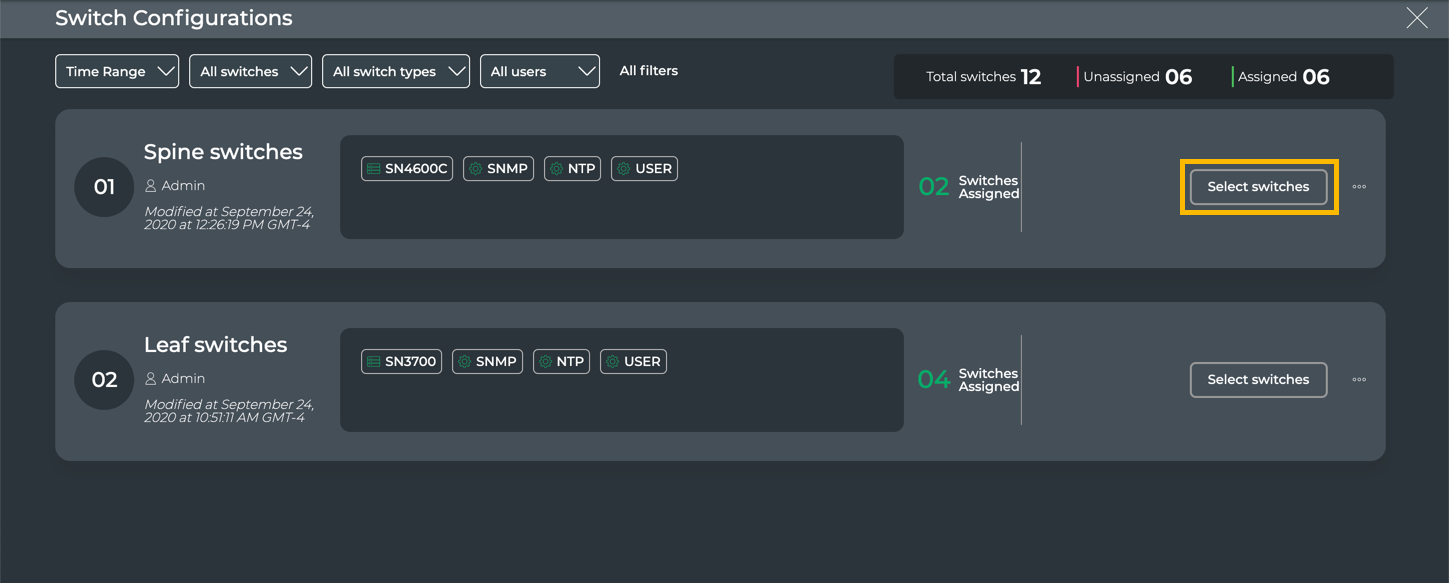
Locate the configuration you want to assign.
Scroll down or filter the listing by:
- Time Range: Enter a range of time in which the switch configuration was created, then click Done.
- All switches: Search for or select individual switches from the list, then click Done.
- All switch types: Search for or select individual switch series, then click Done.
- All users: Search for or select individual users who created a switch configuration, then click Done.
- All filters: Display all filters at once to apply multiple filters at once. Additional filter options are included here. Click Done when satisfied with your filter criteria.
By default, filters show all of that items of the given filter type until it is restricted by these settings.
-
Click Select switches in the switch configuration summary.
-
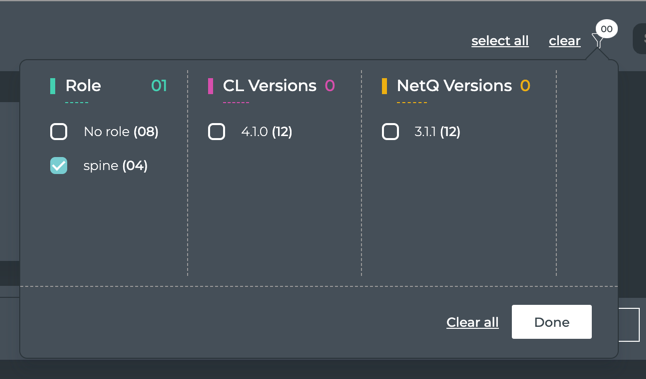
Select the switches that you want to assign to the switch configuration.
Scroll down or use the select all, clear, filter , and Search options to help find the switches of interest. You can filter by role, Cumulus Linux version, or NetQ version. The badge on the filter icon indicates the number of filters applied. Colors on filter options are only used to distinguish between options. No other indication is intended.
In this example, we have one role defined, and we have selected that role.
The result is two switches. Note that only the switches that meet the criteria and have no switch configuration assigned are shown. In this example, there are two additional switches with the spine role, but they already have a switch configuration assigned to them. Click on the link above the list to view those switches.
Continue narrowing the list of switches until all or most of the switches are visible.
-
Hover over the switches and click
or click select all.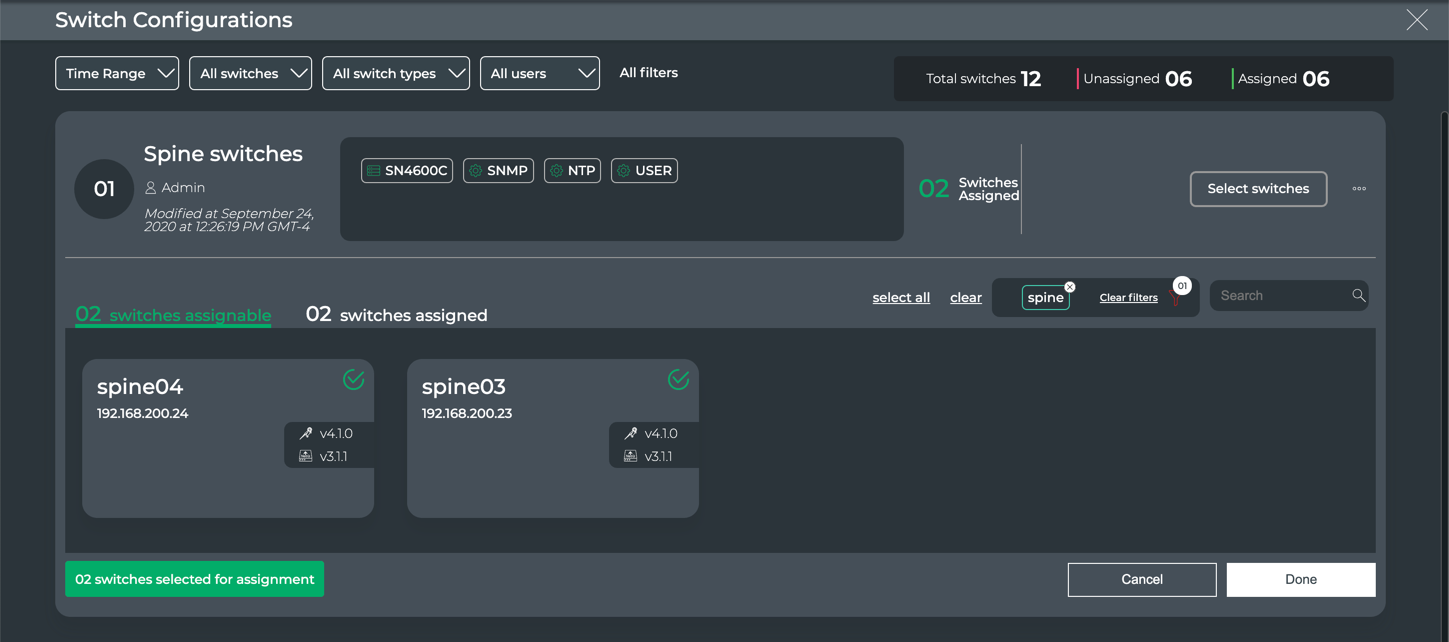
-
Click Done.
-
To run the job to apply the configuration, you first have the option to change the hostnames of the selected switches.
Either change the hostnames and then click Continue or just click Continue without changing the hostnames.
-
If you have additional switches that you want to assign a different switch configuration, follow Steps 3-7 for each switch configuration.
If you do this, multiple assignment configurations are listed in the bottom area of the page. They all become part of a single assignment job.
-
When you have all the assignments configured, click Start Assignment to start the job.
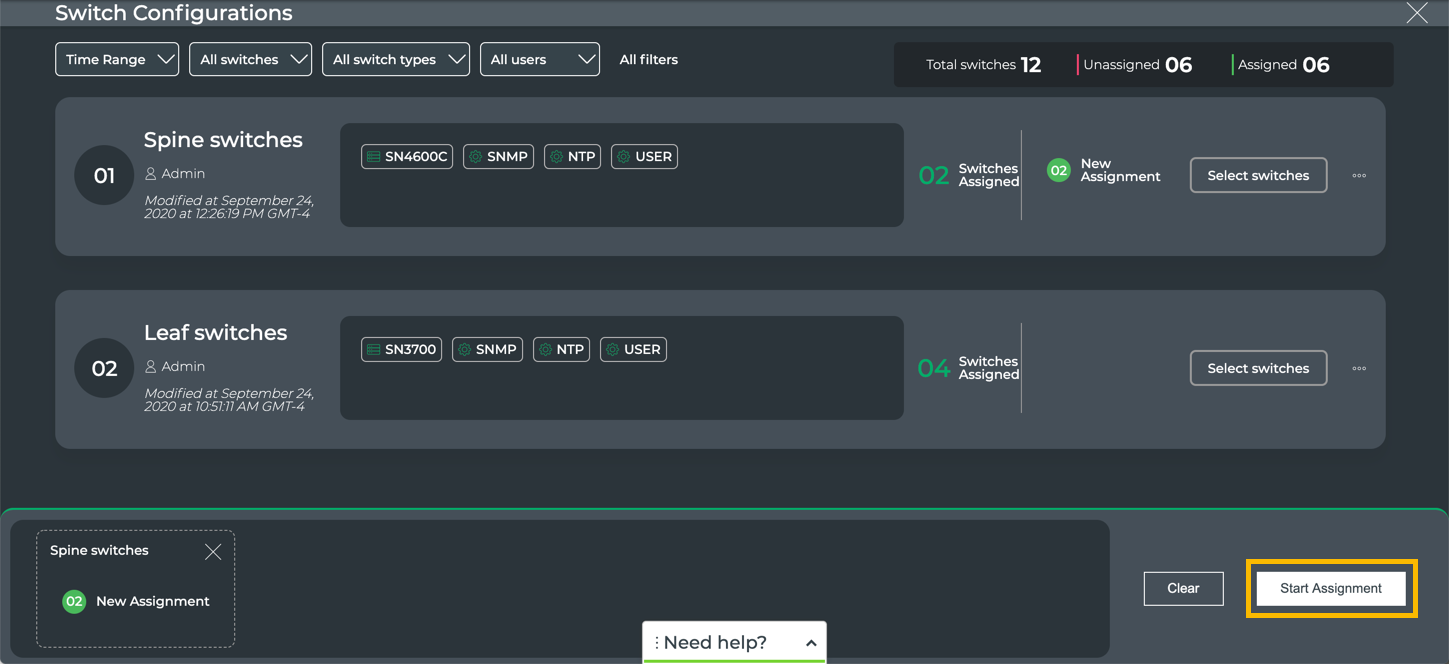
-
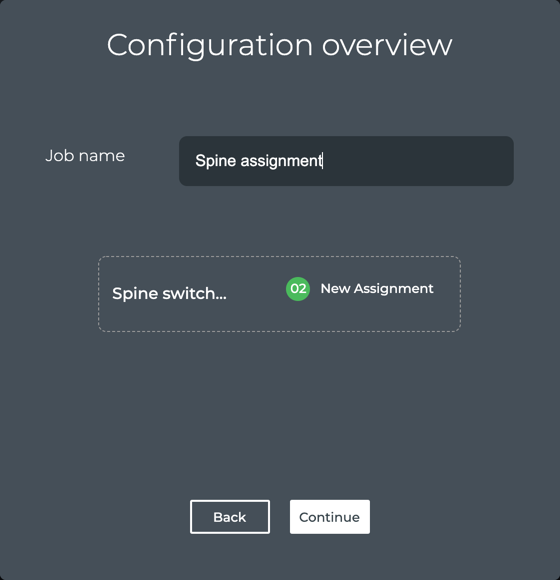
Enter a name for the job (maximum of 22 characters including spaces), then click Continue.
-
Watch the progress or click
to return to the switch configuration page where you can either create another configuration and apply it. If you are finished assigning switch configurations to switches, click to return to the lifecycle management dashboard.The Config Assignment History card is updated to include the status of the job you just ran.
Change the Configuration Assignment on a Switch
You can change the switch configuration assignment at any time. For example you might have a switch that is starting to experience reduced performance, so you want to run What Just Happened on it to see if there is a particular problem area. You can reassign this switch to a new configuration with WJH enabled on the NetQ Agent while you test it. Then you can change it back to its original assignment.
To change the configuration assignment on a switch:
-
Locate the Switch Configurations card on the lifecycle management dashboard.
-
Click Manage.
-
Locate the configuration you want to assign. Scroll down or filter the listing to help find the configuration when there are multiple configurations.
-
Click Select switches in the switch configuration summary.
-
Select the switches that you want to assign to the switch configuration.
Scroll down or use the select all, clear, filter , and Search options to help find the switch(es) of interest.
-
Hover over the switches and click
or click select all. -
Click Done.
-
Click Start Assignment.
-
Watch the progress.
On completion, each switch shows the previous assignment and the newly applied configuration assignment.

-
Click
to return to the switch configuration page where you can either create another configuration and apply it. If you are finished assigning switch configurations to switches, click to return to the lifecycle management dashboard.The Config Assignment History card is updated to include the status of the job you just ran.
View Switch Configuration History
You can view a history of switch configuration assignments using the Config Assignment History card.
To view a summary, locate the Config Assignment History card on the lifecycle management dashboard.
To view details of the assignment jobs, click View.
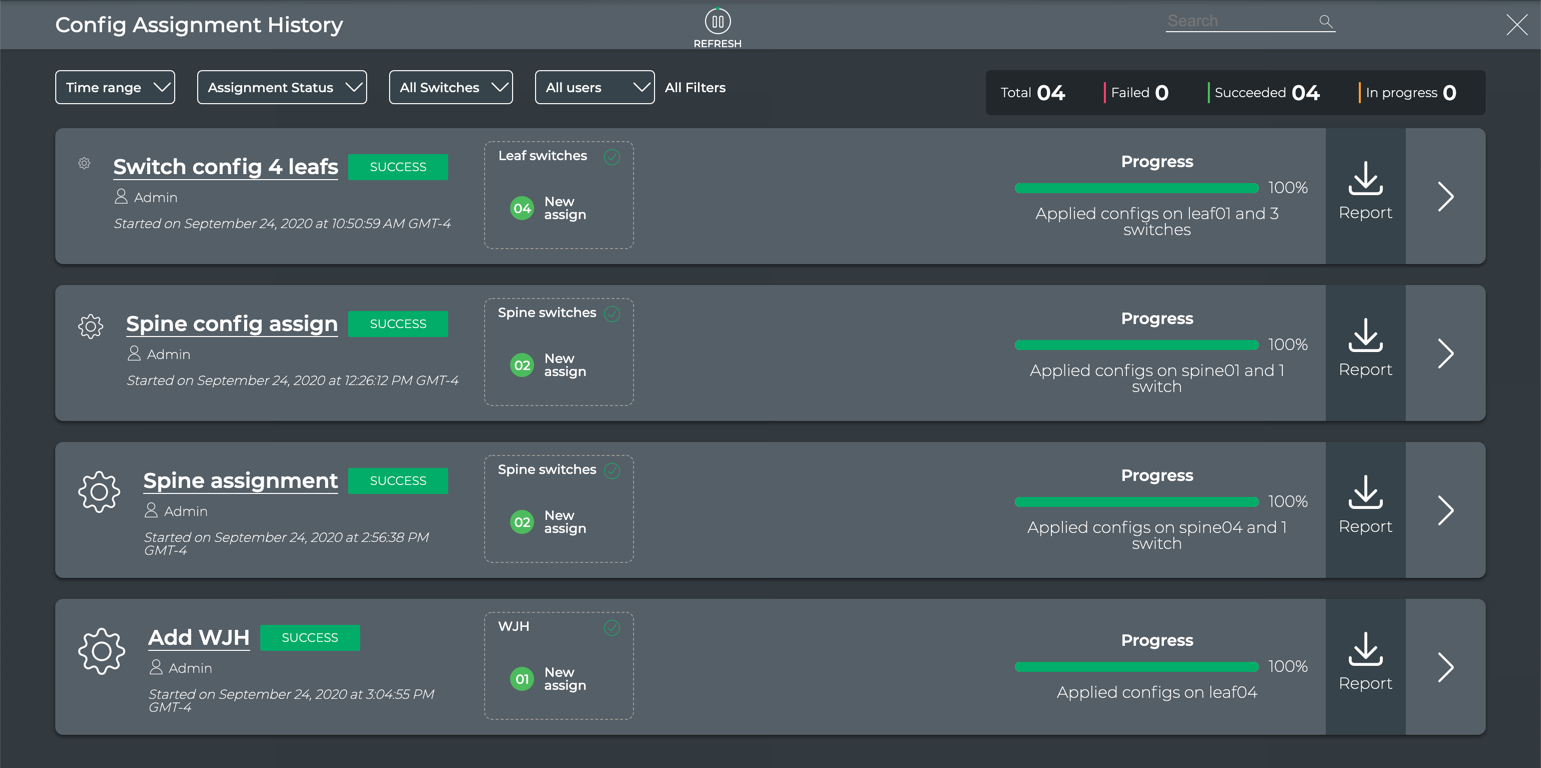
Above the jobs, a number of filters are provided to help you find a particular job. To the right of those is a status summary of all jobs. Click ![]() in the job listing to see the details of that job. Click
in the job listing to see the details of that job. Click ![]() to return to the lifecycle management dashboard.
to return to the lifecycle management dashboard.