Application Management
As an administrator, you can manage access to and various application-wide settings for the Cumulus NetQ UI from a single location.
Individual users have the ability to set preferences specific to their workspaces. This information is covered separately. Refer to Set User Preferences.
NetQ Management Workbench
The NetQ Management workbench is accessed from the main menu. For the user(s) responsible for maintaining the application, this is a good place to start each day.
To open the workbench, click ![]() , and select Management under the Admin column.
, and select Management under the Admin column.
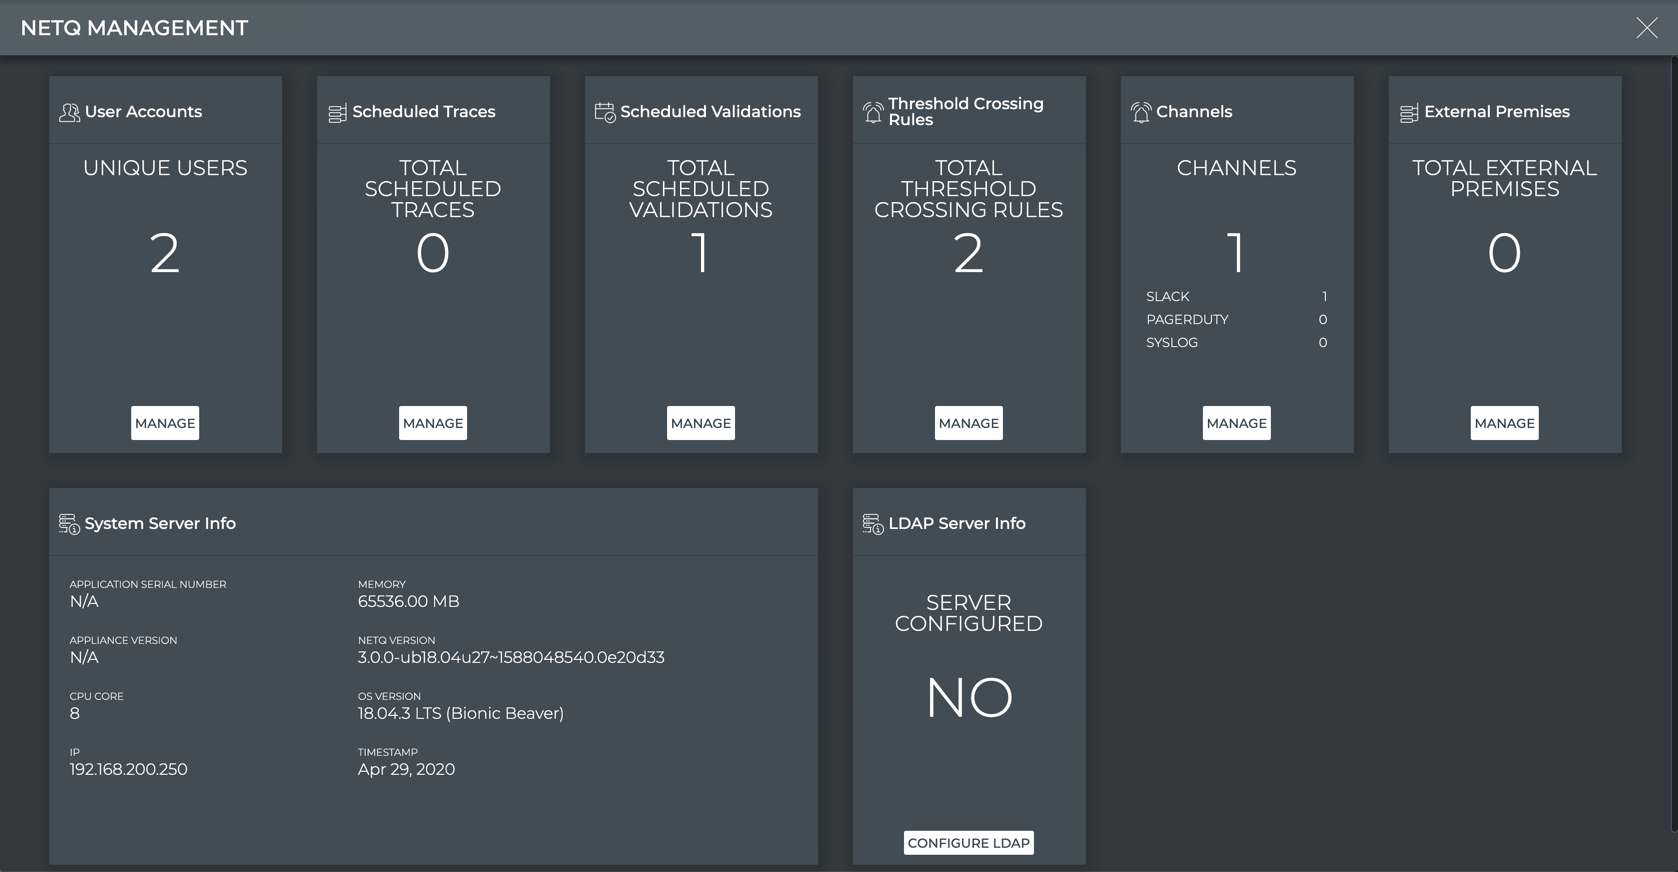
For cloud deployments, the LDAP Server Info card is not available. Refer to Integrate NetQ with Your LDAP server for details.
Manage User Accounts
From the NetQ Management workbench, you can view the number of users with accounts in the system. As an administrator, you can also add, modify, and delete user accounts using the User Accounts card.
Add New User Account
For each user that monitors at least one aspect of your data center network, a user account is needed. Adding a local user is described here. Refer to Integrate NetQ with Your LDAP server for instructions for adding LDAP users.
To add a new user account:
-
Click Manage on the User Accounts card to open the User Accounts tab.
-
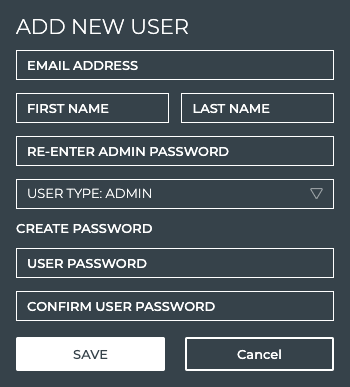
Click Add User.
-
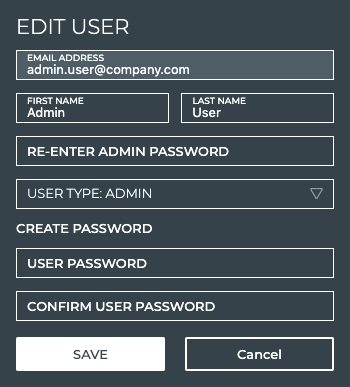
Enter the user’s email address, along with their first and last name.
Be especially careful entering the email address as you cannot change it once you save the account. If you save a mistyped email address, you must delete the account and create a new one.
-
Select the user type: Admin or User.
-
Enter your password in the Admin Password field (only users with administrative permissions can add users).
-
Create a password for the user.
- Enter a password for the user.
- Re-enter the user password. If you do not enter a matching password, it will be underlined in red.
-
Click Save to create the user account, or Cancel to discard the user account.
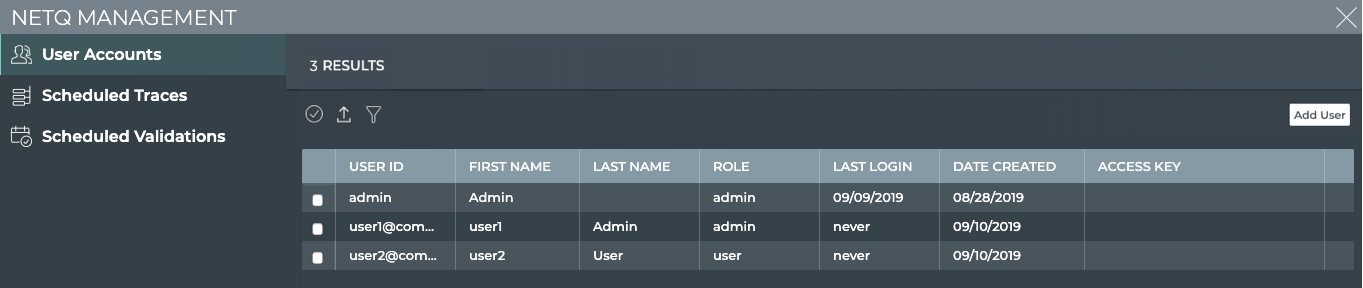
By default the User Accounts table is sorted by Role.
-
Repeat these steps to add all of your users.
Edit a User Name
If a user’s first or last name was incorrectly entered, you can fix them easily.
To change a user name:
-
Click Manage on the User Accounts card to open the User Accounts tab.
-
Click the checkbox next to the account you want to edit.
-
Click
 above the account list.
 -
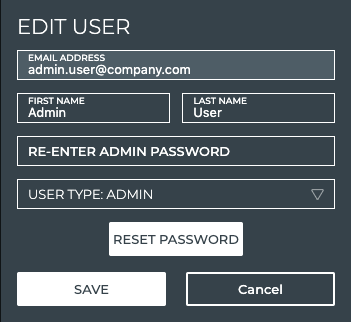
Modify the first and/or last name as needed.
-
Enter your admin password.
-
Click Save to commit the changes or Cancel to discard them.
Change a User’s Password
Should a user forget his password or for security reasons, you can change a password for a particular user account.
To change a password:
-
Click Manage on the User Accounts card to open the User Accounts tab.
-
Click the checkbox next to the account you want to edit.
-
Click
above the account list. -
Click Reset Password.
-
Enter your admin password.
-
Enter a new password for the user.
-
Re-enter the user password. Tip: If the password you enter does not match, Save is gray (not activated).
-
Click Save to commit the change, or Cancel to discard the change.
Change a User’s Access Permissions
If a particular user has only standard user permissions and they need administrator permissions to perform their job (or the opposite, they have administrator permissions, but only need user permissions), you can modify their access rights.
To change access permissions:
-
Click Manage on the User Accounts card to open the User Accounts tab.
-
Click the checkbox next to the account you want to edit.
-
Click
above the account list. -
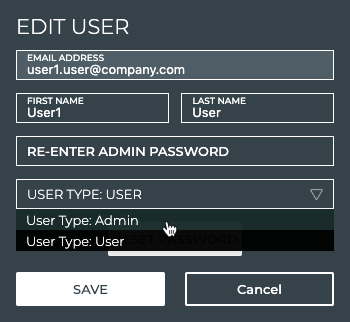
Select the appropriate user type from the dropdown list.
-
Enter your admin password.
-
Click Save to commit the change, or Cancel to discard the change.
Correct a Mistyped User ID (Email Address)
You cannot edit a user’s email address, because this is the identifier the system uses for authentication. If you need to change an email address, you must create a new one for this user. Refer to Add New User Account. You should delete the incorrect user account. Select the user account, and click ![]() .
.
Export a List of User Accounts
You can export user account information at any time using the User Accounts tab.
To export information for one or more user accounts:
-
Click Manage on the User Accounts card to open the User Accounts tab.
-
Select one or more accounts that you want to export by clicking the checkbox next to them. Alternately select all accounts by clicking
 .
. -
Click
 to export the selected user accounts.
Delete a User Account
NetQ application administrators should remove user accounts associated with users that are no longer using the application.
To delete one or more user accounts:
-
Click Manage on the User Accounts card to open the User Accounts tab.
-
Select one or more accounts that you want to remove by clicking the checkbox next to them.
-
Click
 to remove the accounts.
Manage Scheduled Traces
From the NetQ Management workbench, you can view the number of traces scheduled to run in the system. A set of default traces are provided with the NetQ GUI. As an administrator, you can run one or more scheduled traces, add new scheduled traces, and edit or delete existing traces.
Add a Scheduled Trace
You can create a scheduled trace to provide regular status about a particularly important connection between a pair of devices in your network or for temporary troubleshooting.
To add a trace:
-
Click Manage on the Scheduled Traces card to open the Scheduled Traces tab.
-
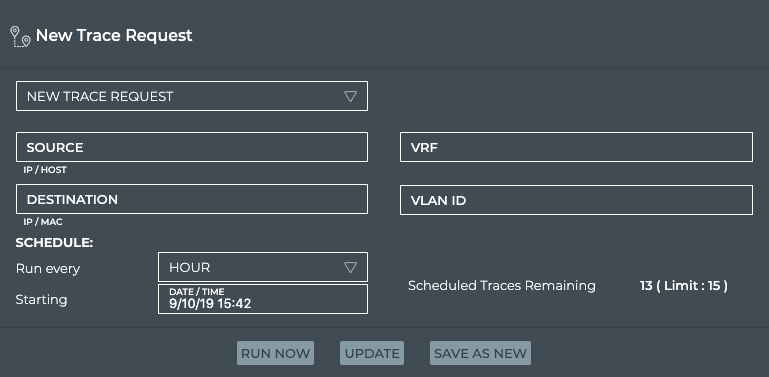
Click Add Trace to open the large New Trace Request card.
-
Enter source and destination addresses.
For layer 2 traces, the source must be a hostname and the destination must be a MAC address. For layer 3 traces, the source can be a hostname or IP address, and the destination must be an IP address.
-
Specify a VLAN for a layer 2 trace or (optionally) a VRF for a layer 3 trace.
-
Set the schedule for the trace, by selecting how often to run the trace and when to start it the first time.
-
Click Save As New to add the trace. You are prompted to enter a name for the trace in the Name field.
If you want to run the new trace right away for a baseline, select the trace you just added from the dropdown list, and click Run Now.
Delete a Scheduled Trace
If you do not want to run a given scheduled trace any longer, you can remove it.
To delete a scheduled trace:
-
Click Manage on the Scheduled Trace card to open the Scheduled Traces tab.
-
Select at least one trace by clicking on the checkbox next to the trace.
-
Click
.
Export a Scheduled Trace
You can export a scheduled trace configuration at any time using the Scheduled Traces tab.
To export one or more scheduled trace configurations:
-
Click Manage on the Scheduled Trace card to open the Scheduled Traces tab.
-
Select one or more traces by clicking on the checkbox next to the trace. Alternately, click
to select all traces. -
Click
to export the selected traces.
Manage Scheduled Validations
From the NetQ Management workbench, you can view the total number of validations scheduled to run in the system. A set of default scheduled validations are provided and pre-configured with the NetQ UI. These are not included in the total count. As an administrator, you can view and export the configurations for all scheduled validations, or add a new validation.
View Scheduled Validation Configurations
You can view the configuration of a scheduled validation at any time. This can be useful when you are trying to determine if the validation request needs to be modified to produce a slightly different set of results (editing or cloning) or if it would be best to create a new one.
To view the configurations:
-
Click Manage on the Scheduled Validations card to open the Scheduled Validations tab.
-
Click
 in the top right to return to your NetQ Management cards.
Add a Scheduled Validation
You can add a scheduled validation at any time using the Scheduled Validations tab.
To add a scheduled validation:
-
Click Manage on the Scheduled Validations card to open the Scheduled Validations tab.
-
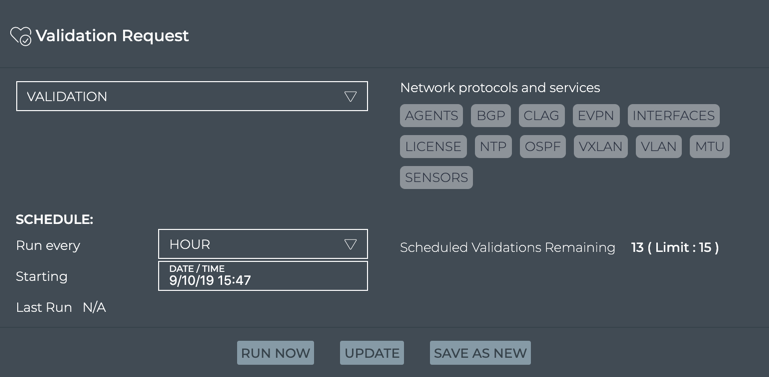
Click Add Validation to open the large Validation Request card.
-
Configure the request. Refer to Validate Network Protocol and Service Operations for details.
Delete Scheduled Validations
You can remove a scheduled validation that you created (one of the 15 allowed) at any time. You cannot remove the default scheduled validations included with NetQ.
To remove a scheduled validation:
-
Click Manage on the Scheduled Validations card to open the Scheduled Validations tab.
-
Select one or more validations that you want to delete.
-
Click
above the validations list.
Export Scheduled Validation Configurations
You can export one or more scheduled validation configurations at any time using the Scheduled Validations tab.
To export a scheduled validation:
-
Click Manage on the Scheduled Validations card to open the Scheduled Validations tab.
-
Select one or more validations by clicking the checkbox next to the validation. Alternately, click
to select all validations. -
Click
to export selected validations.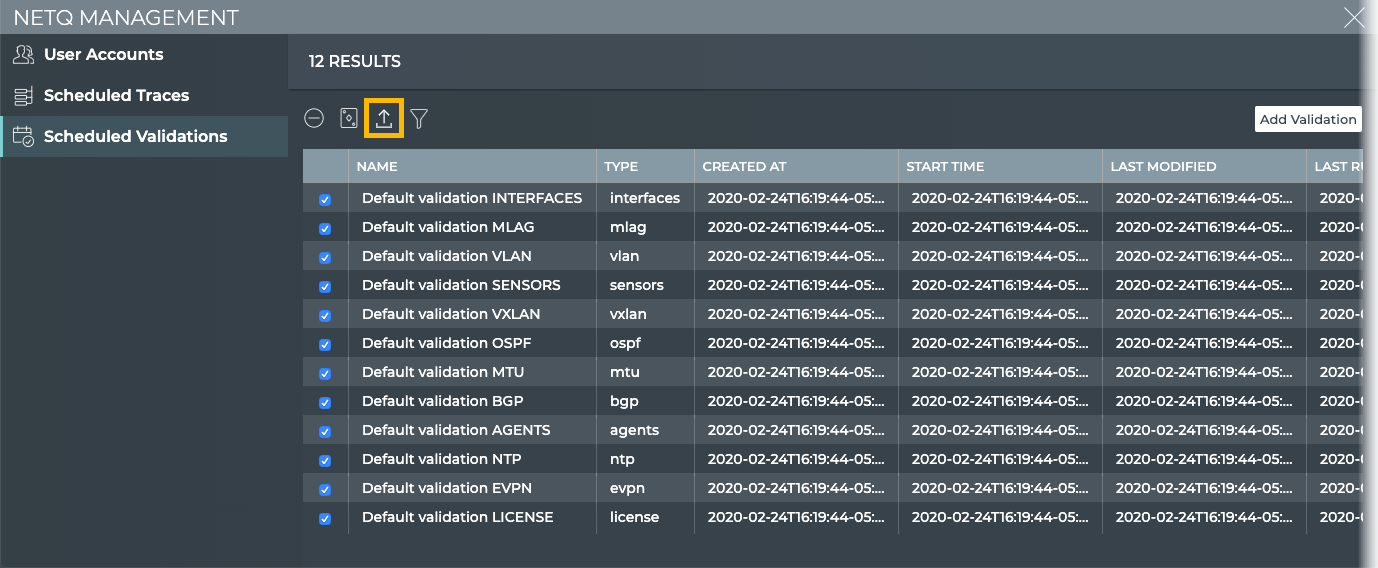
Manage Threshold Crossing Rules
NetQ supports a set of events that are triggered by crossing a user-defined threshold. These events allow detection and prevention of network failures for selected interface, utilization, sensor, forwarding, ACL and digital optics events.
A notification configuration must contain one rule. Each rule must contain a scope and a threshold.
Supported Events
The following events are supported:
| Event ID | Description |
|---|---|
| TCA_TCAM_IN_ACL_V4_FILTER_UPPER | Number of ingress ACL filters for IPv4 addresses on a given switch or host is greater than maximum threshold |
| TCA_TCAM_EG_ACL_V4_FILTER_UPPER | Number of egress ACL filters for IPv4 addresses on a given switch or host is greater than maximum threshold |
| TCA_TCAM_IN_ACL_V4_MANGLE_UPPER | Number of ingress ACL mangles for IPv4 addresses on a given switch or host is greater than maximum threshold |
| TCA_TCAM_EG_ACL_V4_MANGLE_UPPER | Number of egress ACL mangles for IPv4 addresses on a given switch or host is greater than maximum threshold |
| TCA_TCAM_IN_ACL_V6_FILTER_UPPER | Number of ingress ACL filters for IPv6 addresses on a given switch or host is greater than maximum threshold |
| TCA_TCAM_EG_ACL_V6_FILTER_UPPER | Number of egress ACL filters for IPv6 addresses on a given switch or host is greater than maximum threshold |
| TCA_TCAM_IN_ACL_V6_MANGLE_UPPER | Number of ingress ACL mangles for IPv6 addresses on a given switch or host is greater than maximum threshold |
| TCA_TCAM_EG_ACL_V6_MANGLE_UPPER | Number of egress ACL mangles for IPv6 addresses on a given switch or host is greater than maximum threshold |
| TCA_TCAM_IN_ACL_8021x_FILTER_UPPER | Number of ingress ACL 802.1 filters on a given switch or host is greater than maximum threshold |
| TCA_TCAM_ACL_L4_PORT_CHECKERS_UPPER | Number of ACL port range checkers on a given switch or host is greater than maximum threshold |
| TCA_TCAM_ACL_REGIONS_UPPER | Number of ACL regions on a given switch or host is greater than maximum threshold |
| TCA_TCAM_IN_ACL_MIRROR_UPPER | Number of ingress ACL mirrors on a given switch or host is greater than maximum threshold |
| TCA_TCAM_ACL_18B_RULES_UPPER | Number of ACL 18B rules on a given switch or host is greater than maximum threshold |
| TCA_TCAM_ACL_32B_RULES_UPPER | Number of ACL 32B rules on a given switch or host is greater than maximum threshold |
| TCA_TCAM_ACL_54B_RULES_UPPER | Number of ACL 54B rules on a given switch or host is greater than maximum threshold |
| TCA_TCAM_IN_PBR_V4_FILTER_UPPER | Number of ingress policy-based routing (PBR) filters for IPv4 addresses on a given switch or host is greater than maximum threshold |
| TCA_TCAM_IN_PBR_V6_FILTER_UPPER | Number of ingress policy-based routing (PBR) filters for IPv6 addresses on a given switch or host is greater than maximum threshold |
| Event ID | Description |
|---|---|
| TCA_INPUT_POWER_UPPER | Transceiver Input power (mW) for the digital optical module on a given switch or host is greater than maximum threshold |
| TCA_INPUT_POWER_LOWER | Transceiver Input power (mW) for the digital optical module on a given switch or host is less than minimum threshold |
| TCA_LASER_BIAS_UPPER | Laser bias current (mA) for the digital optical module on a given switch or host is greater than maximum threshold |
| TCA_LASER_BIAS_LOWER | Laser bias current (mA) for the digital optical module on a given switch or host is less than minimum threshold |
| TCA_LASER_OUTPUT_POWER_UPPER | Laser output power (mW) for the digital optical module on a given switch or host is greater than maximum threshold |
| TCA_LASER_OUTPUT_POWER_LOWER | Laser output power (mW) for the digital optical module on a given switch or host is less than minimum threshold |
| TCA_MODULE_TEMPERATURE_UPPER | Digital optical module temperature (°C) on a given switch or host is greater than maximum threshold |
| TCA_MODULE_TEMPERATURE_LOWER | Digital optical module temperature (°C) on a given switch or host is less than minimum threshold |
| TCA_TRANSCEIVER_VOLTAGE_UPPER | Transceiver voltage (mV) on a given switch or host is greater than maximum threshold |
| TCA_TRANSCEIVER_VOLTAGE_LOWER | Transceiver voltage (mV) on a given switch or host is less than minimum threshold |
| Event ID | Description |
|---|---|
| TCA_TCAM_TOTAL_ROUTE_ENTRIES_UPPER | Number of routes on a given switch or host is greater than maximum threshold |
| TCA_TCAM_TOTAL_MCAST_ROUTES_UPPER | Number of multicast routes on a given switch or host is greater than maximum threshold |
| TCA_TCAM_MAC_ENTRIES_UPPER | Number of MAC addresses on a given switch or host is greater than maximum threshold |
| TCA_TCAM_IPV4_ROUTE_UPPER | Number of IPv4 routes on a given switch or host is greater than maximum threshold |
| TCA_TCAM_IPV4_HOST_UPPER | Number of IPv4 hosts on a given switch or host is greater than maximum threshold |
| TCA_TCAM_IPV6_ROUTE_UPPER | Number of IPv6 hosts on a given switch or host is greater than maximum threshold |
| TCA_TCAM_IPV6_HOST_UPPER | Number of IPv6 hosts on a given switch or host is greater than maximum threshold |
| TCA_TCAM_ECMP_NEXTHOPS_UPPER | Number of equal cost multi-path (ECMP) next hop entries on a given switch or host is greater than maximum threshold |
| Event ID | Description |
|---|---|
| TCA_RXBROADCAST_UPPER | rx_broadcast bytes per second on a given switch or host is greater than maximum threshold |
| TCA_RXBYTES_UPPER | rx_bytes per second on a given switch or host is greater than maximum threshold |
| TCA_RXMULTICAST_UPPER | rx_multicast per second on a given switch or host is greater than maximum threshold |
| TCA_TXBROADCAST_UPPER | tx_broadcast bytes per second on a given switch or host is greater than maximum threshold |
| TCA_TXBYTES_UPPER | tx_bytes per second on a given switch or host is greater than maximum threshold |
| TCA_TXMULTICAST_UPPER | tx_multicast bytes per second on a given switch or host is greater than maximum threshold |
| Event ID | Description |
|---|---|
| TCA_CPU_UTILIZATION_UPPER | CPU utilization (%) on a given switch or host is greater than maximum threshold |
| TCA_DISK_UTILIZATION_UPPER | Disk utilization (%) on a given switch or host is greater than maximum threshold |
| TCA_MEMORY_UTILIZATION_UPPER | Memory utilization (%) on a given switch or host is greater than maximum threshold |
| Event ID | Description |
|---|---|
| TCA_SENSOR_FAN_UPPER | Switch sensor reported fan speed on a given switch or host is greater than maximum threshold |
| TCA_SENSOR_POWER_UPPER | Switch sensor reported power (Watts) on a given switch or host is greater than maximum threshold |
| TCA_SENSOR_TEMPERATURE_UPPER | Switch sensor reported temperature (°C) on a given switch or host is greater than maximum threshold |
| TCA_SENSOR_VOLTAGE_UPPER | Switch sensor reported voltage (Volts) on a given switch or host is greater than maximum threshold |
Define a Scope
A scope is used to filter the events generated by a given rule. Scope values are set on a per TCA rule basis. All rules can be filtered on Hostname. Some rules can also be filtered by other parameters.
| Event ID | Scope Parameters |
|---|---|
| TCA_TCAM_IN_ACL_V4_FILTER_UPPER | Hostname |
| TCA_TCAM_EG_ACL_V4_FILTER_UPPER | Hostname |
| TCA_TCAM_IN_ACL_V4_MANGLE_UPPER | Hostname |
| TCA_TCAM_EG_ACL_V4_MANGLE_UPPER | Hostname |
| TCA_TCAM_IN_ACL_V6_FILTER_UPPER | Hostname |
| TCA_TCAM_EG_ACL_V6_FILTER_UPPER | Hostname |
| TCA_TCAM_IN_ACL_V6_MANGLE_UPPER | Hostname |
| TCA_TCAM_EG_ACL_V6_MANGLE_UPPER | Hostname |
| TCA_TCAM_IN_ACL_8021x_FILTER_UPPER | Hostname |
| TCA_TCAM_ACL_L4_PORT_CHECKERS_UPPER | Hostname |
| TCA_TCAM_ACL_REGIONS_UPPER | Hostname |
| TCA_TCAM_IN_ACL_MIRROR_UPPER | Hostname |
| TCA_TCAM_ACL_18B_RULES_UPPER | Hostname |
| TCA_TCAM_ACL_32B_RULES_UPPER | Hostname |
| TCA_TCAM_ACL_54B_RULES_UPPER | Hostname |
| TCA_TCAM_IN_PBR_V4_FILTER_UPPER | Hostname |
| TCA_TCAM_IN_PBR_V6_FILTER_UPPER | Hostname |
| Event ID | Scope Parameters |
|---|---|
| TCA_INPUT_POWER_UPPER | xxx |
| TCA_INPUT_POWER_LOWER | xxx |
| TCA_LASER_BIAS_UPPER | xxx |
| TCA_LASER_BIAS_LOWER | xxx |
| TCA_LASER_OUTPUT_POWER_UPPER | xxx |
| TCA_LASER_OUTPUT_POWER_LOWER | xxx |
| TCA_MODULE_TEMPERATURE_UPPER | xxx |
| TCA_MODULE_TEMPERATURE_LOWER | xxx |
| TCA_TRANSCEIVER_VOLTAGE_UPPER | xxx |
| TCA_TRANSCEIVER_VOLTAGE_LOWER | xxx |
| Event ID | Scope Parameters |
|---|---|
| TCA_TCAM_TOTAL_ROUTE_ENTRIES_UPPER | Hostname |
| TCA_TCAM_TOTAL_MCAST_ROUTES_UPPER | Hostname |
| TCA_TCAM_MAC_ENTRIES_UPPER | Hostname |
| TCA_TCAM_ECMP_NEXTHOPS_UPPER | Hostname |
| TCA_TCAM_IPV4_ROUTE_UPPER | Hostname |
| TCA_TCAM_IPV4_HOST_UPPER | Hostname |
| TCA_TCAM_IPV6_ROUTE_UPPER | Hostname |
| TCA_TCAM_IPV6_HOST_UPPER | Hostname |
| Event ID | Scope Parameters |
|---|---|
| TCA_RXBROADCAST_UPPER | Hostname, Interface |
| TCA_RXBYTES_UPPER | Hostname, Interface |
| TCA_RXMULTICAST_UPPER | Hostname, Interface |
| TCA_TXBROADCAST_UPPER | Hostname, Interface |
| TCA_TXBYTES_UPPER | Hostname, Interface |
| TCA_TXMULTICAST_UPPER | Hostname, Interface |
| Event ID | Scope Parameters |
|---|---|
| TCA_CPU_UTILIZATION_UPPER | Hostname |
| TCA_DISK_UTILIZATION_UPPER | Hostname |
| TCA_MEMORY_UTILIZATION_UPPER | Hostname |
| Event ID | Scope Parameters |
|---|---|
| TCA_SENSOR_FAN_UPPER | Hostname, Sensor Name |
| TCA_SENSOR_POWER_UPPER | Hostname, Sensor Name |
| TCA_SENSOR_TEMPERATURE_UPPER | Hostname, Sensor Name |
| TCA_SENSOR_VOLTAGE_UPPER | Hostname, Sensor Name |
Scopes are displayed as regular expressions in the rule card.
| Scope | Display in Card | Result |
|---|---|---|
| All devices | hostname = * | Show events for all devices |
| All interfaces | ifname = * | Show events for all devices and all interfaces |
| All sensors | s_name = * | Show events for all devices and all sensors |
| All ACLs | xxx | Show events for all ACL resources |
| All forwarding | xxx | Show events for all forwarding resources |
| All digital optical modules | xxx | Show events for all digital optics |
| Particular device | hostname = leaf01 | Show events for leaf01 switch |
| Particular interface | ifname = swp14 | Show events for swp14 interface |
| Particular sensor | s_name = fan2 | Show events for the fan2 fan |
| Particular ACL resource | xxx | Show events for the xxx ACL resource |
| Particular forwarding resource | xxx | Show events for the xxx forwarding resource |
| Particular digital optical module | xxx | Show events for the xxx digital optics module |
| Set of devices | hostname ^ leaf | Show events for switches having names starting with leaf |
| Set of interfaces | ifname ^ swp | Show events for interfaces having names starting with swp |
| Set of sensors | s_name ^ fan | Show events for sensors having names starting with fan |
| Set of ACL resources | xxx | Show events for xxx |
| Set of forwarding resources | xxx | Show events for xxx |
| Set of digital optical modules | xxx | Show events for xxx |
When a rule is filtered by more than one parameter, each is displayed on the card. Leaving a value blank for a parameter defaults to all; all hostnames, interfaces, sensors, forwarding resources, ACL resources, and digital optics.
Specify Notification Channels
The notification channel specified by a TCA rule tells NetQ where to send the notification message.
To specify a notification channel:
-
Click
 , and then click Channels in the Notifications column.
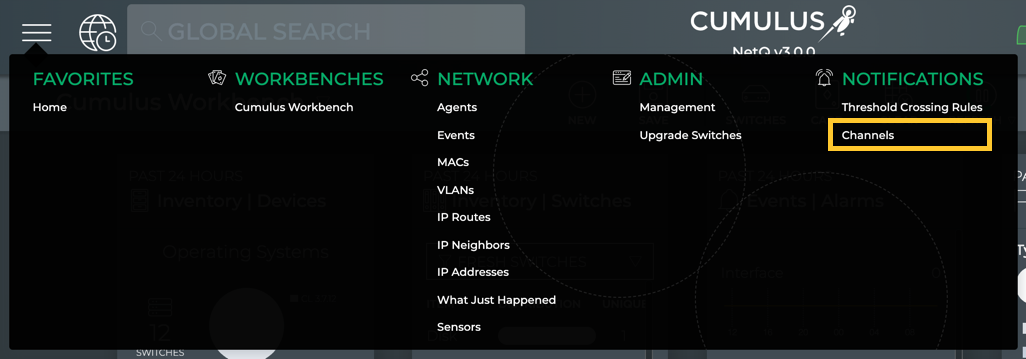
This opens the Channels view.

-
Determine the type of channel you want to add (Slack, PagerDuty, or Syslog). Follow the instructions for the selected type.
Specify Slack Channels
To specify Slack channels:
-
Create one or more channels using Slack.
-
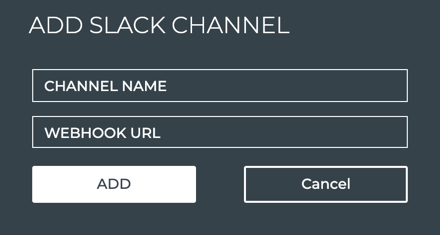
In NetQ, click Slack in the Channels view.
-
When no channels have been specified, click on the note. When at least one channel has been specified, click
 above the table.
 -
Provide a unique name for the channel. Note that spaces are not allowed. Use dashes or camelCase instead.
-
Copy and paste the incoming webhook URL for a channel you created in Step 1 (or earlier).
-
Click Add.

-
Repeat to add additional Slack channels as needed.
Specify PagerDuty Channels
To specify PagerDuty channels:
-
Create one or more channels using PagerDuty.
-
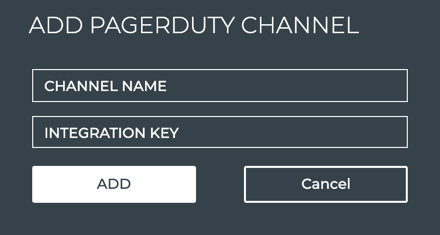
In NetQ, click PagerDuty in the Channels view.
-
When no channels have been specified, click on the note. When at least one channel has been specified, click
above the table. -
Provide a unique name for the channel. Note that spaces are not allowed. Use dashes or camelCase instead.
-
Copy and paste the integration key for a PagerDuty channel you created in Step 1 (or earlier).
-
Click Add.
-
Repeat to add additional PagerDuty channels as needed.
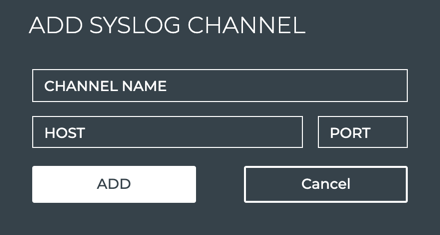
Specify a Syslog Channel
To specify a Syslog channel:
-
Click Syslog in the Channels view.
-
When no channels have been specified, click on the note. When at least one channel has been specified, click
above the table. -
Provide a unique name for the channel. Note that spaces are not allowed. Use dashes or camelCase instead.
-
Enter the IP address and port of the Syslog server.
-
Click Add.
-
Repeat to add additional Syslog channels as needed.
Remove Notification Channels
You can view your notification channels at any time. If you create new channels or retire selected channels, you might need to add or remove them from NetQ as well. To add channels refer to Specify Notification Channels.
To remove channels:
-
Click
, and then click Channels in the Notifications column.
This opens the Channels view.
-
Click the tab for the type of channel you want to remove (Slack, PagerDuty, or Syslog).
-
Select one or more channels.
-
Click
.
Create a TCA Rule
Now that you know which events are supported and how to set the scope, you can create a basic rule to deliver one of the TCA events to a notification channel.
To create a TCA rule:
-
Click
to open the Main Menu.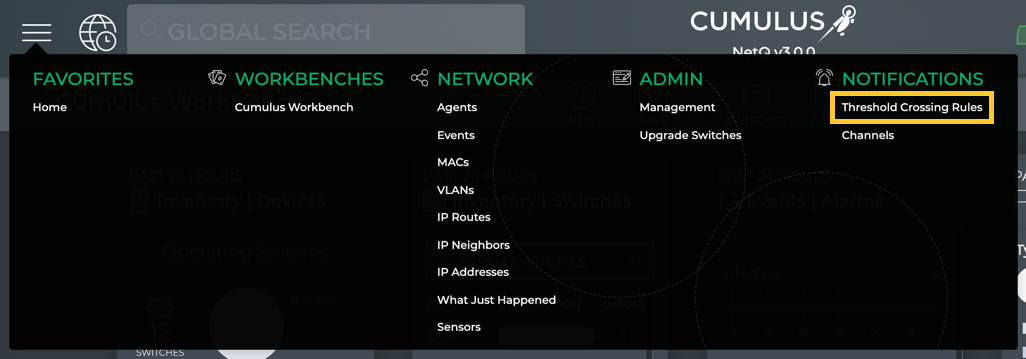
-
Click Threshold Crossing Rules under Notifications.
-
Click
to add a rule.The Create TCA Rule dialog opens. Four steps create the rule.
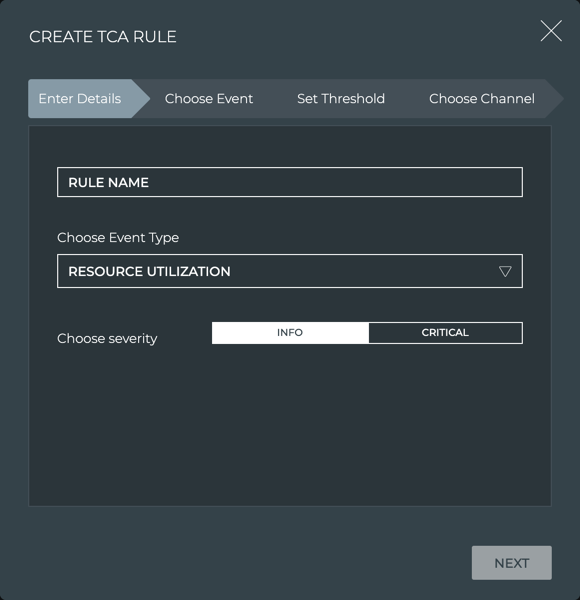
You can move forward and backward until you are satisfied with your rule definition.
-
On the Enter Details step, enter a name for your rule, choose your TCA event type, and assign a severity.
The rule name has a maximum of 20 characters (including spaces).
-
Click Next.
-
On the Choose Event step, select the attribute to measure against.
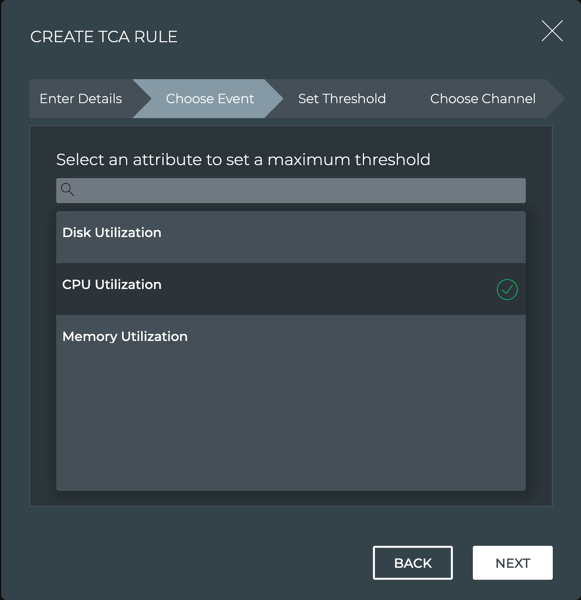
The attributes presented depend on the event type chosen in the Enter Details step. This example shows the attributes available when Resource Utilization was selected.
-
Click Next.
-
On the Set Threshold step, enter a threshold value.

-
Define the scope of the rule.
-
If you want to restrict the rule to a particular device, and enter values for one or more of the available parameters.
-
If you want the rule to apply to all devices, click the scope toggle.

-
-
Click Next.
-
Optionally, select a notification channel where you want the events to be sent. If no channel is select, the notifications are only available from the database. You can add a channel at a later time. Refer to Modify TCA Rules.
-
Click Finish.
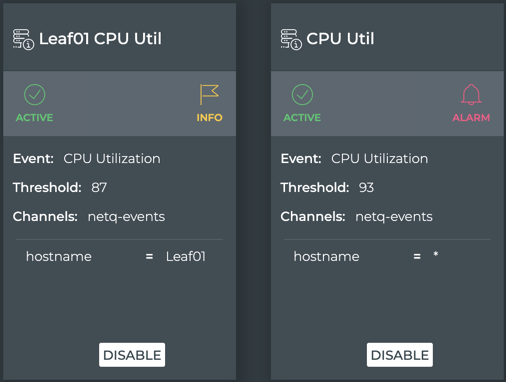
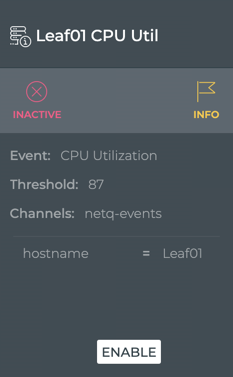
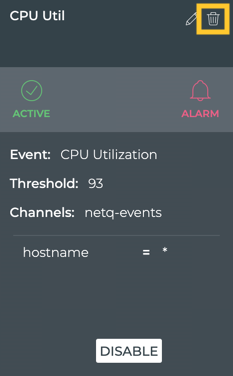
This example shows two rules. The rule on the left triggers an informational event when switch leaf01 exceeds the maximum CPU utilization of 87%. The rule on the right triggers a critical event when any device exceeds the maximum CPU utilization of 93%. Note that the cards indicate both rules are currently Active.
View All TCA Rules
You can view all of the threshold-crossing event rules you have created by clicking ![]() and then selecting Threshold Crossing Rules under Notifications.
and then selecting Threshold Crossing Rules under Notifications.
Modify TCA Rules
You can modify the threshold value and scope of any existing rules.
To edit a rule:
-
Click
to open the Main Menu. -
Click Threshold Crossing Rules under Notifications.
-
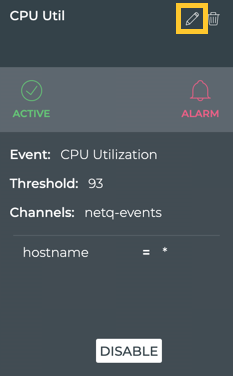
Locate the rule you want to modify and hover over the card.
-
Click
.
-
Modify the rule, changing the threshold, scope or associated channel.
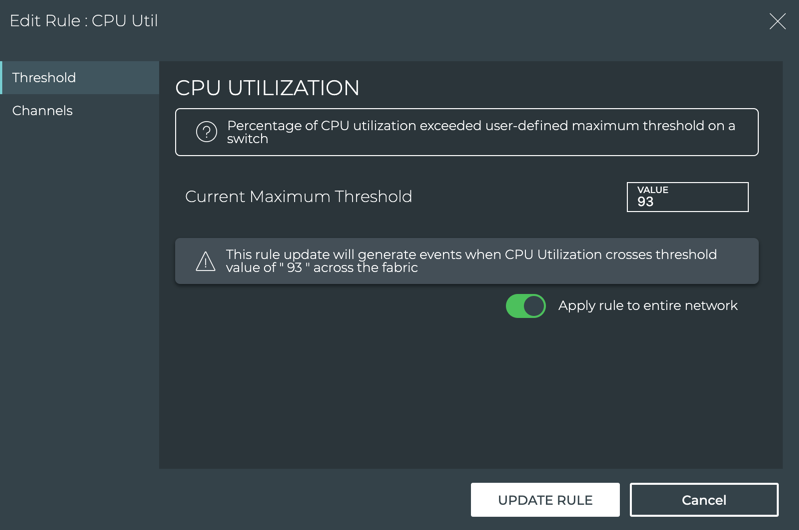
If you want to modify the rule name or severity after creating the rule, you must delete the rule and recreate it.
-
Click Update Rule.
Manage TCA Rules
Once you have created a bunch of rules, you might have the need to manage them; suppress a rule, disable a rule, or delete a rule.
Rule States
The TCA rules have three possible states:
- Active: Rule is operating, delivering events. This would be the normal operating state.
- Suppressed: Rule is disabled until a designated date and time. When that time occurs, the rule is automatically reenabled. This state is useful during troubleshooting or maintenance of a switch when you do not want erroneous events being generated.
- Disabled: Rule is disabled until a user manually reenables it. This state is useful when you are unclear when you want the rule to be reenabled. This is not the same as deleting the rule.
Suppress a Rule
To suppress a rule for a designated amount of time, you must change the state of the rule.
To suppress a rule:
-
Click
to open the Main Menu. -
Click Threshold Crossing Rules under Notifications.
-
Locate the rule you want to suppress.
-
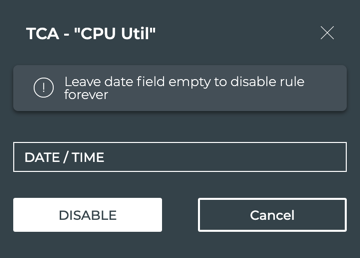
Click Disable.
-
Click in the Date/Time field to set when you want the rule to be automatically reenabled.
-
Click Disable.

Note the changes in the card:
- The state is now marked as Inactive, but remains green
- The date and time that the rule will be enabled is noted in the Suppressed field
- The Disable option has changed to Disable Forever. Refer to Disable a Rule for information about this change.
Disable a Rule
To disable a rule until you want to manually reenable it, you must change the state of the rule.
To disable a rule that is currently active:
-
Click
to open the Main Menu. -
Click Threshold Crossing Rules under Notifications.
-
Locate the rule you want to disable.
-
Click Disable.
-
Leave the Date/Time field blank.
-
Click Disable.
Note the changes in the card:
- The state is now marked as Inactive and is red
- The rule definition is grayed out
- The Disable option has changed to Enable to reactivate the rule when you are ready
To disable a rule that is currently suppressed:
-
Click
to open the Main Menu. -
Click Threshold Crossing Rules under Notifications.
-
Locate the rule you want to disable.
-
Click Disable Forever.
Note the changes in the card:
- The state is now marked as Inactive and is red
- The rule definition is grayed out
- The Disable option has changed to Enable to reactivate the rule when you are ready
Delete a Rule
You might find that you no longer want to receive event notifications for a particular TCA event. In that case, you can either disable the event if you think you may want to receive them again or delete the rule altogether. Refer to Disable a Rule in the first case. Follow the instructions here to remove the rule. The rule can be in any of the three states.
To delete a rule:
-
Click
to open the Main Menu. -
Click Threshold Crossing Rules under Notifications.
-
Locate the rule you want to remove and hover over the card.
-
Click
.
Resolve Scope Conflicts
There may be occasions where the scope defined by multiple rules for a given TCA event may overlap each other. In such cases, the TCA rule with the most specific scope that is still true is used to generate the event.
To clarify this, consider this example. Three events have occurred:
- First event on switch leaf01, interface swp1
- Second event on switch leaf01, interface swp3
- Third event on switch spine01, interface swp1
NetQ attempts to match the TCA event against hostname and interface name with three TCA rules with different scopes:
- Scope 1 send events for the swp1 interface on switch leaf01 (very specific)
- Scope 2 send events for all interfaces on switches that start with leaf (moderately specific)
- Scope 3 send events for all switches and interfaces (very broad)
The result is:
- For the first event, NetQ applies the scope from rule 1 because it matches scope 1 exactly
- For the second event, NetQ applies the scope from rule 2 because it does not match scope 1, but does match scope 2
- For the third event, NetQ applies the scope from rule 3 because it does not match either scope 1 or scope 2
In summary:
| Input Event | Scope Parameters | Rule 1, Scope 1 | Rule 2, Scope 2 | Rule 3, Scope 3 | Scope Applied |
|---|---|---|---|---|---|
| leaf01, swp1 | Hostname, Interface | hostname=leaf01, ifname=swp1 | hostname ^ leaf, ifname=* | hostname=*, ifname=* | Scope 1 |
| leaf01, swp3 | Hostname, Interface | hostname=leaf01, ifname=swp1 | hostname ^ leaf, ifname=* | hostname=*, ifname=* | Scope 2 |
| spine01, swp1 | Hostname, Interface | hostname=leaf01, ifname=swp1 | hostname ^ leaf, ifname=* | hostname=*, ifname=* | Scope 3 |
Manage Monitoring of Multiple Premises
The NetQ Management dashboard provides the ability to configure a single NetQ UI and CLI for monitoring data from multiple external premises in addition to your local premises.
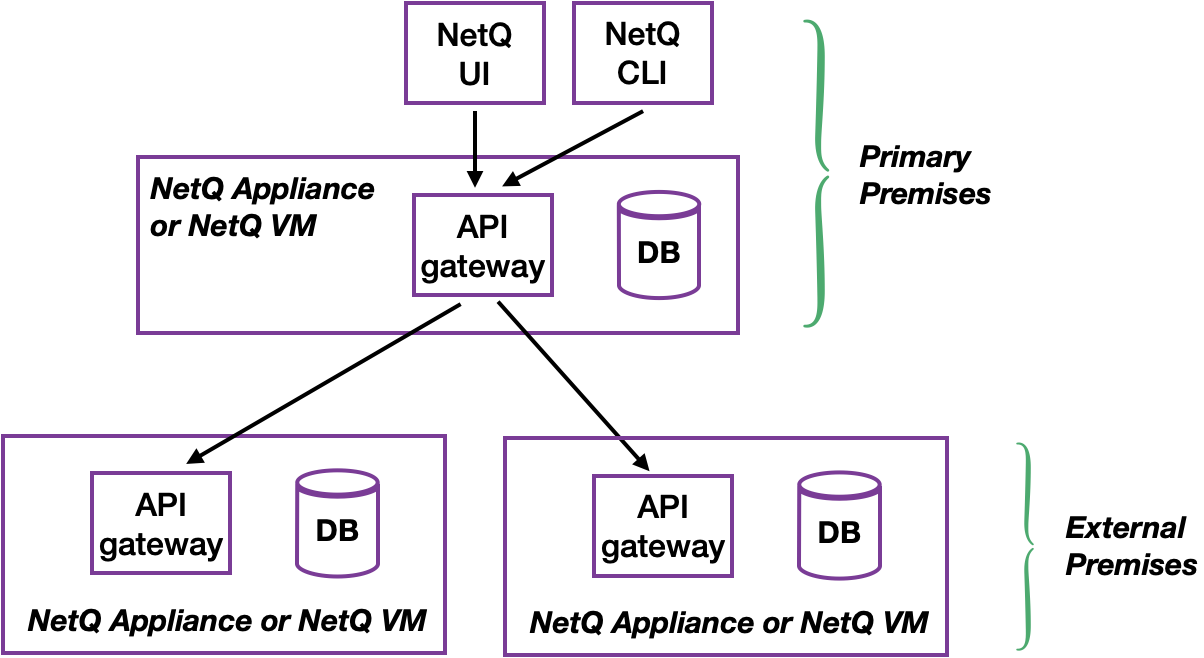
A complete NetQ deployment is required at each premises. The NetQ appliance or VM of one of the deployments acts as the primary (similar to a proxy) for the premises in the other deployments. A list of these external premises is stored with the primary deployment. After the multiple premises are configured, you can view this list of external premises, change the name of premises on the list, and delete premises from the list.
To configure monitoring of external premises:
-
Sign in to primary NetQ Appliance or VM.
-
In the NetQ UI, click
. -
Select Management from the Admin column.
-
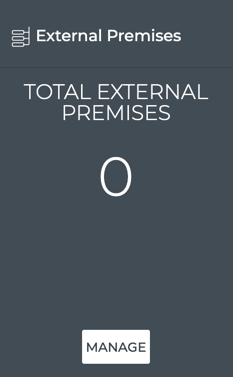
Locate the External Premises card.
-
Click Manage.
-
Click
to open the Add Premises dialog.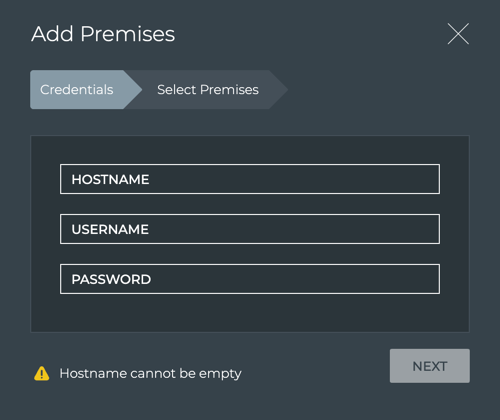
-
Specify an external premises.
- Enter an IP address for the API gateway on the external NetQ Appliance or VM in the Hostname field (required)
- Enter the access credentials
-
Click Next.
-
Select from the available premises associated with this deployment by clicking on their names.
-
Click Finish.
-
Add more external premises by repeating Steps 6-10.
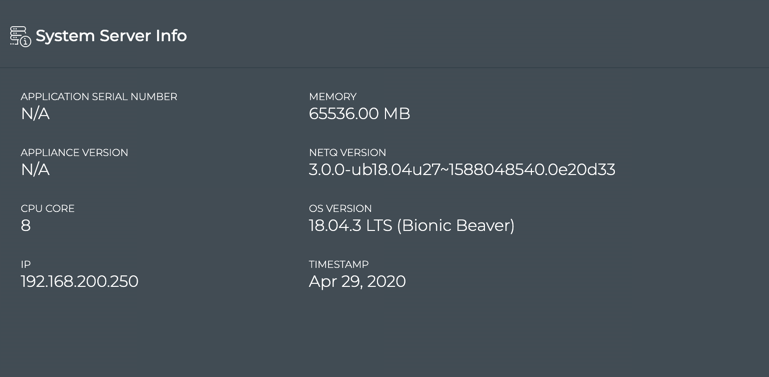
System Server Information
You can easily view the configuration of the physical server of VM from the NetQ Management dashboard.
To view the server information:
-
Click
. -
Select Management from the Admin column.
-
Locate the System Server Info card.
Integrate with Your LDAP Server
For on-premises deployments you can integrate your LDAP server with NetQ to provide access to NetQ using LDAP user accounts instead of ,or in addition to, the NetQ user accounts. Refer to Integrate NetQ with Your LDAP Server for more detail.