Lifecycle Management
As an administrator, you want to manage the deployment of Cumulus Networks product software onto your network devices (servers, appliances, and switches) in the most efficient way and with the most information about the process as possible. With this release, NetQ expands its initial lifecycle management (LCM) feature of network Snapshot and Compare to support Cumulus Linux image, switch, and credential management, and a UI workflow for the Cumulus Linux image installation and upgrade, including backup and restoration of the switch configuration files. Each of these features can be managed separately, but the greatest benefits are seen when they are used together in the workflow.
This feature is only available for on-premises deployments.
Access Lifecycle Management Features
To manage the various lifecycle management features, click ![]() (Main Menu) and select Upgrade Switches.
(Main Menu) and select Upgrade Switches.
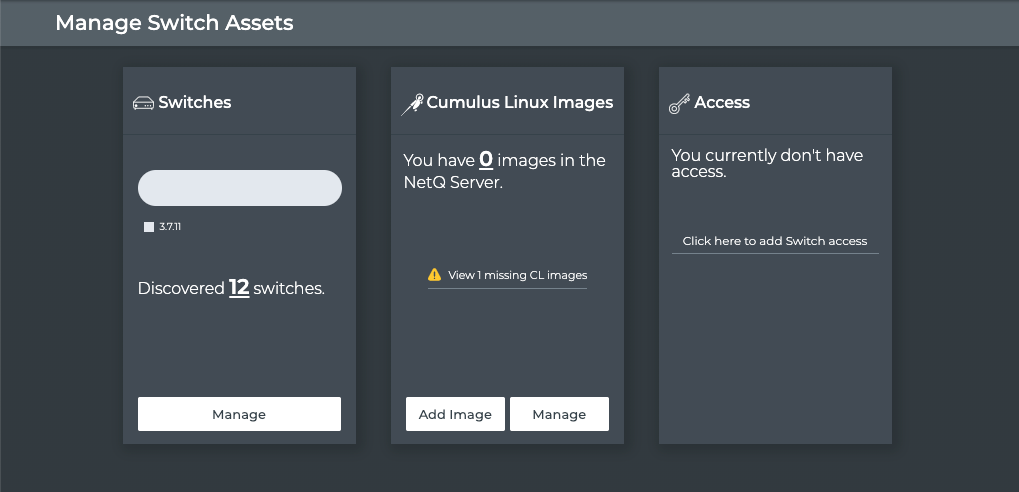
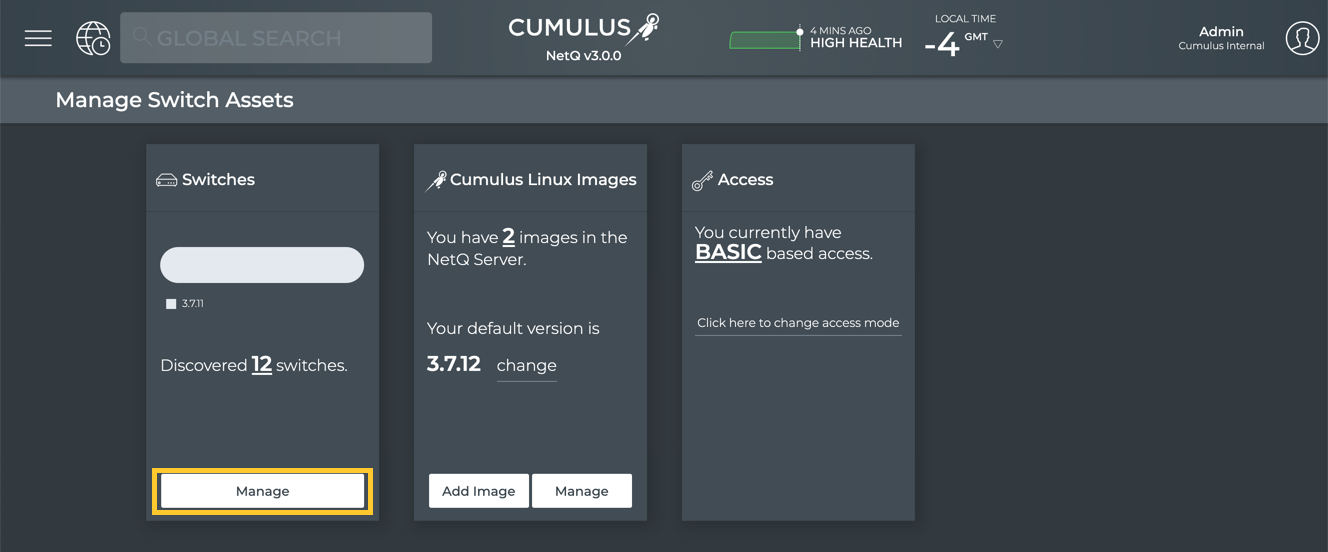
The Manage Switch Assets view provides a summary card for switch inventory, uploaded images, and switch access settings.
If you have a workbench open, you can also access this view by clicking ![]() (Upgrade) in the workbench header.
(Upgrade) in the workbench header.
Image Management
Cumulus Linux binary images can be uploaded to a local LCM repository for use with installation and upgrade of your switches. You can upload images from an external drive. When NetQ discovers Cumulus Linux switches running NetQ 2.4 or later in your network, it extracts the meta data needed to select the appropriate image for a given switch; including the software version (x.y.z), the CPU architecture (ARM, x86), platform (based on ASIC vendor, Broadcom or Mellanox) and SHA Checksum.
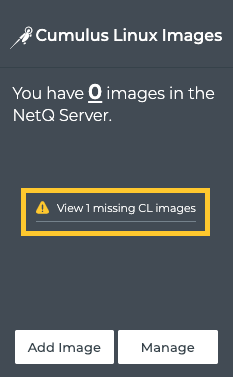
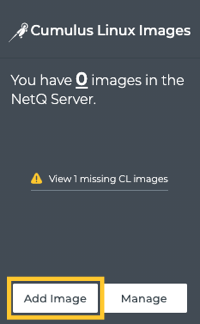
The Cumulus Linux Images card provides a summary of image status in NetQ. It shows the total number of images in the repository, a count of missing images (refer to Missing Images), and the starting points for adding and managing your images.
Default Cumulus Linux Version Assignment
You can assign a specific Cumulus Linux version as the default version to use during installation or upgrade of switches. Choosing the version that is desired for the largest number of your switches is recommended. The default selection can be overridden during upgrade job creation if an alternate version is needed for a set of switches.
Missing Images
You should upload images for each variant of Cumulus Linux currently installed on your switch inventory if you want to support rolling back to a known good version should an installation or upgrade fail. NetQ prompts you to upload any missing images to the repository. For example, if you have both Cumulus Linux 3.7.3 and 3.7.11 versions, some running on ARM and some on x86 architectures, then NetQ would verify the presence of each of these images. If only the 3.7.3 x86, 3.7.3 ARM, and 3.7.11 x86 images are in the repository, NetQ would list the 3.7.11 ARM image as missing.
If you have specified a default Cumulus Linux version, NetQ also verifies that the necessary images are available based on the known switch inventory, and if not, lists those that are missing.
Upload Images
On installation of NetQ 3.0, no images have yet been uploaded to the LCM repository. Begin by adding images that match your current inventory. Then add the image you want to use for upgrading. And finally specify a default image for upgrades, if desired.
Upload Missing Images
To upload missing images:
-
On the Cumulus Linux Images card, click the View missing CL images link to see what images you need. This opens the list of missing images.
-
Select one of the missing images and make note of the version, ASIC Vendor, and CPU architecture.

-
Click
 (Add Image) above the table.
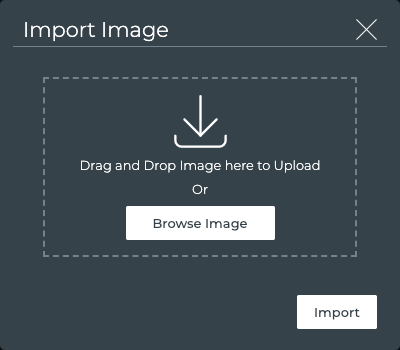
-
Provide the .bin file from an external drive that matches the criteria for the selected image, either by dragging and dropping it onto the dialog or by selecting it from a directory.
-
Click Import.
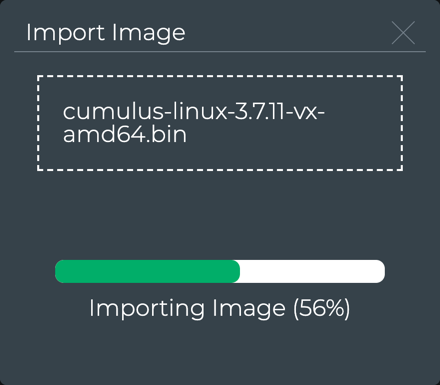
On successful completion, you receive confirmation of the upload.
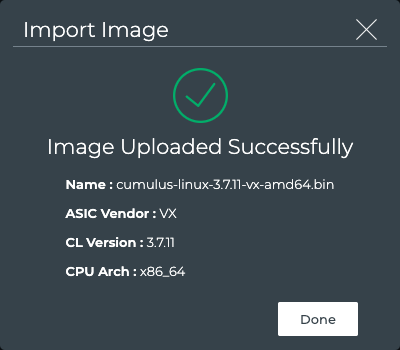
If the upload was not successful, an Image Import Failed message is shown. Close the Import Image dialog and try uploading the file again.
-
Click Done.
-
Click Uploaded tab to verify the image is in the repository.
-
Repeat Steps 1-7 until all of the missing images are uploaded to the repository. When all of the missing images have been uploaded, the Missing list will be empty.
-
Click
 to return to the LCM dashboard.
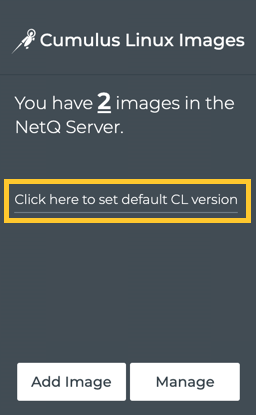
The Cumulus Linux Images card now shows the number of images you uploaded.
Upload Upgrade Images
To upload the Cumulus Linux images that you want to use for upgrade:
-
Click Add Image on the Cumulus Linux Images card.
-
Provide an image from an external drive, either by dragging and dropping it onto the dialog or by selecting it from a directory.
-
Click Import.
-
Click Done.
-
Repeat Steps 1-4 to upload additional images as needed.
For example, if you are upgrading switches with different ASIC vendors or CPU architectures, you will need more than one image.
Specify a Default Image for Upgrade
Lifecycle management does not have a default Cumulus Linux image specified automatically. You must specify the image that is appropriate for your network.
To specify a default Cumulus Linux image:
-
Click the Click here to set the default CL version link in the middle of the Cumulus Linux Images card.
-
Select the image you want to use as the default image for switch upgrades.
-
Click Save. The default version is now displayed on the Cumulus Linux Images card.
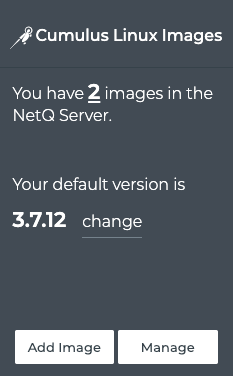
After you have specified a default image, you have the option to change it.
To change the default Cumulus Linux image:
-
Click change next to the currently identified default image on the Cumulus Linux Images card.
-
Select the image you want to use as the default image for switch upgrades.
-
Click Save.
Export Images
Once you have images uploaded to the NetQ LCM repository, you are able to export those images.
To export images:
-
Open the LCM dashboard.
-
Click Manage on the Cumulus Linux Images card.
-
Select the images you want to export from the Uploaded tab. Use the filter option above the table to narrow down a large listing of images.

-
Click
 above the table.
 -
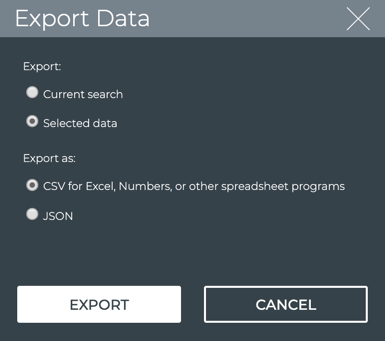
Choose the export file type and click Export.
Remove Images from Local Repository
Once you have upgraded all of your switches beyond a particular release of Cumulus Linux, you may want to remove any associated images from the NetQ LCM repository to save space on the server.
To remove images:
-
Open the LCM dashboard.
-
Click Manage on the Cumulus Linux Images card.
-
On the Uploaded tab, select the images you want to remove. Use the filter option above the table to narrow down a large listing of images.
-
Click
 .
.
Credential Management
Switch access credentials are needed for performing upgrades. You can choose between basic authentication (SSH password) and SSH (Public/Private key) authentication. These credentials apply to all switches.
Specify Switch Credentials
Switch access credentials are not specified by default. You must add these.
To specify access credentials:
-
Open the LCM dashboard.
-
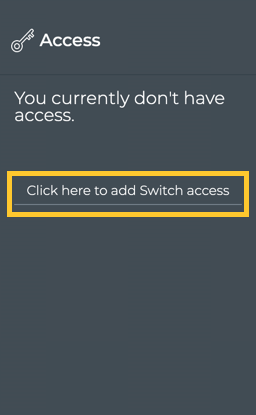
Click the Click here to add switch access link on the Access card.
-
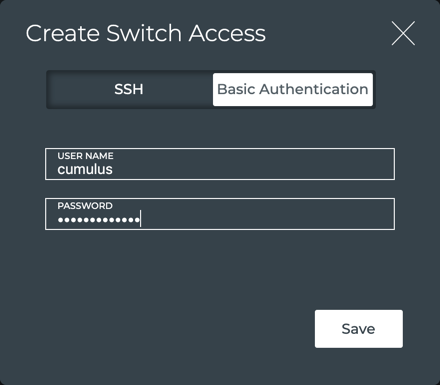
Select the authentication method you want to use; SSH or Basic Authentication. Basic authentication is selected by default.
-
Enter a username.
-
Enter a password.
-
Click Save.
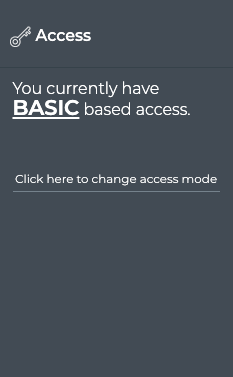
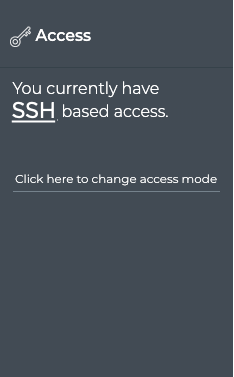
The Access card now indicates your credential configuration.
You must have sudoer permission to properly configure switches when using the SSH Key method.
-
Create a pair of SSH private and public keys.
ssh-keygen -t rsa -C "<USER>" -
Copy the SSH public key to each switch that you want to upgrade using one of the following methods:
- Manually copy SSH public key to the /home/<USER>/.ssh/authorized_keys file on each switches, or
- Run
ssh-copy-id USER@<switch_ip>on the server where the SSH key pair was generated for each switch
-
Copy the SSH private key into the text box in the Create Switch Access card.
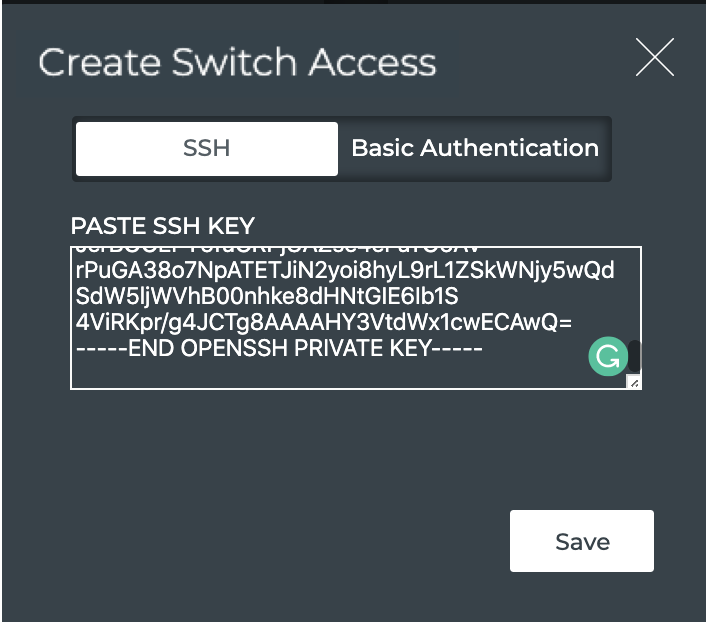
For security, your private key is stored in an encrypted format, and only provided to internal processes while encrypted.
The Access card now indicates your credential configuration.
Modify Switch Credentials
You can modify your switch access credentials at any time. You can change between authentication methods or change values for either method.
To change your access credentials:
-
Open the LCM dashboard.
-
On the Access card, click the Click here to change access mode link in the center of the card.
-
Select the authentication method you want to use; SSH or Basic Authentication. Basic authentication is selected by default.
-
Based on your selection:
- Basic: Enter a new username and/or password
- SSH: Copy and paste a new SSH private key
Refer to Specify Switch Credentials for details.
-
Click Save.
Switch Management
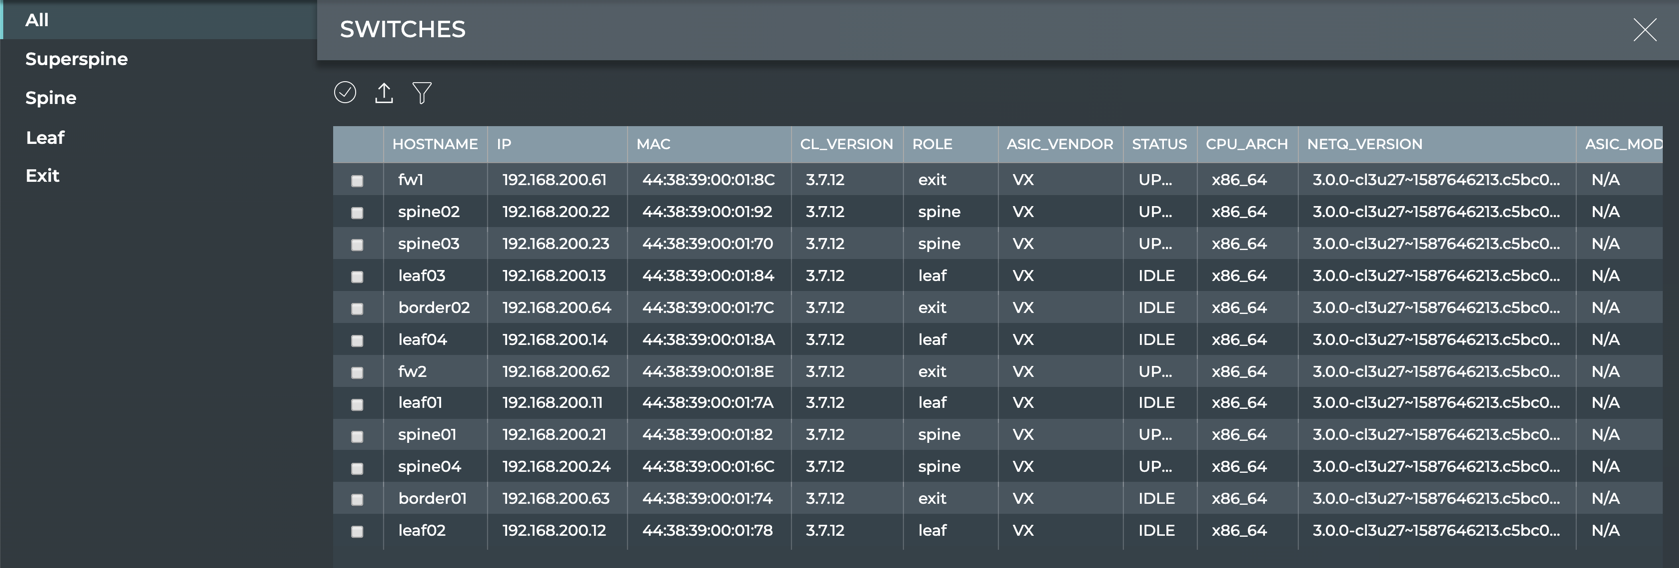
This lifecycle management feature provides an inventory of switches that have been automatically discovered by NetQ 3.0.0 and are available for software installation or upgrade through NetQ. This includes all switches running Cumulus NetQ Agent 2.4 or later in your network. You assign network roles to switches and select switches for software installation and upgrade from this inventory listing.
A count of the switches NetQ was able to discover and the Cumulus Linux versions that are running on those switches is available from the LCM dashboard.
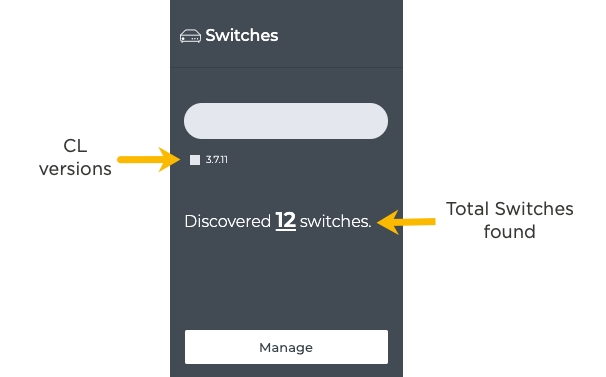
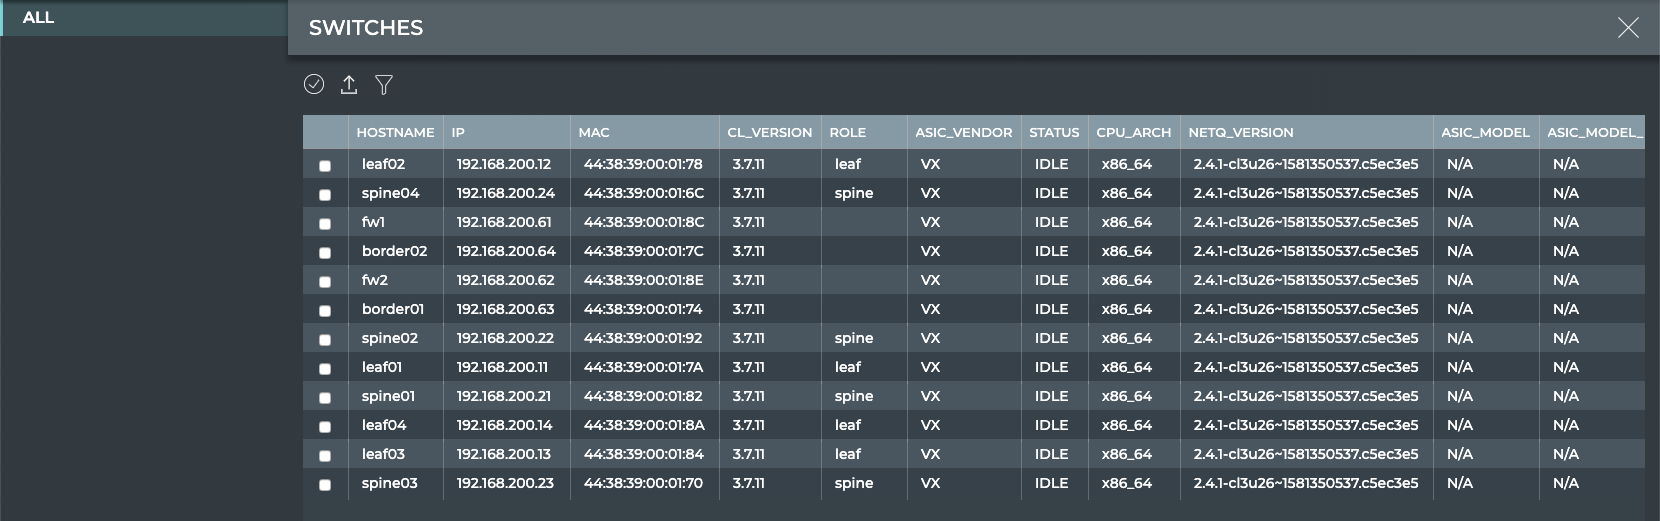
To view a list of all switches known to lifecycle management, click Manage on the Switches card.
Review the list, filtering as needed (click ![]() ) to determine if the switches you want to upgrade are included.
) to determine if the switches you want to upgrade are included.
If you have more than one Cumulus Linux version running on your switches, you can click a version segment on the Switches card graph to open a list of switches pre-filtered by that version.
If the switches you are looking to upgrade are not present in the final list, verify the switches have NetQ 2.4 or later Agents on them.
To verify the NetQ Agent version, click ![]() , then click Agents in the Network section. Search for the switches of interest and confirm the applied version in the Version column. Upgrade any NetQ Agents if needed. Refer to Upgrade NetQ Agents for instructions.
, then click Agents in the Network section. Search for the switches of interest and confirm the applied version in the Version column. Upgrade any NetQ Agents if needed. Refer to Upgrade NetQ Agents for instructions.
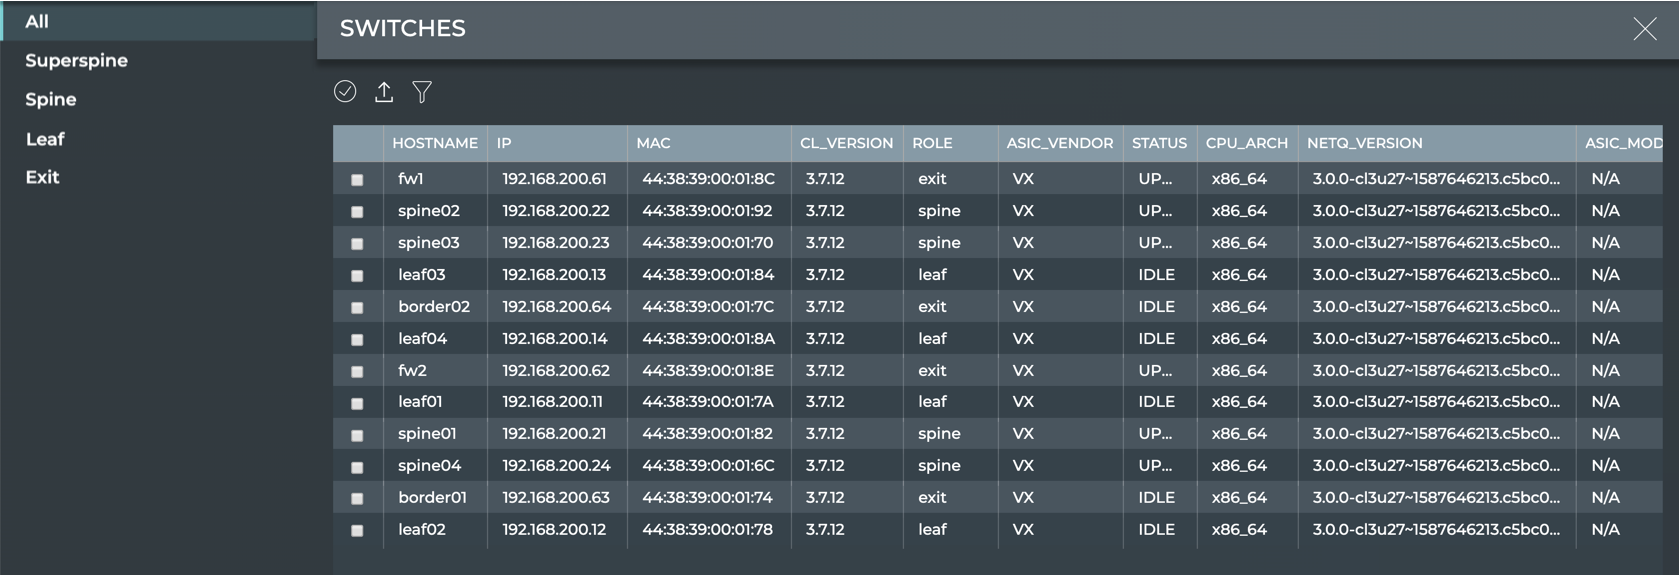
After all of the switches you want to upgrade are contained in the list, you can assign roles to them.
Role Management
Four pre-defined switch roles are available based on the CLOS architecture:
- Superspine
- Spine
- Leaf
- Exit
With this release, you cannot create your own roles.
Switch roles are used to:
- Identify switch dependencies and determine the order in which switches are upgraded
- Determine when to stop the process if a failure is encountered
When roles are assigned, the upgrade process begins with switches having the superspine role, then continues with the spine switches, leaf switches, exit switches, and finally switches with no role assigned. All switches with a given role must be successfully upgraded before the switches with the closest dependent role can be upgraded.
For example, a group of seven switches are selected for upgrade. Three are spine switches and four are leaf switches. After all of the spine switches are successfully upgraded, then the leaf switches are upgraded. If one of the spine switches were to fail the upgrade, the other two spine switches are upgraded, but the upgrade process stops after that, leaving the leaf switches untouched, and the upgrade job fails.
When only some of the selected switches have roles assigned in an upgrade job, the switches with roles are upgraded first and then all the switches with no roles assigned are upgraded.
While role assignment is optional, using roles can prevent switches from becoming unreachable due to dependencies between switches or single attachments. And when MLAG pairs are deployed, switch roles avoid upgrade conflicts. For these reasons, Cumulus Networks highly recommends assigning roles to all of your switches.
Assign Switch Roles
-
Open the LCM dashboard.
-
On the Switches card, click Manage.
-
Select one switch or multiple switches that should be assigned to the same role.
-
Click
 .
. -
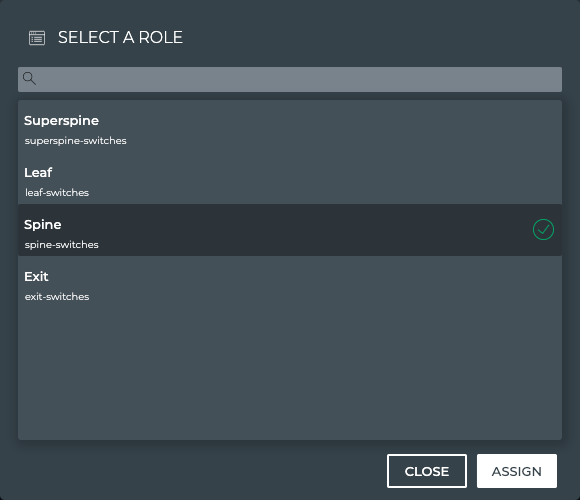
Select the role that applies to the selected switch(es).
-
Click Assign.
Note that the Role column is updated with the role assigned to the selected switch(es).
-
Continue selecting switches and assigning roles until most or all switches have roles assigned.
A bonus of assigning roles to switches is that you can then filter the list of switches by their roles by clicking the appropriate tab.
Change the Role of a Switch
If you accidentally assign an incorrect role to a switch, it can easily be changed to the correct role.
To change a switch role:
-
Open the LCM dashboard.
-
On the Switches card, click Manage.
-
Select the switch with the incorrect role from the list.
-
Click
. -
Select the correct role.
-
Click Assign.
Export List of Switches
Using the Switch Management feature you can export a listing of all or a selected set of switches.
To export the switch listing:
-
Open the LCM dashboard.
-
On the Switches card, click Manage.
-
Select one or more switches, filtering as needed, or select all switches (click
 ).
). -
Click
. -
Choose the export file type and click Export.
Network Snapshot and Compare
Creating and comparing network snapshots can be used at various times; typically when you are upgrading or changing the configuration of your switches in some way. The instructions here describe how to create and compare network snapshots at any time. Refer to Image Installation and Upgrade to see how snapshots are automatically created in that workflow to validate that the network state has not changed after an upgrade.
Create a Network Snapshot
It is simple to capture the state of your network currently or for a time in the past using the snapshot feature.
To create a snapshot:
-
From any workbench, click
 in the workbench header.
 -
Click Create Snapshot.
-
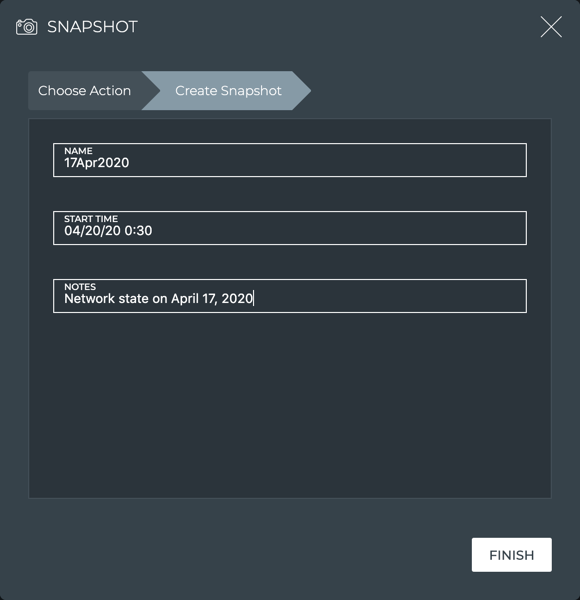
Enter a name for the snapshot.
-
Accept the time provided or enter a previous date and time.
-
Optionally, add a descriptive note for the snapshot.
-
Click Finish.
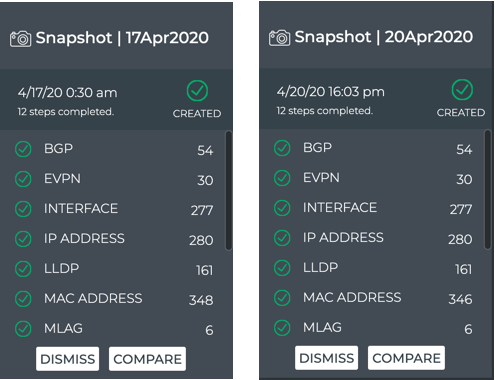
A medium Snapshot card appears on your desktop. Spinning arrows are visible while it works. When it finishes you can see the number of items that have been captured, and if any failed. This example shows a successful result.
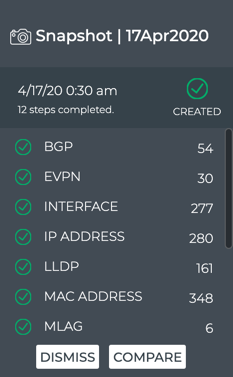
If you have already created other snapshots, Compare is active. Otherwise it is inactive (grayed-out).
Compare Network Snapshots
You can compare the state of your network before and after an upgrade or other configuration change to validate the changes.
To compare network snapshots:
-
Create a snapshot (as described in previous section) before you make any changes.
-
Make your changes.
-
Create a second snapshot.
-
Compare the results of the two snapshots. Depending on what, if any, cards are open on your workbench:
-
If you have the two desired snapshot cards open:
- Simply put them next to each other to view a high-level comparison.
- Scroll down to see all of the items.
- To view a more detailed comparison, click Compare on one of the cards. Select the other snapshot from the list.
-
If you have only one of the cards open:
- Click Compare on the open card.
- Select the other snapshot to compare.

-
If no snapshot cards are open (you may have created them some time before):
- Click .
- Click Compare Snapshots.
- Click on the two snapshots you want to compare.
- Click Finish. Note that two snapshots must be selected before Finish is active.
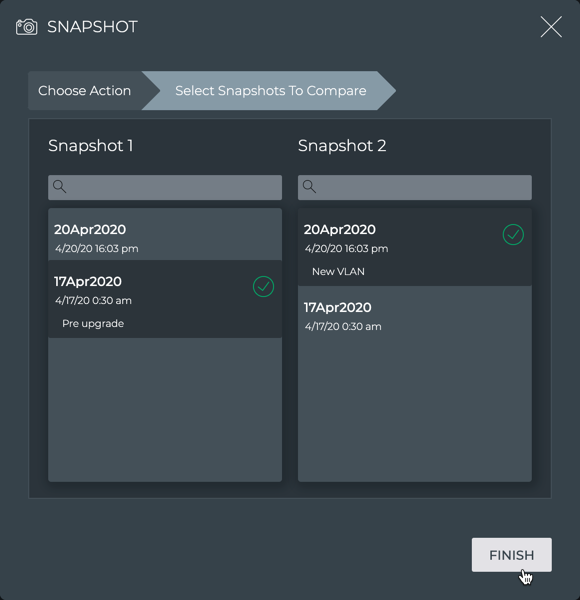
- Click
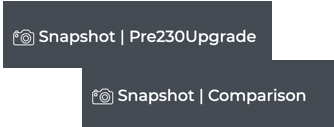
In the latter two cases, the large Snapshot card opens. The only difference is in the card title. If you opened the comparison card from a snapshot on your workbench, the title includes the name of that card. If you open the comparison card through the Snapshot menu, the title is generic, indicating a comparison only. Functionally, you have reached the same point.
Scroll down to view all element comparisons.
-
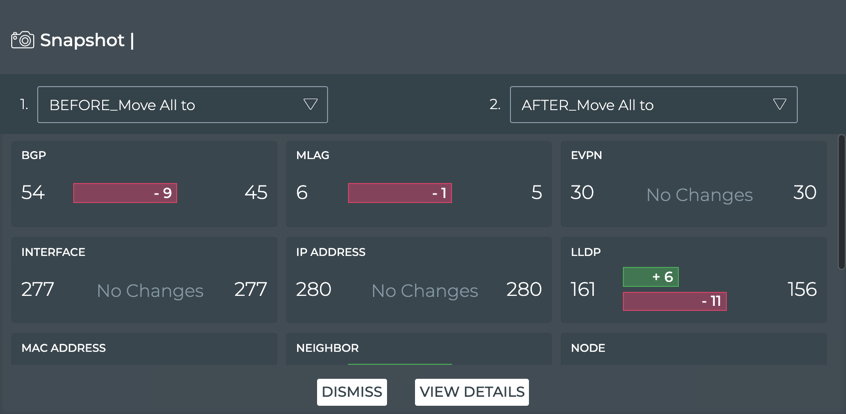
Interpreting the Comparison Data
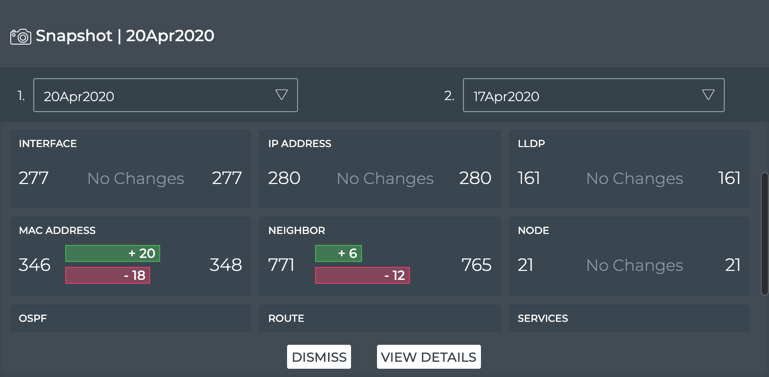
For each network element that is compared, count values and changes are shown:
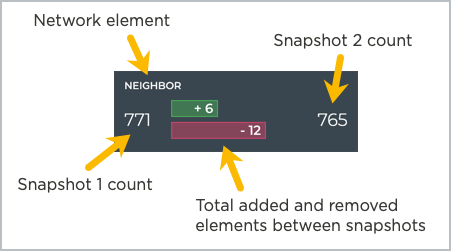
In this example, a change was made to the VLAN. The snapshot taken before the change (17Apr2020) had a total count of 765 neighbors. The snapshot taken after the change (20Apr2020) had a total count of 771 neighbors. Between the two totals you can see the number of neighbors added and removed from one time to the next, resulting in six new neighbors after the change.
The red and green coloring indicates only that items were removed (red) or added (green). The coloring does not indicate whether the removal or addition of these items is bad or good.
From this card, you can also change which snapshots to compare. Select an alternate snapshot from one of the two snapshot dropdowns and then click Compare.
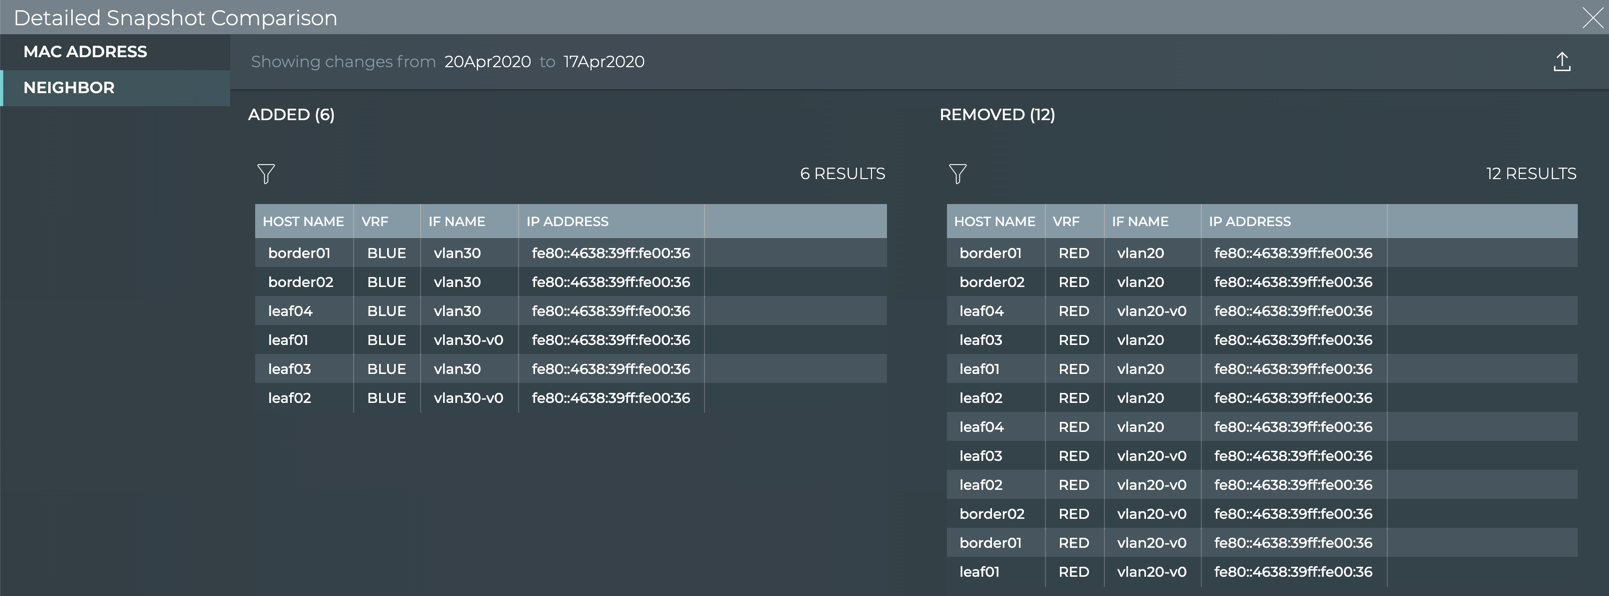
View Change Details
You can view additional details about the changes that have occurred between the two snapshots by clicking View Details. This opens the full screen Detailed Snapshot Comparison card.
From this card you can:
- View changes for each of the elements that had added and/or removed items, and various information about each; only elements with changes are presented
- Filter the added and removed items by clicking

- Export all differences in JSON file format by clicking
The following table describes the information provided for each element type when changes are present:
| Element | Data Descriptions |
|---|---|
| BGP |
|
| CLAG |
|
| Interface |
|
| IP Address |
|
| Links |
|
| LLDP |
|
| MAC Address |
|
| Neighbor |
|
| Node |
|
| OSPF |
|
| Route |
|
| Sensors |
|
| Services |
|
Manage Network Snapshots
You can create as many snapshots as you like and view them at any time. When a snapshot becomes old and no longer useful, you can remove it.
To view an existing snapshot:
-
From any workbench, click
in the workbench header. -
Click View/Delete Snapshots.
-
Click View.
-
Click one or more snapshots you want to view, then click Finish.
Click Back or Choose Action to cancel viewing of your selected snapshot(s).
To remove an existing snapshot:
-
From any workbench, click
in the workbench header. -
Click View/Delete Snapshots.
-
Click Delete.
-
Click one or more snapshots you want to remove, then click Finish.
Click Back or Choose Action to cancel the deletion of your selected snapshot(s).
Cumulus Linux Upgrade
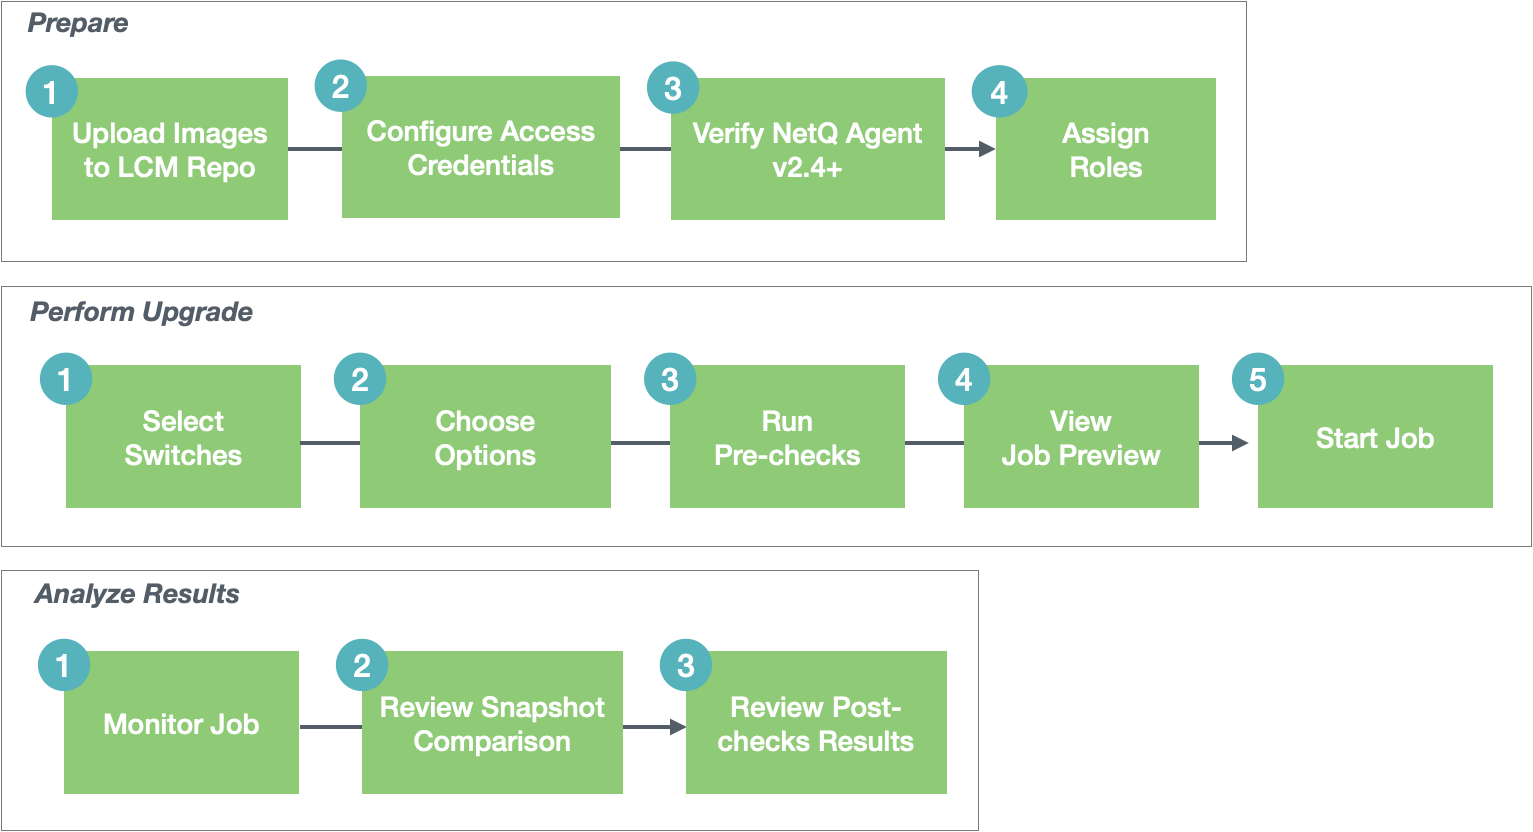
The workflow for installation and upgrade of Cumulus Linux using LCM is to: select switches, choose options, run pre-checks, view job preview, begin job, monitor job, review snapshot comparison and analyze as needed. Up to five jobs can be run simultaneously; however, a given switch can only be contained in one of those jobs.
Upgrades can be performed between Cumulus Linux 3.x releases, and between Cumulus Linux 4.x releases. Lifecycle management does not support upgrades from Cumulus Linux 3.x to 4.x releases.
Prepare
In preparation for switch installation or upgrade, first perform the following steps:
- Upload the required images. Refer to Image Management.
- Configure switch access credentials. Refer to Credential Management.
- Verify the switches you want to manage are running NetQ Agent 2.4 or later. Refer to Switch Management.
- Assign each switch a role (optional, but recommended). Refer to Role Management.
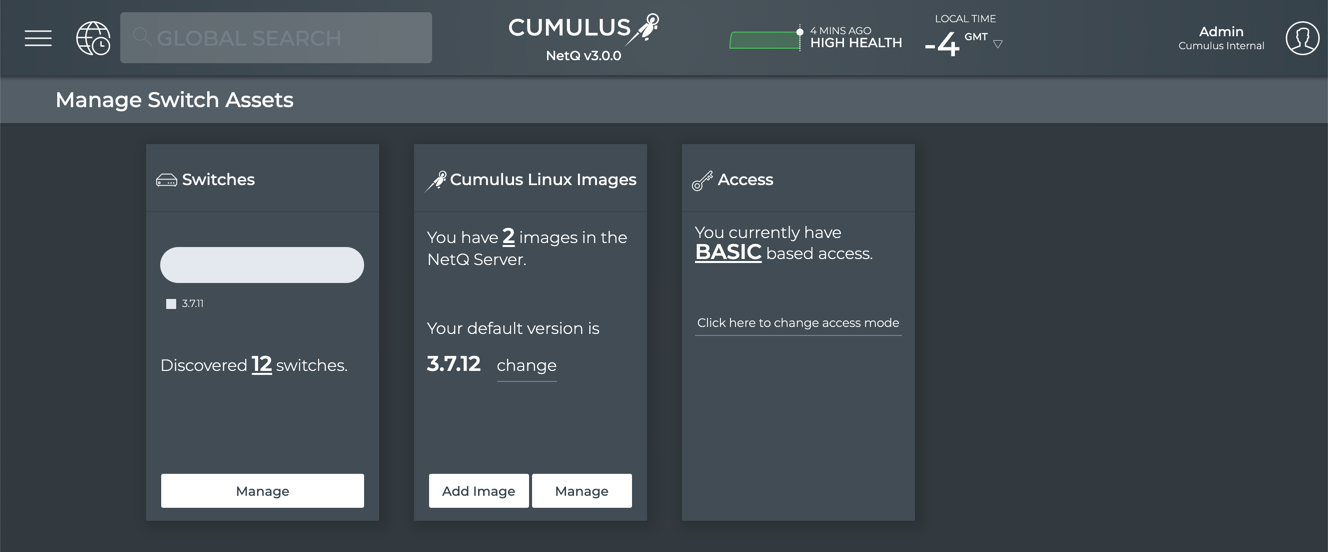
Your LCM dashboard should look similar to this after you have completed these steps:
Perform Install or Upgrade
To install or upgrade switches:
-
Click
 (Main Menu) and select Upgrade Switches, or click
  (Upgrade) in a workbench header.
 -
Click Manage on the Switches card.
-
Select the switches you want to upgrade. If needed, use the filter to the narrow the listing and find these switches.
-
Click
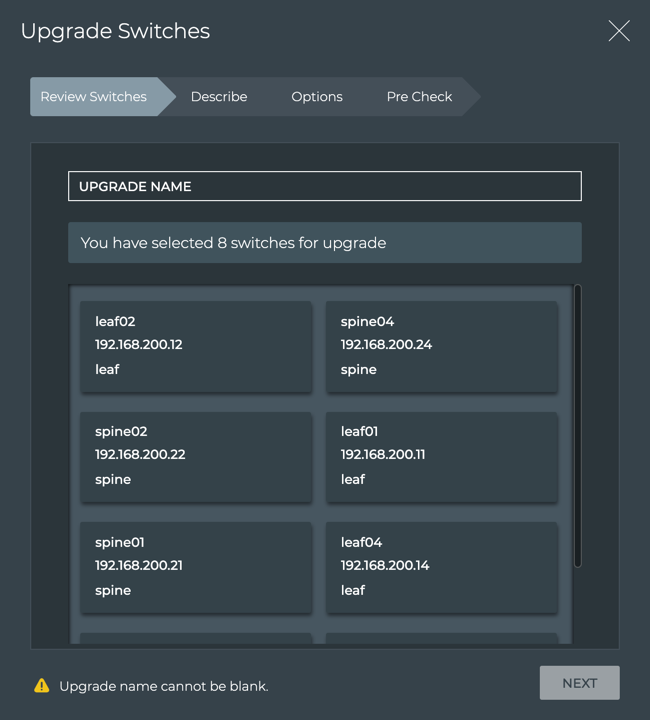
(Upgrade Switches) above the table.From this point forward, the software walks you through the upgrade process, beginning with a review of the switches that you selected for upgrade.
-
Give the upgrade job a name. This is required.
For best presentation, Cumulus Networks recommends keeping the name to a maximum of 22 characters when possible. The name can contain spaces and special characters. If you choose to use longer names, use the distinguishing part of the name at the beginning.
-
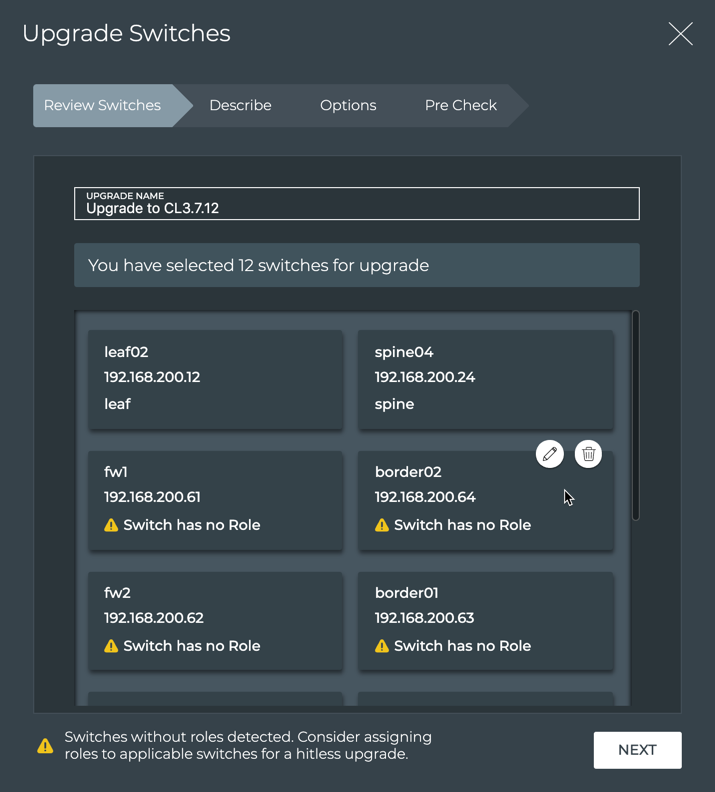
Verify that the switches you selected are included, and that they have the correct IP address and roles assigned.
- If you accidentally included a switch that you do NOT want to upgrade, hover over the switch information card and click to remove it from the upgrade job.
- If the role is incorrect or missing, click
 to select a role for that switch, then click . Click
  to discard a role change.
In this example, some of the selected switches do not have roles assigned.
- If you accidentally included a switch that you do NOT want to upgrade, hover over the switch information card and click
-
When you are satisfied that the list of switches is accurate for the job, click Next.
-
Verify that you want to use the default Cumulus Linux version for this upgrade job. If not, click Custom and select an alternate image from the list.
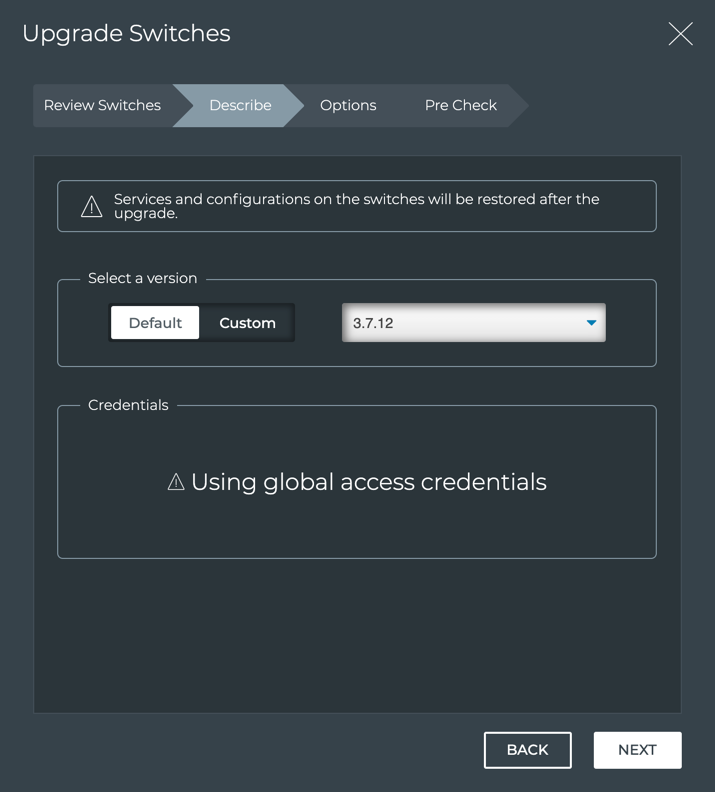
Default CL Version Selected
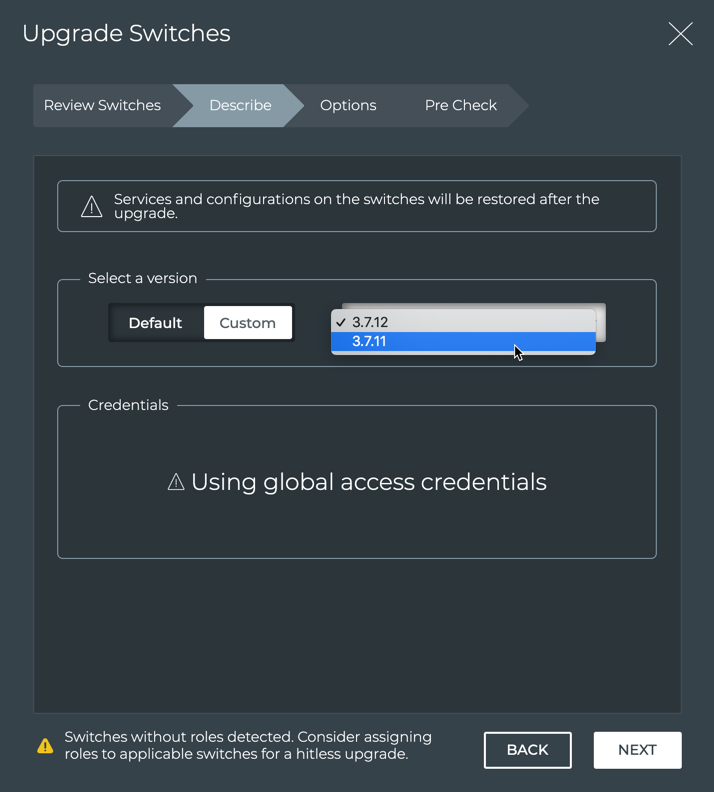
Custom CL Version Selected
-
Note that the switch access authentication method, Using global access credentials, indicates you have chosen either basic authentication with a username and password or SSH key-based authentication for all of your switches. Authentication on a per switch basis is not currently available.
-
Click Next.
-
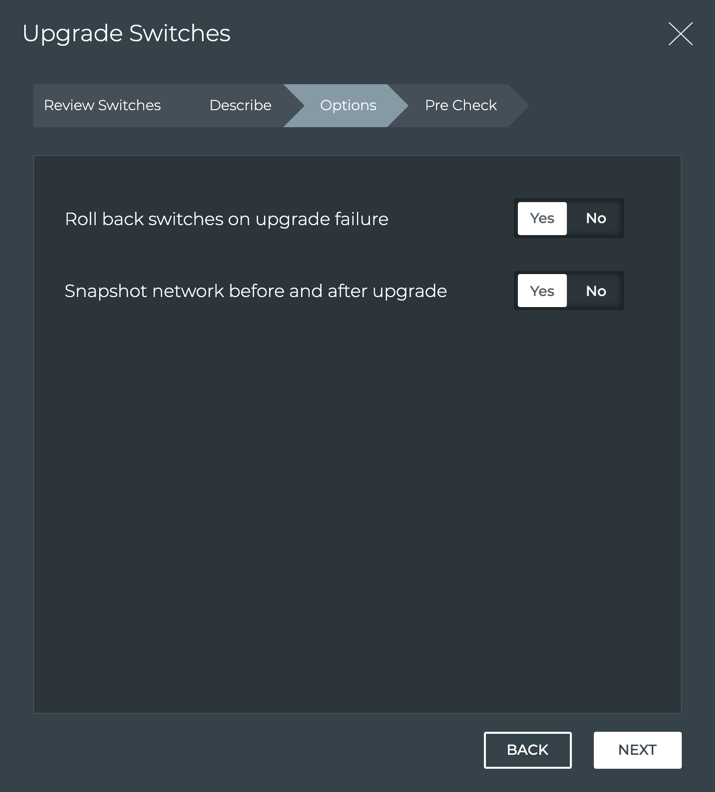
Verify the upgrade job options.
By default, NetQ takes a network snapshot before the upgrade and then one after the upgrade is complete. It also performs a roll back to the original Cumulus Linux version on any server which fails to upgrade.
While these options provide a smoother upgrade process and are highly recommended, you have the option to disable these options by clicking No next to one or both options.
-
Click Next.
-
After the pre-checks have completed successfully, click Preview.
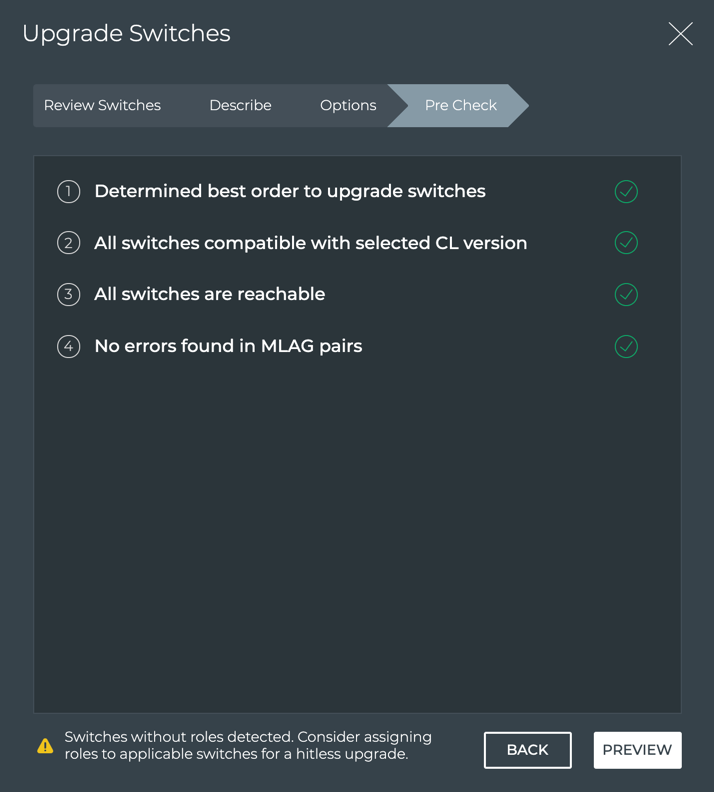
If one or more of the pre-checks fail, resolve the related issue and start the upgrade again. Expand the following dropdown to view common failures, their causes and corrective actions.
-
Review the job preview.
-
When all of your switches have roles assigned, this view displays the chosen job options (top center), the pre-checks status (top right and left in Pre-Upgrade Tasks), the order in which the switches are planned for upgrade (center; upgrade starts from the left), and the post-upgrade tasks status (right).
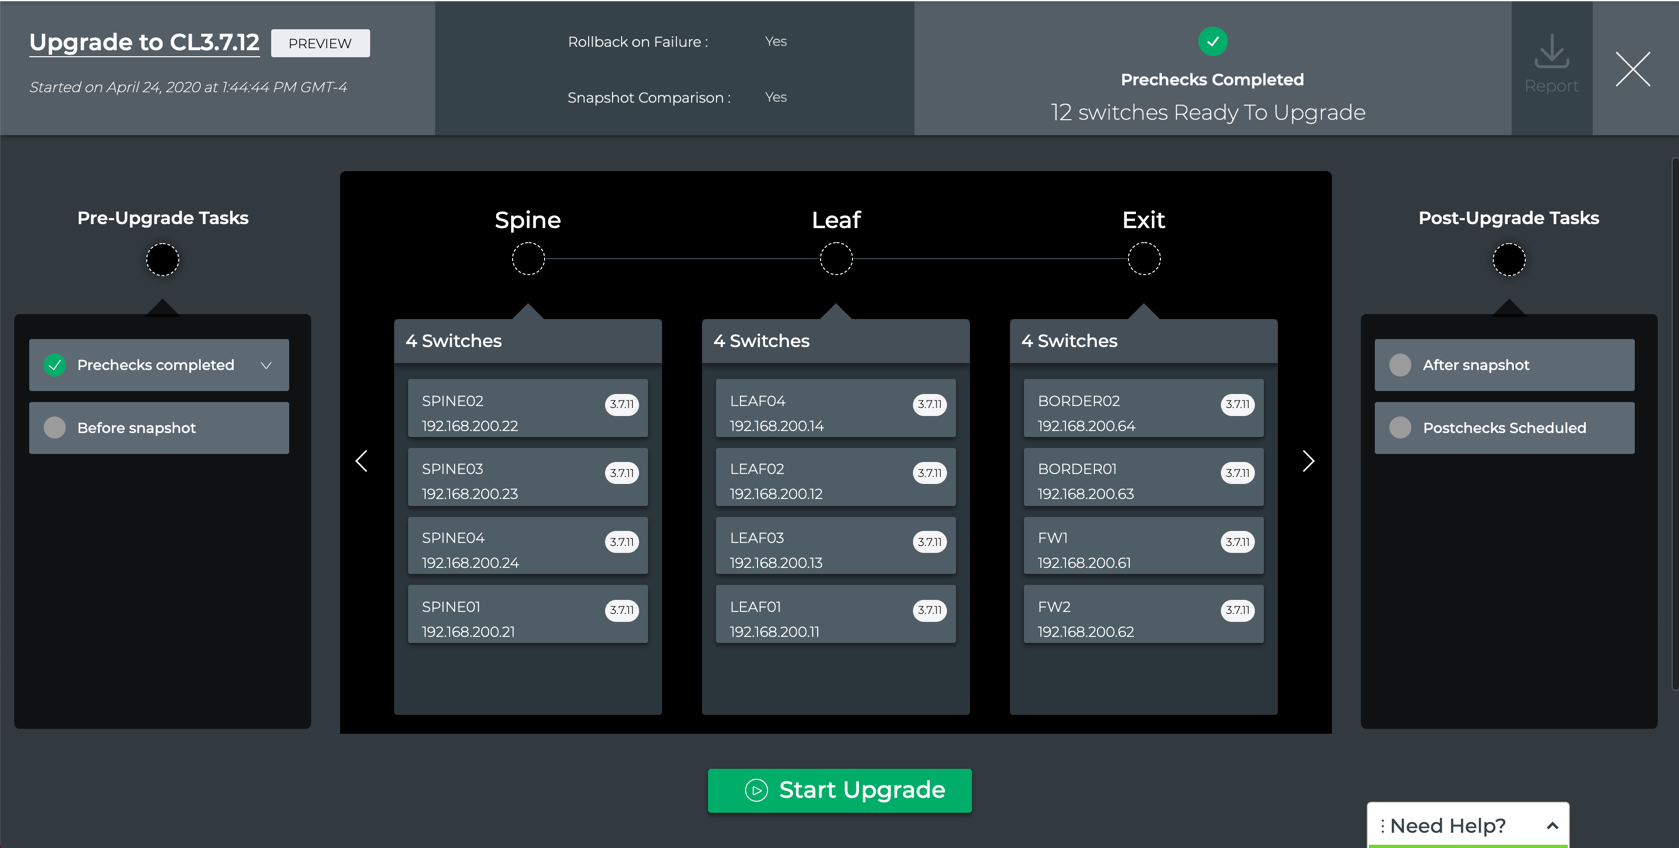
Roles assigned
-
When none of your switches have roles assigned, this view displays the chosen job options (top center), the pre-checks status (top right and left in Pre-Upgrade Tasks), a list of switches planned for upgrade (center), and the post-upgrade tasks status (right).
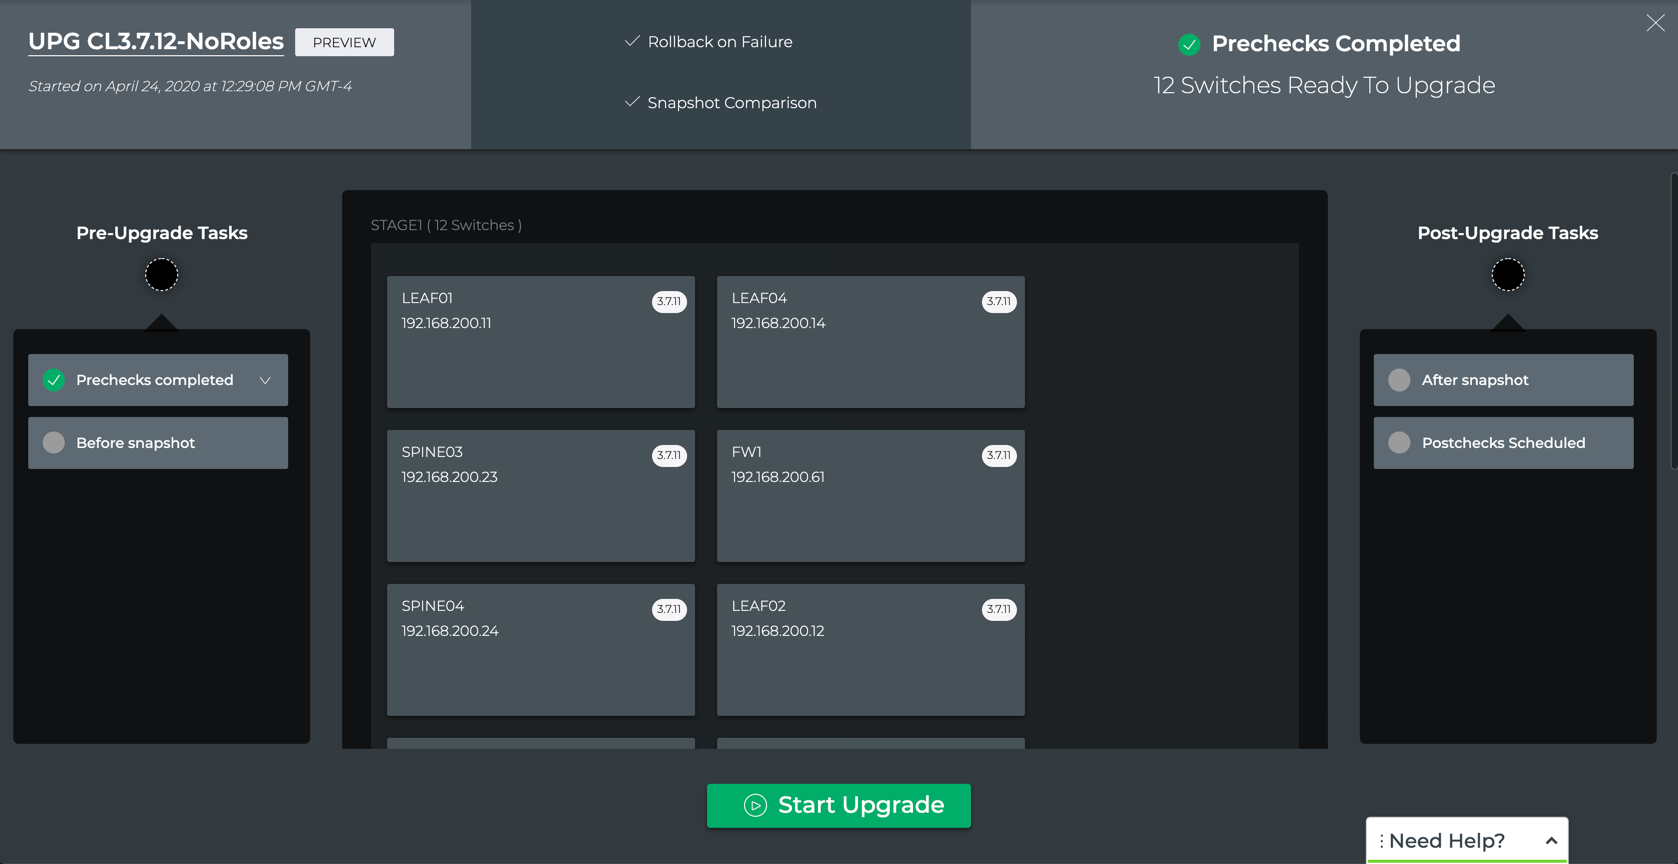
No roles assigned
-
When some of your switches have roles assigned, any switches without roles are upgraded last and are grouped under the label Stage1.
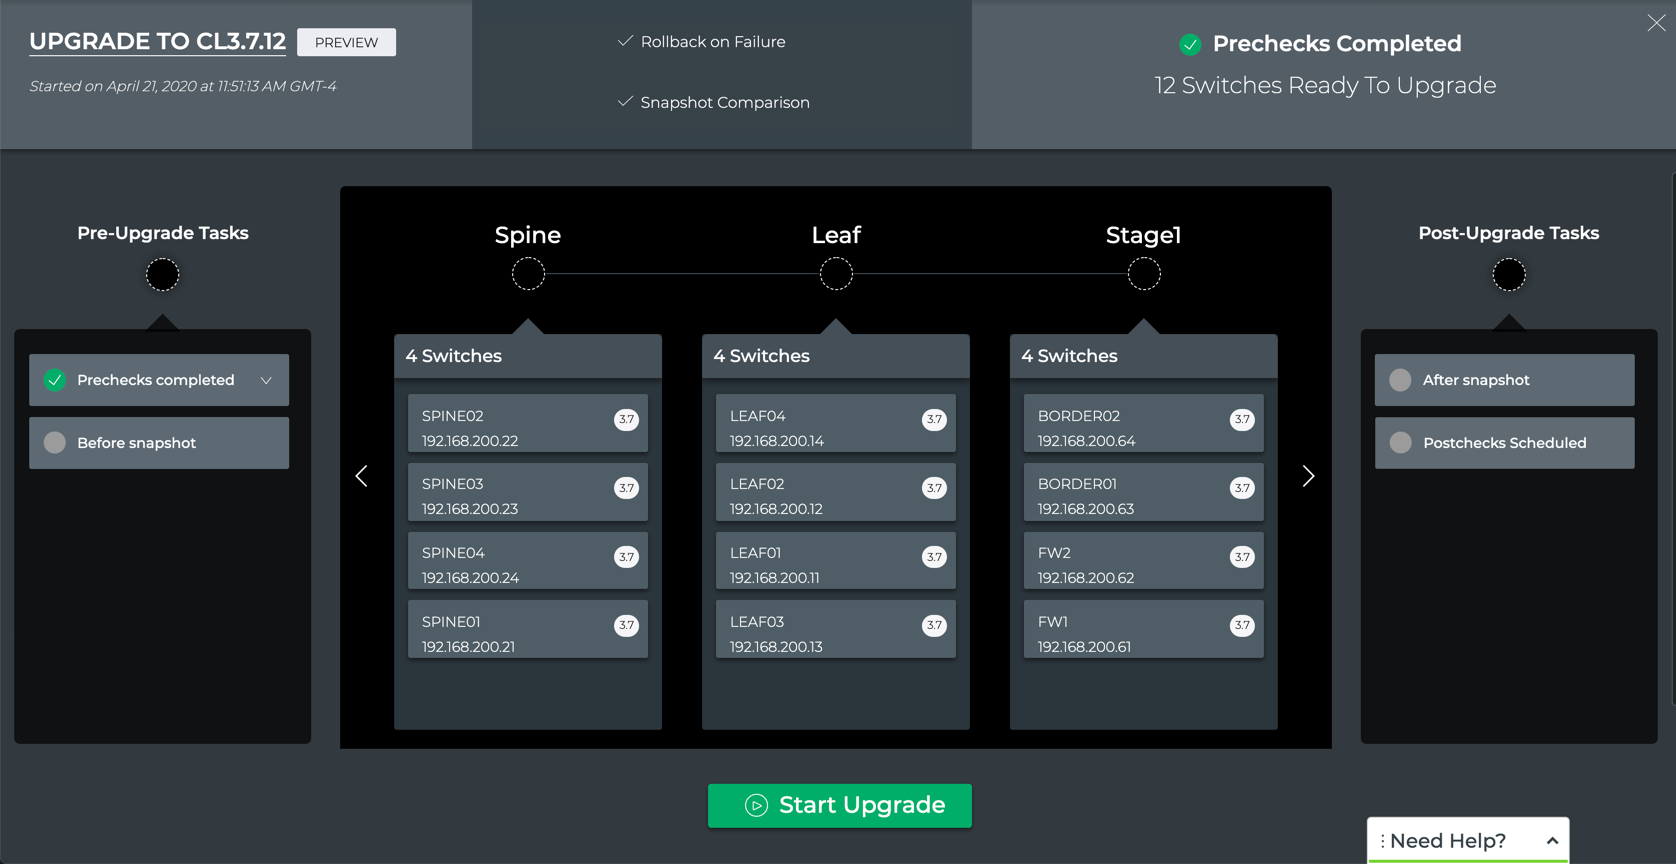
Some roles assigned
-
-
When you are happy with the job specifications, click Start Upgrade.
Analyze Results
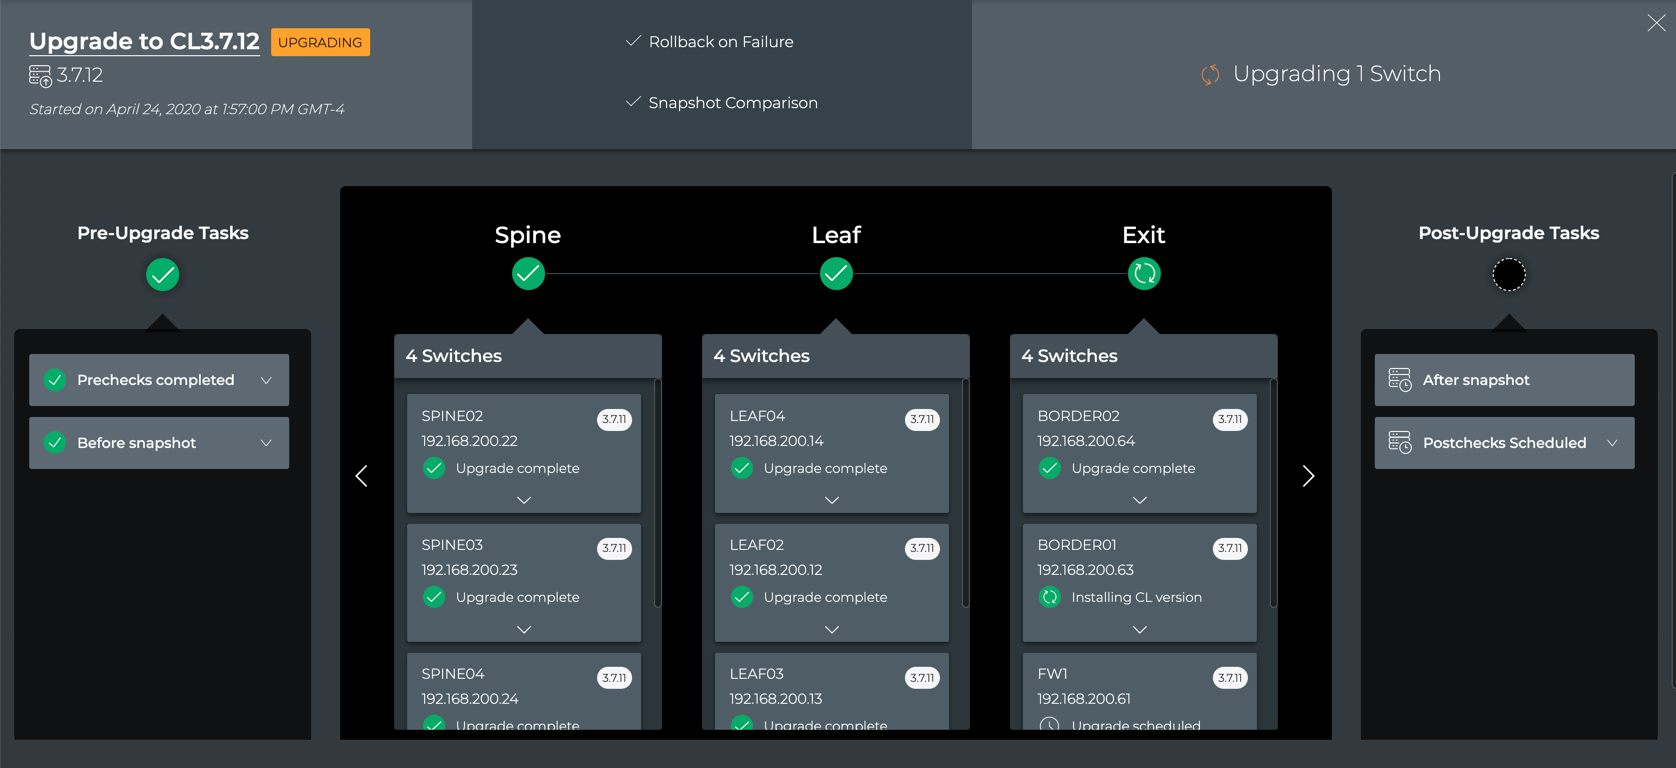
After starting the upgrade you can monitor the progress from the preview page or the Upgrade History page.
From the preview page, a green circle with rotating arrows is shown above each step as it is working. Alternately, you can close the detail of the job and see a summary of all current and past upgrade jobs on the Upgrade History page. The job started most recently is shown at the bottom, and the data is refreshed every minute.
If you are disconnected while the job is in progress, it may appear as if nothing is happening. Try closing (click ![]() ) and reopening your view (click
) and reopening your view (click ![]() ), or refreshing the page.
), or refreshing the page.
Monitoring the Upgrade
Several viewing options are available for monitoring the upgrade job.
-
Monitor the job with full details open:
-
Monitor the job with summary information only in the Upgrade History page. Open this view by clicking
in the full details view:
This view is refreshed automatically. Click
 to view what stage the job is in.
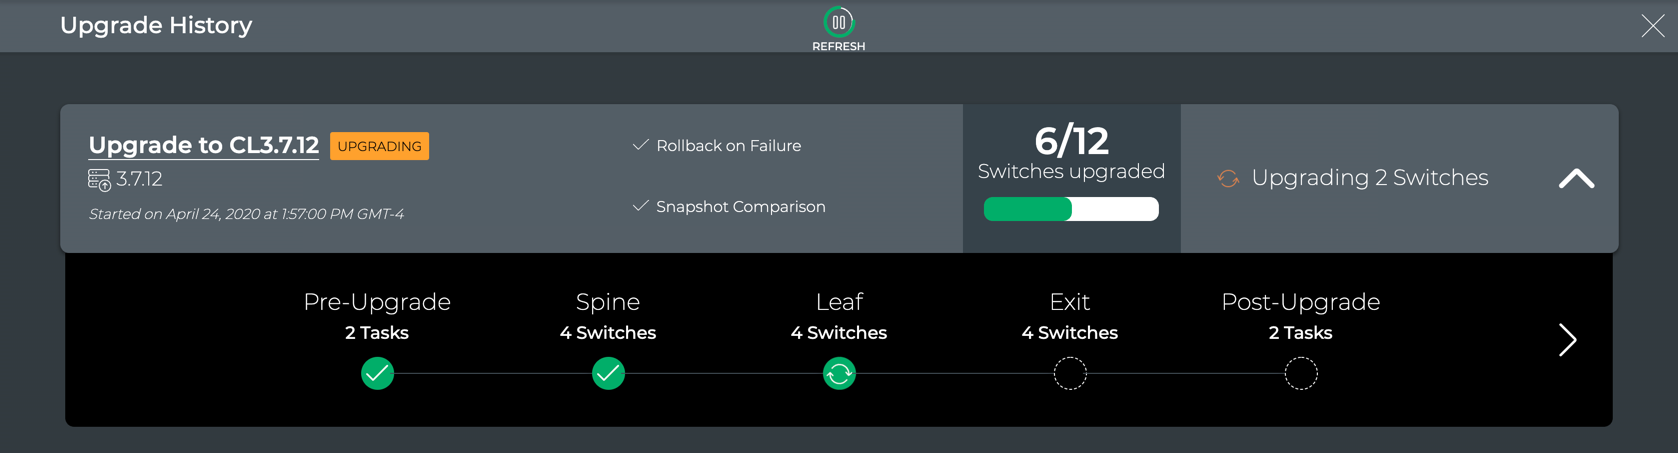
Click
 to view the detailed view.
After either a successful or failed upgrade attempt has been performed, a new Upgrade History card appears on your LCM dashboard.
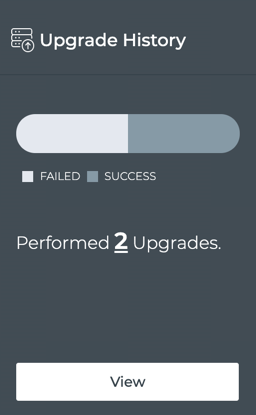
Click View to return to the Upgrade History page as needed.
Sample Successful Upgrade
On successful completion, you can:
-
Compare the network snapshots taken before and after the upgrade.
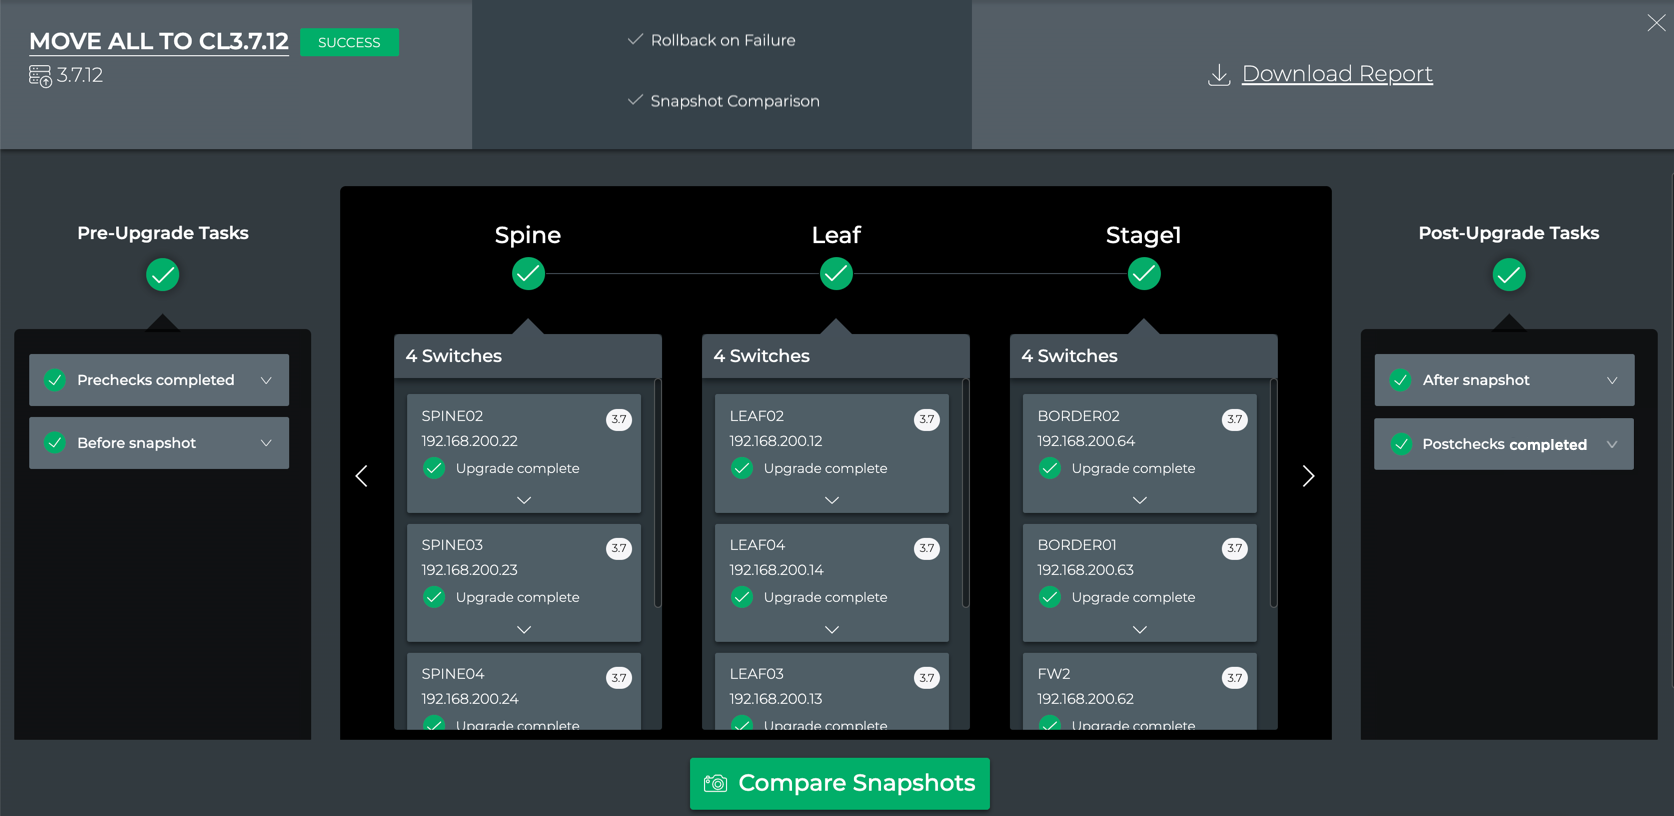
Click Compare Snapshots in the detail view.
Refer to Interpreting the Comparison Data for information about analyzing these results.
-
Download details about the upgrade in the form of a JSON-formatted file, by clicking Download Report.
-
View the changes on the Switches card of the LCM dashboard.
Click
, then Upgrade Switches.
In our example, all switches have been upgraded to Cumulus Linux 3.7.12.
Upgrades can be considered successful and still have post-check warnings. For example, the OS has been updated, but not all services are fully up and running after the upgrade. If one or more of the post-checks fail, warning messages are provided in the Post-Upgrade Tasks section of the preview. Click on the warning category to view the detailed messages.
Sample Failed Upgrade
If an upgrade job fails for any reason, you can view the associated error(s):
-
From the Upgrade History dashboard, find the job of interest.

-
Click
. -
Click
.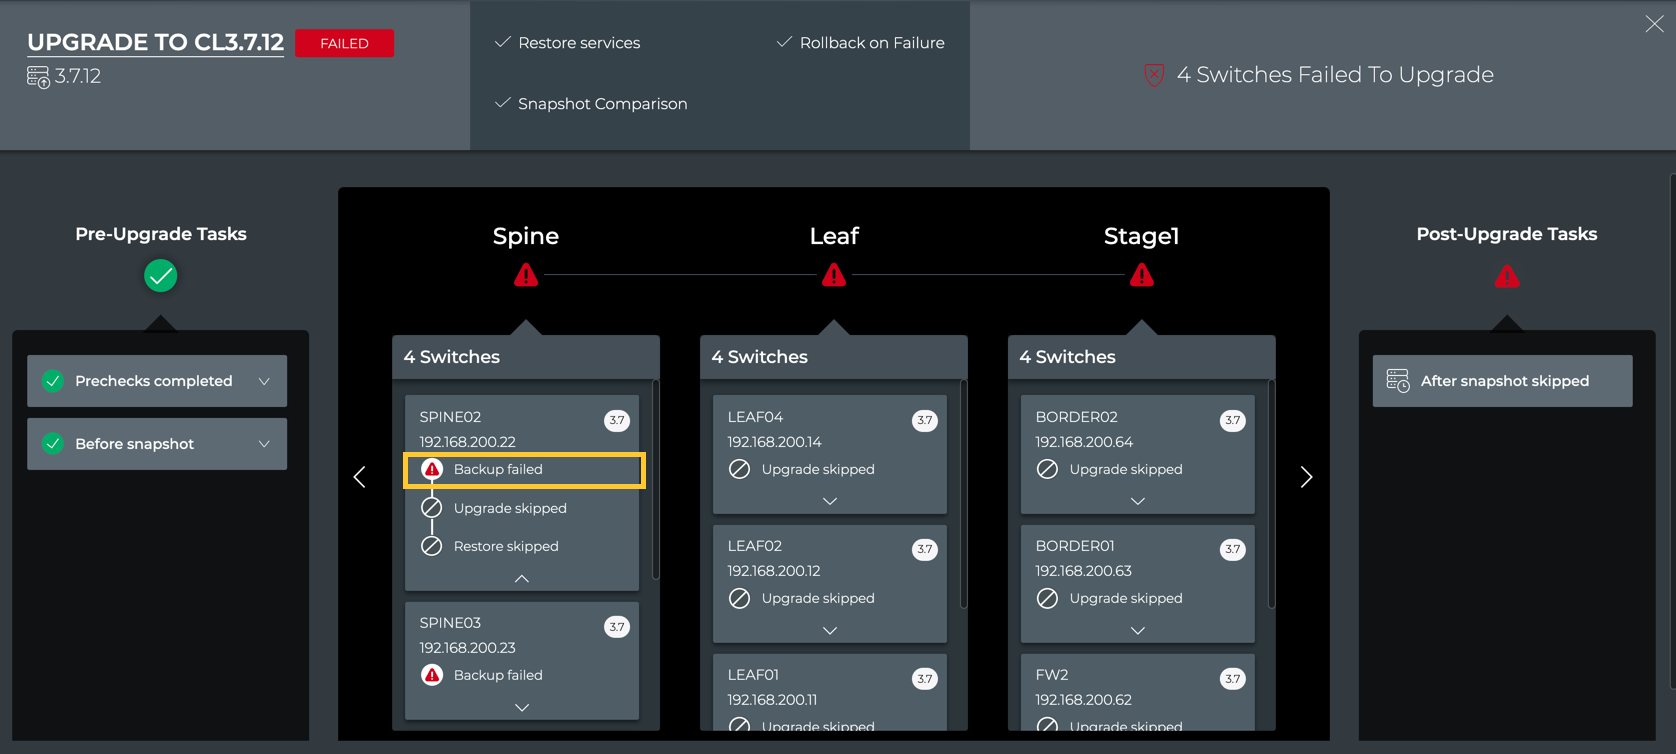
Note in this example, all of the pre-upgrade tasks were successful, but backup failed on the spine switches.
-
Double-click on an error to view a more detailed error message.
This example, shows that the upgrade failure was due to bad switch access credentials. You would need to fix those and then create a new upgrade job.

Reasons for Upgrade Failure
Upgrades can fail at any of the stages of the process, including when backing up data, upgrading the Cumulus Linux software, and restoring the data. Failures can occur when attempting to connect to a switch or perform a particular task on the switch.
Some of the common reasons for upgrade failures and the errors they present:
| Reason | Error Message |
|---|---|
| Switch is not reachable via SSH | Data could not be sent to remote host “192.168.0.15”. Make sure this host can be reached over ssh: ssh: connect to host 192.168.0.15 port 22: No route to host |
| Switch is reachable, but user-provided credentials are invalid | Invalid/incorrect username/password. Skipping remaining 2 retries to prevent account lockout: Warning: Permanently added ‘<hostname-ipaddr>’ to the list of known hosts. Permission denied, please try again. |
| Switch is reachable, but a valid Cumulus Linux license is not installed | 1587866683.880463 2020-04-26 02:04:43 license.c:336 CRIT No license file. No license installed! |
| Upgrade task could not be run | Failure message depends on the why the task could not be run. For example: /etc/network/interfaces: No such file or directory |
| Upgrade task failed | Failed at- <task that failed>. For example: Failed at- MLAG check for the peerLink interface status |
| Retry failed after five attempts | FAILED In all retries to process the LCM Job |