Set Up Your KVM Virtual Machine for a Cloud Server Cluster
First configure the VM on the master node, and then configure the VM on each worker node.
Follow these steps to setup and configure your VM on a cluster of servers in a cloud deployment:
-
Verify that your master node meets the VM requirements.
Resource Minimum Requirements Processor Four (4) virtual CPUs Memory 8 GB RAM Local disk storage 64 GB Network interface speed 1 Gb NIC Hypervisor KVM/QCOW (QEMU Copy on Write) image for servers running CentOS, Ubuntu, and RedHat operating systems -
Confirm that the needed ports are open for communications.
You must open the following ports on your NetQ on-premises servers:
Additionally, for internal cluster communication, you must open these ports:Port or Protocol Number Protocol Component Access 4 IP Protocol Calico networking (IP-in-IP Protocol) 22 TCP SSH 80 TCP Nginx 179 TCP Calico networking (BGP) 443 TCP NetQ UI 2379 TCP etcd datastore 4789 UDP Calico networking (VxLAN) 5000 TCP Docker registry 6443 TCP kube-apiserver 30001 TCP DPU communication 31980 TCP NetQ Agent communication 31982 TCP NetQ Agent SSL communication 32708 TCP API Gateway Port Protocol Component Access 8080 TCP Admin API 5000 TCP Docker registry 6443 TCP Kubernetes API server 10250 TCP kubelet health probe 2379 TCP etcd 2380 TCP etcd 7072 TCP Kafka JMX monitoring 9092 TCP Kafka client 7071 TCP Cassandra JMX monitoring 7000 TCP Cassandra cluster communication 9042 TCP Cassandra client 7073 TCP Zookeeper JMX monitoring 2888 TCP Zookeeper cluster communication 3888 TCP Zookeeper cluster communication 2181 TCP Zookeeper client 36443 TCP Kubernetes control plane -
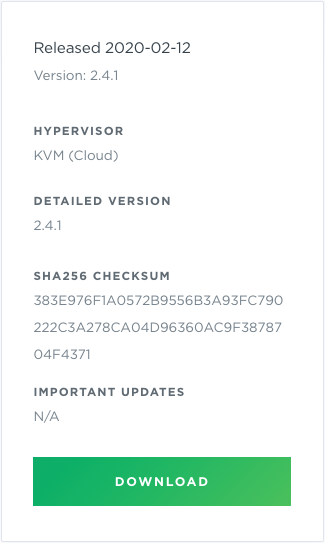
Download the NetQ Platform image.
- On the MyMellanox Downloads page, select NetQ from the Software -> Cumulus Software list.
- Click 2.4 from the Version list, and then select 2.4.1 from the submenu.
- Select KVM (Cloud) from the HyperVisor/Platform list.

- Scroll down to view the image, and click Download.
-
Setup and configure your VM.
KVM Example Configuration
This example shows the VM setup process for a system with Libvirt and KVM/QEMU installed.
-
Confirm that the SHA256 checksum matches the one posted on the NVIDIA Application Hub to ensure the image download has not been corrupted.
$ sha256sum ./Downloads/cumulus-netq-server-2.4.1-ts-amd64-qemu.qcow2
$ 383E976F1A0572B9556B3A93FC790222C3A278CA04D96360AC9F3878704F4371 ./Downloads/cumulus-netq-server-2.4.1-ts-amd64-qemu.qcow2 - Copy the QCOW2 image to a directory where you want to run it.
Tip: Copy, instead of moving, the original QCOW2 image that was downloaded to avoid re-downloading it again later should you need to perform this process again.
$ sudo mkdir /vms
$ sudo cp ./Downloads/cumulus-netq-server-2.4.1-ts-amd64-qemu.qcow2 /vms/ts.qcow2 - Create the VM.
For a Direct VM, where the VM uses a MACVLAN interface to sit on the host interface for its connectivity:
$ virt-install --name=netq_ts --vcpus=4 --memory=8192 --os-type=linux --os-variant=generic --disk path=/vms/ts.qcow2,format=qcow2,bus=virtio,cache=none --network=type=direct,source=eth0,model=virtio --import --noautoconsole
Replace the disk path value with the location where the QCOW2 image is to reside. Replace network model value (eth0 in the above example) with the name of the interface where the VM is connected to the external network.
Or, for a Bridged VM, where the VM attaches to a bridge which has already been setup to allow for external access:
$ virt-install --name=netq_ts --vcpus=4 --memory=8192 --os-type=linux --os-variant=generic \ --disk path=/vms/ts.qcow2,format=qcow2,bus=virtio,cache=none --network=bridge=br0,model=virtio --import --noautoconsole
Replace network bridge value (br0 in the above example) with the name of the (pre-existing) bridge interface where the VM is connected to the external network.
Make note of the name used during install as this is needed in a later step.
- Watch the boot process in another terminal window.
$ virsh console netq_ts
-
-
Verify the master node is ready for installation. Fix any errors indicated before installing the NetQ software.
cumulus@hostname:~$ sudo opta-check-cloud
-
Run the Bootstrap CLI. Be sure to replace the eth0 interface used in this example with the interface on the server used to listen for NetQ Agents.
cumulus@
:~$ netq bootstrap master interface eth0 tarball /mnt/installables/netq-bootstrap-2.4.1.tgz Allow about five to ten minutes for this to complete, and only then continue to the next step.
If this step fails for any reason, you can run
netq bootstrap resetand then try again.If you have changed the IP address or hostname of the NetQ Cloud VM after this step, you need to re-register this address with NetQ as follows:
Reset the VM.
cumulus@hostname:~$ netq bootstrap reset
Re-run the Bootstrap CLI. This example uses interface eth0. Replace this with your updated IP address, hostname or interface using the
interfaceorip-addroption.cumulus@
:~$ netq bootstrap master interface eth0 tarball /mnt/installables/netq-bootstrap-2.4.1.tgz -
Verify that your first worker node meets the VM requirements, as described in Step 1.
-
Confirm that the needed ports are open for communications, as described in Step 2.
-
Open your hypervisor and setup the VM in the same manner as for the master node.
Make a note of the private IP address you assign to the worker node. It is needed for later installation steps.
-
Verify the worker node is ready for installation. Fix any errors indicated before installing the NetQ software.
cumulus@hostname:~$ sudo opta-check-cloud
-
Run the Bootstrap CLI on the worker node.
cumulus@
:~$ netq bootstrap worker tarball /mnt/installables/netq-bootstrap-2.4.1.tgz master-ip <master-ip> [password <text-password>] Allow about five to ten minutes for this to complete, and only then continue to the next step.
If this step fails for any reason, you can run
netq bootstrap reseton the new worker node and then try again. -
Repeat Steps 7 through 11 for each additional worker node you want in your cluster.
The final step is to install and activate the Cumulus NetQ software. You can do this using the Admin UI or the CLI.
Click the installation and activation method you want to use to complete installation:
- Use the Admin UI (recommended)
- Use the CLI